Showing posts with label flask. Show all posts

Tuesday, June 27, 2023

Tips for debugging Flask deployments to Azure App Service

There are many ways to deploy Flask web apps to App Service: Azure CLI, VS Code Azure Tools extension, Azure Developer CLI, or GitHub-based deployments. Unfortunately, sometimes a deploy fails, and it can be hard at first to understand what's wrong. Regardless of how you deploy Flask to App Service, you can follow these tips for debugging the deployment.

After you finish deploying, first visit the app URL to see if it loads. If it does, amazing! If it doesn't, here are steps you can take to figure out what went wrong.

Check the deployment logs

Select Deployment Center from the side navigation menu, then select Logs. You should see a timestamped list of recent deploys:
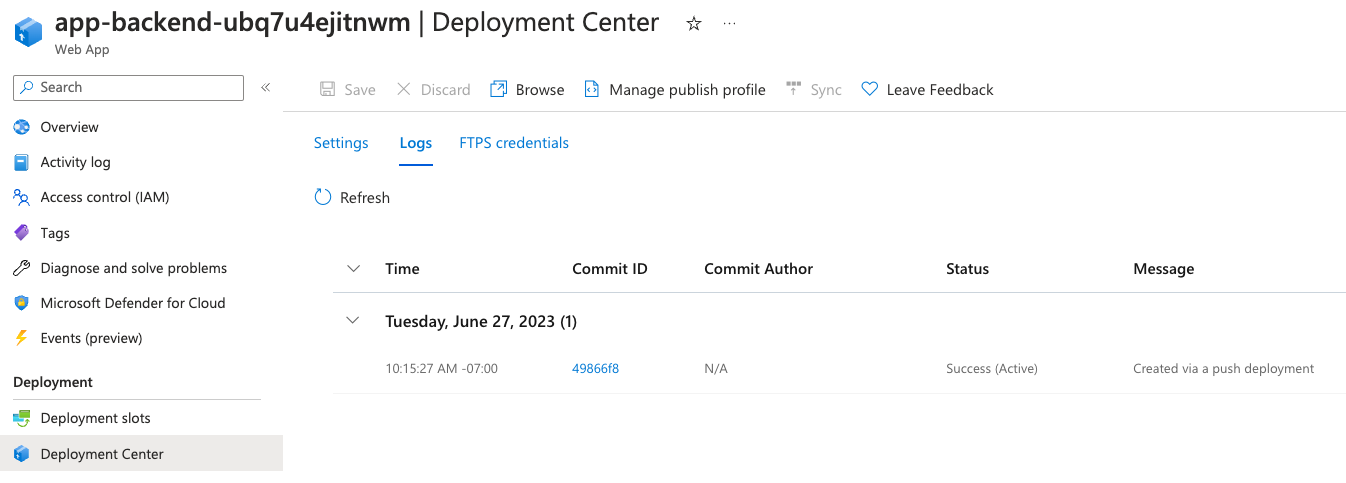
Check whether the status of the most recent deploy is "Success (Active)" or "Failed". If it's success, the deployment logs might still reveal issues, and if it's failed, the logs should certainly reveal the issue.

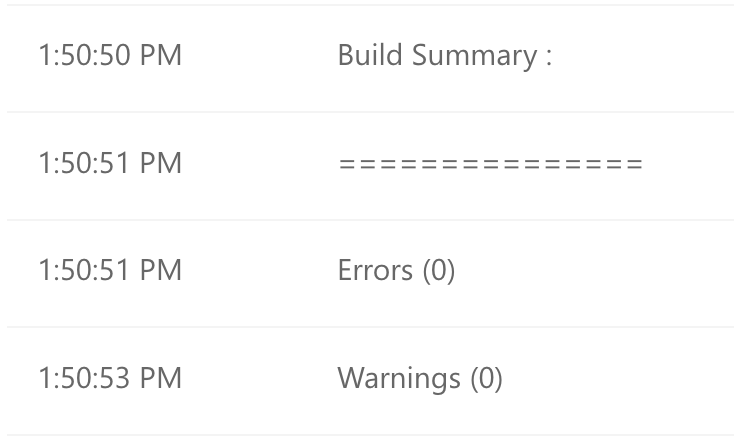
Click the commit ID to open the logs for the most recent deploy. First scroll down to see if any errors or warnings are reported at the end. This is what you'll hopefully see if all went well:
Now scroll back up to find the timestamp with the label "Running oryx build". Oryx is the open source tool that builds apps for App Service, Functions, and other platforms, across all the supported MS languages. Click the Show logs link next to that label. That will pop open detailed logs at the bottom. Scroll down.

Here's what a successful Oryx build looks like for a Flask application:


Command: oryx build /tmp/zipdeploy/extracted -o /home/site/wwwroot --platform python --platform-version 3.10 -p virtualenv_name=antenv --log-file /tmp/build-debug.log  -i /tmp/8db773a0e30ccc6 --compress-destination-dir | tee /tmp/oryx-build.log
Operation performed by Microsoft Oryx, https://github.com/Microsoft/Oryx
You can report issues at https://github.com/Microsoft/Oryx/issues

Oryx Version: 0.2.20230508.1, Commit: 7fe2bf39b357dd68572b438a85ca50b5ecfb4592, ReleaseTagName: 20230508.1

Build Operation ID: 164fee7dc4083f79
Repository Commit : 6e78c534-da03-414e-acc1-e396b92b1405
OS Type           : bullseye
Image Type        : githubactions

Detecting platforms...
Detected following platforms:
  python: 3.10.8
Version '3.10.8' of platform 'python' is not installed. Generating script to install it...

Using intermediate directory '/tmp/8db773a0e30ccc6'.

Copying files to the intermediate directory...
Done in 0 sec(s).

Source directory     : /tmp/8db773a0e30ccc6
Destination directory: /home/site/wwwroot


Downloading and extracting 'python' version '3.10.8' to '/tmp/oryx/platforms/python/3.10.8'...
Detected image debian flavor: bullseye.
Downloaded in 2 sec(s).
Verifying checksum...
Extracting contents...
performing sha512 checksum for: python...
Done in 18 sec(s).

image detector file exists, platform is python..
OS detector file exists, OS is bullseye..
Python Version: /tmp/oryx/platforms/python/3.10.8/bin/python3.10
Creating directory for command manifest file if it does not exist
Removing existing manifest file
Python Virtual Environment: antenv
Creating virtual environment...
Activating virtual environment...
Running pip install...
[18:13:30+0000] Collecting Flask==2.3.2
[18:13:30+0000]   Downloading Flask-2.3.2-py3-none-any.whl (96 kB)
[18:13:30+0000]      ━━━━━━━━━━━━━━━━━━━━━━━━━━━━━━━━━━━━━━━━ 96.9/96.9 kB 4.8 MB/s eta 0:00:00
[18:13:31+0000] Collecting itsdangerous>=2.1.2
[18:13:31+0000]   Downloading itsdangerous-2.1.2-py3-none-any.whl (15 kB)
[18:13:31+0000] Collecting click>=8.1.3
[18:13:31+0000]   Downloading click-8.1.3-py3-none-any.whl (96 kB)
[18:13:31+0000]      ━━━━━━━━━━━━━━━━━━━━━━━━━━━━━━━━━━━━━━━━ 96.6/96.6 kB 5.4 MB/s eta 0:00:00
[18:13:31+0000] Collecting Werkzeug>=2.3.3
[18:13:31+0000]   Downloading Werkzeug-2.3.6-py3-none-any.whl (242 kB)
[18:13:31+0000]      ━━━━━━━━━━━━━━━━━━━━━━━━━━━━━━━━━━━━━━━ 242.5/242.5 kB 8.7 MB/s eta 0:00:00
[18:13:31+0000] Collecting blinker>=1.6.2
[18:13:31+0000]   Downloading blinker-1.6.2-py3-none-any.whl (13 kB)
[18:13:31+0000] Collecting Jinja2>=3.1.2
[18:13:31+0000]   Downloading Jinja2-3.1.2-py3-none-any.whl (133 kB)
[18:13:31+0000]      ━━━━━━━━━━━━━━━━━━━━━━━━━━━━━━━━━━━━━━━ 133.1/133.1 kB 6.9 MB/s eta 0:00:00
[18:13:32+0000] Collecting MarkupSafe>=2.0
[18:13:32+0000]   Downloading MarkupSafe-2.1.3-cp310-cp310-manylinux_2_17_x86_64.manylinux2014_x86_64.whl (25 kB)
[18:13:33+0000] Installing collected packages: MarkupSafe, itsdangerous, click, blinker, Werkzeug, Jinja2, Flask
[18:13:35+0000] Successfully installed Flask-2.3.2 Jinja2-3.1.2 MarkupSafe-2.1.3 Werkzeug-2.3.6 blinker-1.6.2 click-8.1.3 itsdangerous-2.1.2

[notice] A new release of pip available: 22.2.2 -> 23.1.2
[notice] To update, run: pip install --upgrade pip
Not a vso image, so not writing build commands
Preparing output...

Copying files to destination directory '/tmp/_preCompressedDestinationDir'...
Done in 3 sec(s).
Compressing content of directory '/tmp/_preCompressedDestinationDir'...
Copied the compressed output to '/home/site/wwwroot'

Removing existing manifest file
Creating a manifest file...
Manifest file created.
Copying .ostype to manifest output directory.

Done in 70 sec(s).

Look for these important steps in the Oryx build:

  • Detected following platforms: python: 3.10.8
    That should match your runtime in the App Service configuration.
  • Running pip install...
    That should install all the requirements in your requirements.txt - if it didn't find your requirements.txt, then you won't see the packages installed.

If you see all those steps in the Oryx build, then that's a good sign that the build went well, and you can move on to checking the App Service logs.

Check the log stream

Under the Monitoring section of the side nav, select Log stream. Scroll to the timestamp corresponding to your most recent deploy.

The logs should start with pulling Docker images:
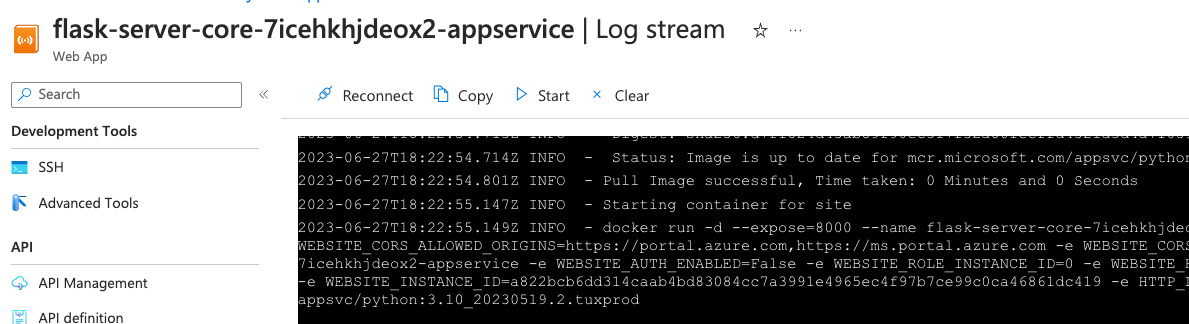
Screenshot of Log stream in App Service

Here are the full logs for a Flask app successfully starting in an App Service container:


2023-06-27T20:00:33.556Z INFO  - 3.10_20230519.2.tuxprod Pulling from appsvc/python
2023-06-27T20:00:33.559Z INFO  -  Digest: sha256:d7f1824d43ab89f90ec317f32a801ecffd4321a3d4a710593658be9bd980cd22
2023-06-27T20:00:33.560Z INFO  -  Status: Image is up to date for mcr.microsoft.com/appsvc/python:3.10_20230519.2.tuxprod
2023-06-27T20:00:33.563Z INFO  - Pull Image successful, Time taken: 0 Minutes and 0 Seconds
2023-06-27T20:00:34.710Z INFO  - Starting container for site
2023-06-27T20:00:34.711Z INFO  - docker run -d --expose=8000 --name flask-server-core-7icehkhjdeox2-appservice_5_edde42ea -e WEBSITE_CORS_ALLOWED_ORIGINS=https://portal.azure.com,https://ms.portal.azure.com -e WEBSITE_CORS_SUPPORT_CREDENTIALS=False -e WEBSITE_SITE_NAME=flask-server-core-7icehkhjdeox2-appservice -e WEBSITE_AUTH_ENABLED=False -e WEBSITE_ROLE_INSTANCE_ID=0 -e WEBSITE_HOSTNAME=flask-server-core-7icehkhjdeox2-appservice.azurewebsites.net -e WEBSITE_INSTANCE_ID=a822bcb6dd314caab4bd83084cc7a3991e4965ec4f97b7ce99c0ca46861dc419 -e HTTP_LOGGING_ENABLED=1 -e WEBSITE_USE_DIAGNOSTIC_SERVER=False appsvc/python:3.10_20230519.2.tuxprod  
2023-06-27T20:00:37.357175818Z    _____                               
2023-06-27T20:00:37.357230418Z   /  _  \ __________ _________   ____  
2023-06-27T20:00:37.357235518Z  /  /_\  \\___   /  |  \_  __ \_/ __ \ 
2023-06-27T20:00:37.357239618Z /    |    \/    /|  |  /|  | \/\  ___/ 
2023-06-27T20:00:37.357243418Z \____|__  /_____ \____/ |__|    \___  >
2023-06-27T20:00:37.357247318Z         \/      \/                  \/ 
2023-06-27T20:00:37.357251218Z A P P   S E R V I C E   O N   L I N U X
2023-06-27T20:00:37.357254918Z 
2023-06-27T20:00:37.357258418Z Documentation: http://aka.ms/webapp-linux
2023-06-27T20:00:37.357261918Z Python 3.10.11
2023-06-27T20:00:37.357282418Z Note: Any data outside '/home' is not persisted
2023-06-27T20:00:41.641875105Z Starting OpenBSD Secure Shell server: sshd.
2023-06-27T20:00:41.799900179Z App Command Line not configured, will attempt auto-detect
2023-06-27T20:00:42.761658829Z Starting periodic command scheduler: cron.
2023-06-27T20:00:42.761688529Z Launching oryx with: create-script -appPath /home/site/wwwroot -output /opt/startup/startup.sh -virtualEnvName antenv -defaultApp /opt/defaultsite
2023-06-27T20:00:42.876778283Z Found build manifest file at '/home/site/wwwroot/oryx-manifest.toml'. Deserializing it...
2023-06-27T20:00:42.887163588Z Build Operation ID: 820645c3a1e60b5e
2023-06-27T20:00:42.890123289Z Oryx Version: 0.2.20230512.3, Commit: a81ce1fa16b6e03d37f79d3ba5e99cf09b28e4ef, ReleaseTagName: 20230512.3
2023-06-27T20:00:42.897199993Z Output is compressed. Extracting it...
2023-06-27T20:00:42.964545124Z Extracting '/home/site/wwwroot/output.tar.gz' to directory '/tmp/8db774903eba755'...
2023-06-27T20:00:46.203967540Z App path is set to '/tmp/8db774903eba755'
2023-06-27T20:00:46.728397586Z Detected an app based on Flask
2023-06-27T20:00:46.730162987Z Generating `gunicorn` command for 'app:app'
2023-06-27T20:00:46.770331805Z Writing output script to '/opt/startup/startup.sh'
2023-06-27T20:00:47.050828437Z Using packages from virtual environment antenv located at /tmp/8db774903eba755/antenv.
2023-06-27T20:00:47.052387737Z Updated PYTHONPATH to '/opt/startup/app_logs:/tmp/8db774903eba755/antenv/lib/python3.10/site-packages'
2023-06-27T20:00:50.406265801Z [2023-06-27 20:00:50 +0000] [67] [INFO] Starting gunicorn 20.1.0
2023-06-27T20:00:50.434991028Z [2023-06-27 20:00:50 +0000] [67] [INFO] Listening at: http://0.0.0.0:8000 (67)
2023-06-27T20:00:50.441222333Z [2023-06-27 20:00:50 +0000] [67] [INFO] Using worker: sync
2023-06-27T20:00:50.473174263Z [2023-06-27 20:00:50 +0000] [70] [INFO] Booting worker with pid: 70
2023-06-27T20:00:53.772011632Z 169.254.130.1 - - [27/Jun/2023:20:00:53 +0000] "GET /robots933456.txt HTTP/1.1" 404 91 "-" "HealthCheck/1.0"
2023-06-27T20:00:55.268900825Z 169.254.130.5 - - [27/Jun/2023:20:00:55 +0000] "GET /robots933456.txt HTTP/1.1" 404 91 "-" "HealthCheck/1.0"

2023-06-27T20:01:47.691011982Z 169.254.130.5 - - [27/Jun/2023:20:01:47 +0000] "GET /hello HTTP/1.1" 200 183 "-" "Mozilla/5.0 (Macintosh; Intel Mac OS X 10_15_7) AppleWebKit/537.36 (KHTML, like Gecko) Chrome/113.0.0.0 Safari/537.36 Edg/113.0.1774.57"

A few notable logs:

  • 2023-06-27T18:22:17.803525340Z Detected an app based on Flask
    This log indicates that Oryx auto-detected a Flask app (by inspecting the requirements.txt) file.
  • 2023-06-27T18:22:17.803557841Z Generating `gunicorn` command for 'app:app'
    This indicates the Oryx detected an app.py file and assumes it has an app object inside it.
  • 2023-06-27T18:22:42.540158812Z [2023-06-27 18:22:42 +0000] [67] [INFO] Starting gunicorn 20.1.0
    That's the start of the gunicorn server serving the Flask app. After it starts, the logs should show HTTP requests.

If you aren't seeing the full logs, it's possible that your deploy happened too long ago and the portal has deleted some logs. In that case, open the Log stream and do another deploy, and you should see the full logs.

Downloading the logs

Alternatively, you can download the full logs from the Kudu interface. Select Advanced Tools from the side nav:
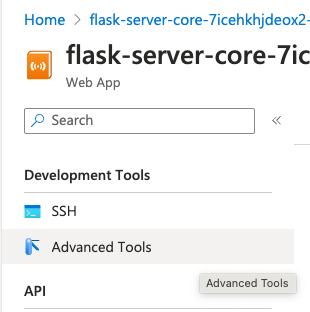
Screenshot of Azure Portal side nav with Advanced Tools selected

When the Kudu website loads, find the Current Docker Logs link and select Download as zip next to it:
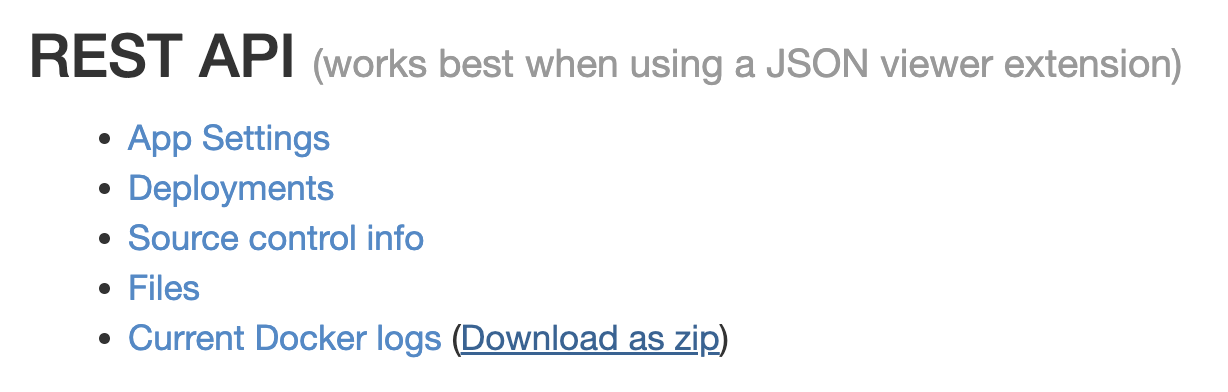
Screenshot of website list of links

In the downloaded zip file, find the filename that starts with the most recent date and ends with "_default_docker.log":
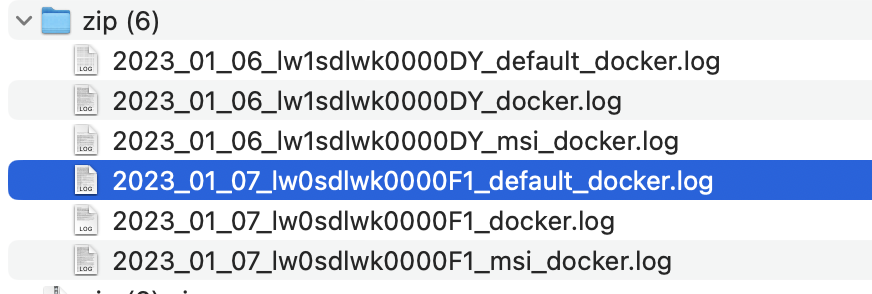
Screenshot of extracted zip folder with files

Open that file to see the full logs, with the most recent logs at the bottom.
Friday, March 31, 2023

Adding Microsoft Graph authentication as a Flask Blueprint

Over the last month, I've been working a lot with the Microsoft Graph API identity platform, which makes it possible for users to login to a website with a Microsoft 365 account. With some additional configuration, it even acts as a generic customer identity management solution.

For Python developers, msal has been the traditional package for interacting with the API. However, the author of that library recently developed a higher-level package, identity, to wrap the most common authentication flow. The ms-identity-python-webapp sample demonstrates how to use that flow in a minimal Flask web app.

Flask developers often use Blueprints and Application factories to organize large Flask apps, and many requested guidance on integrating the authentication code with a Blueprint-based application. I have developed a few Blueprint-based apps lately, so I decided to attempt the integration myself. Good news: it worked! 🎉

You can see my integration in the identity branch of flask-surveys-container-app, and look through the changes in the pull request.

To aid others in their integration, I'll walk through the notable bits.

The auth blueprint

First I added an auth blueprint to bundle up the auth-related routes and templates.

auth/
├── __init__.py
├── routes.py
└── templates/
    └── auth/
        ├── auth_error.html
        └── login.html

The routes in the blueprint are similar to those in the original sample. However, I added a line to store next_url inside the current session. By remembering that, a user can login from any page and get redirected back to that page (versus getting redirected back to the index). That's a much nicer user experience in a large app.

@bp.route("/login")
def login():
    auth = current_app.config["AUTH"]
    session["next_url"] = request.args.get("next_url", url_for("index"))
    return render_template(
        "auth/login.html",
        version=identity.__version__,
        **auth.log_in(
            scopes=current_app.config["SCOPE"],
            redirect_uri=url_for(".auth_response", _external=True)
        ),
    )

@bp.route("/getAToken")
def auth_response():
    auth = current_app.config["AUTH"]
    result = auth.complete_log_in(request.args)
    if "error" in result:
        return render_template("auth/auth_error.html", result=result)
    next_url = session.pop("next_url", url_for("index"))
    return redirect(next_url)


@bp.route("/logout")
def logout():
    auth = current_app.config["AUTH"]
    return redirect(auth.log_out(url_for("index", _external=True)))

The templates in the auth blueprint now extend base.html, the only template in the root templates directory. That gives the authentication-related pages a more consistent UI with the rest of the site.

App configuration

The global app configuration happens in the root __init__.py, mostly inside the create_app function.

To make sure I could access the identity package's Auth object from any blueprint, I added it to app.config:

app.config.update(
    AUTH=identity.web.Auth(
        session=session,
        authority=app.config.get("AUTHORITY"),
        client_id=app.config["CLIENT_ID"],
        client_credential=app.config["CLIENT_SECRET"],
    )
)

I also used the app.context_processor decorator to inject a user variable into every template that gets rendered.

@app.context_processor
def inject_user():
    auth = app.config["AUTH"]
    user = auth.get_user()
    return dict(user=user)

Finally, I registered the new auth blueprint in the usual way:

from backend.auth import bp as auth_bp

app.register_blueprint(auth_bp, url_prefix="")

Requiring login

Typically, in an app with user authentication, logging in is required for some routes while optional for others. To mark routes accordingly, I defined a login_required decorator:

def login_required(f):
    @wraps(f)
    def decorated_function(*args, **kwargs):
        auth = current_app.config["AUTH"]
        if auth.get_user() is None:
            login_url = url_for("auth.login", next_url=request.url)
            return redirect(login_url)
        return f(*args, **kwargs)
    return decorated_function

When that decorator sees that there is no current user, it forces a redirect to the auth blueprint's login route, and passes along the current URL as the next URL.

I then applied that decorator to any route that required login:

@bp.route("/surveys/new", methods=["GET"])
@login_required
def surveys_create_page():
    return render_template("surveys/surveys_create.html")

Accessing user in templates

I want to let users know their current login status on every page in the app, and give them a way to either login or log out. To accomplish that, I added some logic to the Bootstrap nav bar in base.html:

{% if user %}
  <li class="nav-item dropdown">
      <a class="nav-link dropdown-toggle" href="/"
            id="navbarDropdown" role="button"
            data-bs-toggle="dropdown" aria-expanded="false">
        {{ user.get("name")}}
      </a>
      <ul class="dropdown-menu dropdown-menu-end" aria-labelledby="navbarDropdown">
        <li class="nav-item">
          <a class="nav-link" href="{{ url_for('auth.logout') }}">Sign out</a>
        </li>
      </ul>
  </li>
{% else %}
  <li class="nav-item">
    <a class="nav-link" href="{{ url_for('auth.login') }}">Sign in</a>
  </li>
{% endif %}

...And that's about it! Look throughthe full code or pull request for more details. Let me know if you have suggestions for a better way to architect the auth blueprint, or if you end up using this in your own app. 🤔

Thursday, March 2, 2023

Rendering matplotlib charts in Flask

Way back in the day when I was working in Google developer relations, we released one of my favorite tools: the Google Charts API. It was an image API which, with the right set of query parameters, could produce everything from bar charts to "Google-o-meters". The team even added custom map markers to the API at one point. I pointedly asked team "do you promise not to deprecate this?" before using the map marker output in Google Maps API demos, since Google had started getting deprecation-happy. They promised not to, but alas, just a few years later, the API was indeed deprecated!

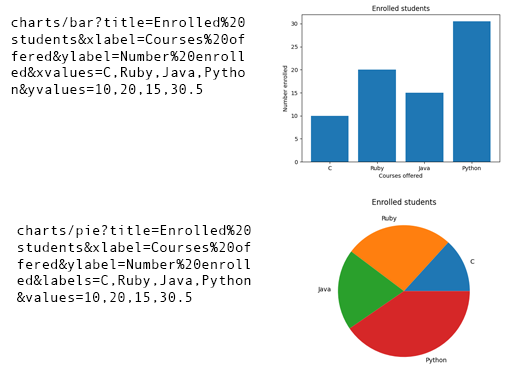
In honor of the fallen API, I created a sample app this week that serves a simple Charts API, currently outputting just bar charts and pie charts.

API URLs on left side and Chart API output on right side

To output the charts, I surveyed the landscape of Python charting options and decided to go with matplotlib, since I have at least some familiarity with it, plus it even has a documentation page showing usage in Flask.

Figure vs pyplot

When using matplotlib in Jupyter notebooks, the standard approach is to use pylot like so:

import matplotlib.pyplot as plt

fig, ax = plt.subplots()
ax.pie(data["values"], labels=data.get("labels"))

However, the documentation discourages use of pyplot in web servers and instead recommends using the Figure class, like so:

from matplotlib.figure import Figure

fig = Figure()
axes = fig.subplots(squeeze=False)[0][0]
axes.pie(data["values"], labels=data.get("labels"))

From Figure to PNG response

The next piece of the puzzle is turning the Figure object into a Flask Response containing a binary PNG file. I first save the figure into a BytesIO buffer from Python's io module, then seek to the beginning of that buffer, and finally use send_file to return the data with the correct mime-type.

from io import BytesIO

# Save it to a temporary buffer.
buf = BytesIO()
fig.savefig(buf, format="png")
buf.seek(0)
return send_file(buf, download_name="chart.png", mimetype="image/png")

You can see it all together in __init__.py, which also uses the APIFlask framework to parameterize and validate the routes.

Monday, February 27, 2023

Testing APIFlask with schemathesis

When I asked developers on Mastodon "what framework do you use for building APIs?", the two most popular answers were FastAPI and Flask. So I set out building an API using Flask to see what the experience was like. I immediately found myself wanting a library like FastAPI to handle parameter validation for me, and I discovered APIFlask, a very similar framework that's still "100% compatible with the Flask ecosystem".


The Chart API

Using APIFlask, I wrote an API to generate Chart PNGs using matplotlib, with endpoints for both bar charts and pie charts. It could easily support many other kinds of charts, but I'll leave that as an exercise for the reader. 😉

API URLs on left side and Chart API output on right side

The following code defines the pie chart endpoint and schema:

class PieChartParams(Schema):
    title = String(required=False, validate=Length(0, 30))
    values = DelimitedList(Number, required=True)
    labels = DelimitedList(String)

@app.get("/charts/pie")
@app.input(PieChartParams, location="query")
def pie_chart(data: dict):
    fig = Figure()
    axes: Axes = fig.subplots(squeeze=False)[0][0]
    axes.pie(data["values"], labels=data.get("labels"))
    axes.set_title(data.get("title"))

    buf = BytesIO()
    fig.savefig(buf, format="png")
    buf.seek(0)
    return send_file(buf, download_name="chart.png", mimetype="image/png")

Using property-based testing

I like all my code to be fully tested, or at least, "fully" to my knowledge. I started off writing standard pytest unit tests for the endpoint (with much thanks to Github Copilot for filling in the tests). But I wasn't sure whether there were edge cases that I was missing, since my code wraps on top of matplotlib and I'm not a matplotlib expert.

What I wanted was property-based testing: automatically generated tests based on function parameter types, which make sure to include commonly missed edge cases (like negative numbers). In the past, I've used the hypothesis library for property-based testing. I wondered if there was a variant that was specially built for API frameworks, where the parameter types are declared in schemas, and lo-and-hold, I discovered that exact creature: schemathesis. It's built on top of hypothesis, and is perfect for FastAPI, APIFlask, or any similar framework.

The schemathesis library can be used from the command-line or inside pytest, using a fixture. I opted for the latter since I was already using pytest, and after reading their WSGI support docs, I came up with this file:

import pytest
import schemathesis
import hypothesis

from src import app

schema = schemathesis.from_wsgi("/openapi.json", app)

@schema.parametrize()
@hypothesis.settings(print_blob=True, report_multiple_bugs=False)
@pytest.mark.filterwarnings("ignore:Glyph:UserWarning")
def test_api(case):
    response = case.call_wsgi()
    case.validate_response(response)

There are a few additional lines in that file that you may not need: the hypothesis.settings fixture, and the pytest.mark.filterwarnings fixture. I added settings to increase the verbosity of the output, to help me replicate the issues, and I added filterwarnings to ignore the many glyph-related warnings coming out of matplotlib.

The API improvements

As a result of the schemathesis tests, I identified several parameters that could use additional validation.

I added both a min and max to the Number field in the values parameter:

values = DelimitedList(Number(validate=Range(min=0, max=3.4028235e38)), required=True)

I also added a custom validator for situations which couldn't be addressed with the built-in validators. The custom validator checks to make sure that the number of labels matches the number of values provided, and disallows a single value of 0.

@validates_schema
def validate_numbers(self, data, **kwargs):
    if "labels" in data and len(data["labels"]) != len(data["values"]):
        raise ValidationError("Labels must be specified for each value")
    if len(data["values"]) == 1 and data["values"][0] == 0:
        raise ValidationError("Cannot create a pie chart with single value of 0")

The full code can be seen in __init__.py.

I added specific tests for the custom validators to my unit tests, but I didn't do so for the built-in min/max validators, since I'm relying on the library's tests to ensure those work as expected.

Thanks to the property-based tests, users of this API will see a useful error instead of a 500 error. I'm a fan of property-based testing, and I hope to find ways to use it in future applications.

Friday, November 18, 2022

Running PostgreSQL in a Dev Container with Flask/Django

Not familiar with Dev Containers? Read my first post about Dev Containers.

I recently added Dev Container support to a Flask+PostgreSQL sample and a Django+PostgreSQL sample. I really wanted to be able to run PostgreSQL entirely inside the Dev Container, since 1) I've had a hard time trying to setup PostgreSQL on my laptop in the past, and 2) I'd like to access the database when running the Dev Container inside Github Codespaces on the web. Fortunately, thanks to some Docker magic, I figured it out! 🐳

The first step is to create a docker-compose.yml file inside the .devcontainer folder:

version: "3"

services:
  app:
    build:
      context: ..
      dockerfile: .devcontainer/Dockerfile
      args:
        VARIANT: 3.9
        USER_UID: 1000
        USER_GID: 1000

    volumes:
      - ..:/workspace:cached

    # Overrides default so things don't shut down after the process ends
    command: sleep infinity

    # Runs app on the same network as the database container,
    # allows "forwardPorts" in devcontainer.json function
    network_mode: service:db

  db:
    image: postgres:latest
    restart: unless-stopped
    volumes:
      - postgres-data:/var/lib/postgresql/data
    environment:
      POSTGRES_USER: app_user
      POSTGRES_DB: app
      POSTGRES_PASSWORD: app_password

volumes:
  postgres-data:

That file declares an app service based off a Dockerfile (which we'll see next) as well as a db service based off the official postgres image that stores data in a mounted volume. The db service declares environment variables for the database name, username, and password, which must be used by any app that connects to that database.

The next step is the Dockerfile, also inside the .devcontainer folder:

FROM mcr.microsoft.com/vscode/devcontainers/python:0-3

RUN curl -fsSL https://aka.ms/install-azd.sh | bash

ENV PYTHONUNBUFFERED 1

RUN apt-get update && export DEBIAN_FRONTEND=noninteractive \
    && apt-get -y install --no-install-recommends postgresql-client

This file is particular to the needs of my sample, so it builds on a pre-built Python-optimized Dev Container from Microsoft and includes the azd tool. Your own file could start from any Docker image that includes Python. However, you will want the final command in the file that installs a PostgreSQL client.

The final file inside the .devcontainer folder is devcontainer.json, which is the entry point for Github Codespaces and the VS Code Dev Containers extension, and describes all the customizations. Here's a simplified version of mine:

{
    "name": "Python 3 & PostgreSQL",
    "dockerComposeFile": "docker-compose.yml",
    "service": "app",
    "workspaceFolder": "/workspace",
    "forwardPorts": [8000, 5432],
    "extensions": [
        "ms-python.python",
        "mtxr.sqltools",
        "mtxr.sqltools-driver-pg"
    ],
    "settings": {
        "sqltools.connections": [{
            "name": "Container database",
            "driver": "PostgreSQL",
            "previewLimit": 50,
            "server": "localhost",
            "port": 5432,
            "database": "app",
            "username": "app_user",
            "password": "app_password"
        }],
        "python.pythonPath": "/usr/local/bin/python"
    }
}

Let's break that down:

  • dockerComposeFile points at the docker-compose.yml from earlier.
  • service matches the name of the non-postgres service from that file.
  • workspaceFolder matches the location of the volume from that file.
  • forwardPorts instructs the Dev Container to expose port 8000 (for the Django app) and port 5432 (for the PostGres DB).
  • extensions includes a really neat extension, SQLTools, which provides a graphical UI for the database tables and allows you to run queries against the tables.
  • Inside settings, sqltools.connections specifies the same database name, username, and password that was declared in the docker-compose.yml.

The final step is to make sure that the app knows how to access the PostgreSQL database. In my sample apps, the DB details are set via environment variables, so I just use a .env file that looks like this:

DBNAME=app
DBHOST=localhost
DBUSER=app_user
DBPASS=app_password

...And that's it! If you'd like, here's a video where I run a Flask+PostgreSQL Dev Container inside Github Codespaces and also highlight the changes described above:

Check out the sample repos for full code, and let me know if you run into issues enabling a PostgreSQL DB in your own Dev Containers.

Friday, September 30, 2022

Deploying a containerized Flask app to Azure Container Apps

I've used Docker for many years as a local development environment (first for Khan Academy and then Berkeley CS61A), but until this week, I'd never personally made a Docker image or deployed one to production.

One of our offerings at Microsoft is Azure Container Apps, a way to run Docker containers in the cloud, which gives me a great excuse to get my feet wet in the world of containerization. 🐳

To share what I've learnt, I'll walkthrough the process of containerizing a Flask app and running it on Azure.

First, some Docker jargon:

  • A Docker image is a multi-layered environment that is exactly the environment your app thrives in, such as a Linux OS with Python 3.9 and Flask installed. You can also think of an image as a snapshot or a template.
  • A Docker container is an instance of an image, which could run locally on your machine or in the cloud.
  • A registry is a place to host images. There are cloud hosted registries like DockerHub and Azure Container Registry. You can pull images down from those registries, or push images up to them.

These are the high-level steps:

  1. Build an image of the Flask application locally and confirm it works when containerized.
  2. Push the image to the Azure Container Registry.
  3. Run an Azure Container App for that image.

Build image of Flask app

I started from a very simple app, the Flask app used by other Azure tutorials:
https://github.com/Azure-Samples/msdocs-python-flask-webapp-quickstart

Flask's development server is not suitable for production, so I brought in the Gunicorn server as a requirement in requirements.txt:

Flask==2.0.2
gunicorn

I put Gunicorn settings in gunicorn_config.py:

bind = "0.0.0.0:5000"
workers = 4
threads = 4
timeout = 120

Then I added this Dockerfile file in the root:

# syntax=docker/dockerfile:1

FROM python:3.9.13

WORKDIR /code

COPY requirements.txt .

RUN pip3 install -r requirements.txt

COPY . .

EXPOSE 5000

ENTRYPOINT ["gunicorn", "-c", "gunicorn_config.py", "app:app"]

That file tells Docker to start from a base image which has python 3.9.13 installed, create a /code directory, install the package requirements, copy the code into the directory, expose port 5000 (Flask's default port, and then finally use Gunicorn run the Flask application..

I also added a .dockerignore file to make sure Docker doesn't copy over unneeded files:

.git*
**/*.pyc
.venv/

You can download the full code from this repository.

I built a Docker image using the "Build image" option from the VS Code Docker extension. However, it can also be built from the command line:

docker build --tag flask-demo .

Now that the image is built, I can run a container using it:

docker run -d -p 5000:5000 flask-demo

The Flask default port is 5000, so the run command must specify that for the connections to work.

Deploying Option #1: az containerapp up

The Azure CLI has a single command that can take care of all the common steps of container app deployment: az container up.

From the app folder, I run the up command:

az containerapp up \
  -g flask-aca-rg \
  -n flask-aca-app \
  --ingress external \
  --target-port 5000 \
  --source .

That command does the following:

  1. Creates an Azure resource group named "flask-aca-rg". A resource group is basically a folder for all the resources it creates after.
  2. Creates a Container App Environment and Log Analytics workspace inside that group.
  3. Builds the container image using the local Dockerfile.
  4. Creates a registry in the Azure Container Registry and pushes the image to the new registry.
  5. Creates a Container App "flask-aca-app" that uses the pushed image and allows external ingress on port 5000 (public HTTP access).

When the steps are successful, the public URL is displayed in the output:

Browse to your container app at:
http://flask-aca-app.salmontree-4f877506.northcentralusstage.azurecontainerapps.io 

Whenever I update the app code, I run that command again and it repeats the last three steps. Easy peasy! Check the az containerapp up reference to see what additional options are available.


Deploying Option #2: Step-by-step az commands

If you need more customization of the deploying process than is possible with up, it's also possible to do each of those steps yourself using specific Azure CLI commands.

Push image to registry

I followed this tutorial to push an image to the registry, with some customizations.

I created a resource group:

az group create --location eastus --name flask-container-apps

Then I created a registry using a unique name and logged in to that registry:

az acr create --resource-group flask-container-apps \
  --name pamelascontainerregistry --sku Basic

az acr login --name pamelascontainerregistry

Now comes the tricky part: pushing an image to that repository. I am working on a Mac with an M1 (ARM 64) chip, but Azure Container Apps (and other cloud-hosted container runners) expect images to be built for an Intel (AMD 64) chip. That means I can't just push the image that I built in the earlier step, I actually have to build specifically for AMD 64 and push that image.

One way to do that is with the docker buildx command, specifying the target architecture and target registry location:

docker buildx build --push --platform linux/amd64 \
    -t pamelascontainerregistry.azurecr.io/flask-demo:latest .

However, a much faster way to do it is with the az acr build command, which uploads the code to cloud and builds it there:

az acr build --platform linux/amd64 \
    -t pamelascontainerregistry.azurecr.io/flask-demo:latest \
    -r pamelascontainerregistry .

⏱ The `docker buildx` command took ~ 10 minutes, whereas the `az acr build` command took only a minute. Nice!

Create Azure Container App

Now that I have an image uploaded to a registry, I can create a container app for that image. I followed this tutorial.

I upgraded the extension and registered the necessary providers:

az extension add --name containerapp --upgrade
az provider register --namespace Microsoft.App
az provider register --namespace Microsoft.OperationalInsights

Then I created an environment for the container app:

az containerapp env create --name flask-container-environment \
    --resource-group flask-container-apps --location eastus

Next, I generated credentials so that the command line tool could log in to my registry:

az acr credential show --name pamelascontainerregistry

Finally, I created the container app:

az containerapp create --name my-container-app \
    --resource-group flask-container-apps \
    --image pamelascontainerregistry.azurecr.io/flask-demo:latest \
    --environment flask-container-environment \
    --registry-server pamelascontainerregistry.azurecr.io \
    --registry-username pamelascontainerregistry \
    --registry-password $REGISTRY_PASSWORD \
    --ingress external \
    --target-port 5000

Once that deployed, I followed the URL from the Azure portal to view the website in the browser and verified it was all working. 🎉 Woot!

If I make any Flask code updates, all I need to do is re-build the image and tell the container app to update:

az acr build --platform linux/amd64 \
    -t pamelascontainerregistry.azurecr.io/flask-demo:latest \
    -r pamelascontainerregistry .

az containerapp update --name my-container-app \
  --resource-group my-container-apps \
  --image pamelascontainerregistry.azurecr.io/flask-demo:latest 

⏱ Those commands are fairly fast, about 30 seconds each.

🐳 Now I'm off to containerize more apps!

Wednesday, April 11, 2012

Using the Instagram API from a Python Flask App

Instagram came out with their Android app last week, and finally I had a solution to the age-old problem: all my home-cooked, healthy meals look like crap when photographed with my Android Nexus S camera, and so my EatDifferent stream was not so enticing. Thanks to the Instagram filters, I can now take photos of my meals that actually look somewhat palatable. I could have just taken photos with the Instagram app and uploaded them via the EatDifferent mobile app, but since Instagram offers an API, I wanted to see if I could use the API to automatically import photos from Instagram into EatDifferent. Well, as it turns out, I could, and it was a fairly easy feat, thanks in large part to the Python Instagram API wrapper. Here's a rundown of how it works.

Authenticating Users

Instagram uses OAuth2 for authentication, which means that my app needs a flow which redirect users to Instagram, gets a token from them, upgrades that to an access token, and then saves that access token for any time it wants to make authenticated requests on behalf of the user.

On the settings page, users click on a button that hits this view and redirects them to Instagram:

@app.route('/authorize-instagram')
def authorize_instagram():
    from instagram import client

    redirect_uri = (util.get_host() + url_for('handle_instagram_authorization'))
    instagram_client = client.InstagramAPI(client_id=INSTAGRAM_CLIENT, client_secret=INSTAGRAM_SECRET, redirect_uri=redirect_uri)
    return redirect(instagram_client.get_authorize_url(scope=['basic']))

Then, when Instagram redirects back to my app, it hits this view which upgrades to an access token and saves it:

@app.route('/handle-instagram-authorization')
def handle_instagram_authorization():
    from instagram import client

    code = request.values.get('code')
    if not code:
        return error_response('Missing code')
    try:
        redirect_uri = (util.get_host() + url_for('handle_instagram_authorization'))
        instagram_client = client.InstagramAPI(client_id=INSTAGRAM_CLIENT, client_secret=INSTAGRAM_SECRET, redirect_uri=redirect_uri)
        access_token, instagram_user = instagram_client.exchange_code_for_access_token(code)
        if not access_token:
            return error_response('Could not get access token')
        g.user.instagram_userid = instagram_user['id']
        g.user.instagram_auth   = access_token
        g.user.save()
        deferred.defer(fetch_instagram_for_user, g.user.get_id(), count=20, _queue='instagram')
    except Exception, e:
        return error_response('Error')
    return redirect(url_for('settings_data') + '?after_instagram_auth=True')

Parsing Posts

As you might notice in the above code, I call a method to fetch the user's latest Instagram posts after I've saved their authentication information. I defer that method using App Engine task queues, since it could take some time, and I don't need to do that while the user is waiting.

In the code to fetch the posts, I only process posts which are tagged with "ED" or "eatdifferent", since there may be times when a user wants to post something other than meals. I also check in memcache if I've already seen this update before processing it. I could also store a max ID seen for each user and do it that way, but given the small number of posts I'm processing on average, I went with the solution which uses more memcache hits but is also more straightforward.

def fetch_instagram_for_user(user_id, count=3):
    from instagram import client

    user = models.User.get_by_id(user_id)
    if not user.instagram_auth or not user.instagram_userid:
        return

    instagram_client = client.InstagramAPI(access_token=user.instagram_auth)
    recent_media, next = instagram_client.user_recent_media(user_id=user.instagram_userid, count=count)
    for media in recent_media:
        tags = []
        for tag in media.tags:
            tags.append(tag.name.lower())
        if not ('eatdifferent' in tags or 'ed' in tags):
            continue
        cache_key = 'instagram-%s-%s' % (user.get_id(), media.id)
        if util.get_from_cache(cache_key) and False:
            continue
        imports.import_instagram(user, media)
        util.put_in_cache(cache_key, 'true')

Subscribing to Posts

Now, I want to know whenever an authenticated user updates a new photo, so that I can import it if it's tagged appropriately. The Instagram API uses parts of the PubSubHubBub protocol to let you subscribe to real-time updates. You can subscribe to all posts with particular tags, but you can also subscribe to all posts by your app's authenticated users, and in my case, that's the lower noise option. (There's a surprising number of folks using the tag "#ED", presumably tagging everyone they know named "Ed").

I only had to setup the subscription once (well, once for the test server and once for deployed), using this code:

    instagram_client = client.InstagramAPI(client_id=INSTAGRAM_CLIENT, client_secret=INSTAGRAM_SECRET)
    callback_url = 'http://www.eatdifferent.com/hook/parse-instagram'
    instagram_client.create_subscription(object='user', aspect='media', callback_url=callback_url)

When my app gets hit at the callback URL, it goes to this view which either responds to the hub challenge (if it's the first time Instagram is hitting the callback URL, to verify the subscription) or if it's an actual update, it verifies its from Instagram and calls another function to parse the update.

@app.route('/hook/parse-instagram')
def parse_instagram():
    from instagram import client, subscriptions

    mode         = request.values.get('hub.mode')
    challenge    = request.values.get('hub.challenge')
    verify_token = request.values.get('hub.verify_token')
    if challenge: 
        return Response(challenge)
    else:
        reactor = subscriptions.SubscriptionsReactor()
        reactor.register_callback(subscriptions.SubscriptionType.USER, parse_instagram_update)

        x_hub_signature = request.headers.get('X-Hub-Signature')
        raw_response    = request.data
        try:
            reactor.process(INSTAGRAM_SECRET, raw_response, x_hub_signature)
        except subscriptions.SubscriptionVerifyError:
            logging.error('Instagram signature mismatch')
    return Response('Parsed instagram')

In this function, I extract the Instagram user ID from the update JSON, find the user(s) that connected with that ID, and once again, set up a deferred task to fetch their updates. I also set a countdown of 2 minutes for that task, as I saw issues where the update would exist in the Instagram but wouldn't have all the data yet (like the tags), maybe a stale data propagation issue on their side.

def parse_instagram_update(update):
    instagram_userid = update['object_id']
    users = models.User.all().filter('instagram_userid =', instagram_userid).fetch(10)
    if len(users) == 0:
        logging.info('Didnt find matching users for this update')
    for user in users:
        deferred.defer(fetch_instagram_for_user, user.get_id(), _queue='instagram', _countdown=120)

And that's pretty much it- it's a fun app and a fun API. Hopefully they both stick around after their Facebook acquisition this week. ☺

Friday, December 9, 2011

Using 3-Legged OAuth APIs with Flask

The Withings body scale is a nifty device — after you connect it to your wireless network and create an account, it wirelessly transmits your measurements to its site. It also tries to estimate your body fat ratio, so that even when your weight stays the same, you can see if your body fat ratio is changing. In the last week, I had several EatDifferent users start using a Withings scale to monitor their weight while they improve their eating habits, so I wanted to let them connect their accounts to their Withings accounts.

Fortunately, Withings offers an API for accessing user measurements. Their API uses OAuth for authentication and JSON for the responses. Since users could enter measurements at any time and they don't want developers polling their API constantly, they do the smart thing and let developers add subscriptions for each user, so that a URL on your server is pinged whenever there are updates for a user. The API is well-designed and standards-compliant, so I was looking forward to integrating with it.

The tricky part of using any OAuth API is setting up the flow — your site has to generate a request token from the OAuth provider, redirect the user to the OAuth provider to grant access, and then once the provider redirects back, your site has to exchange the request token for an access token and save the credentials. Finally, with those credentials, you can actually start using the API. Since the OAuth flow involves redirects and saving session information, the implementation varies depending on the server-side framework you're using.

For EatDifferent, I'm using the Flask Python microframework on Google App Engine, so I started my integration by looking for Flask OAuth examples. I started with the Flask OAuth extension, which wraps on top of the oauth2 library and provides various decorators for retrieving the session tokens and handling the redirect. The extension worked, but since I wanted to customize it more, I decided to go straight to the source and just write URL handlers and a Withings client library based on that oauth2 library. You can check out that gist to see the Withings client code, and read on for a description of my URL handlers.

To start off the authentication process, I have this authorize_withings() URL handler that creates a WithingsClient with my key and secret (provided by Withings on registration), gets a request token, saves them in the session as a tuple, and redirects to the authorization URL.

@app.route('/authorize-withings')
def authorize_withings():
    withings_client = withings.WithingsClient(WITHINGS_KEY, WITHINGS_SECRET)
    callback_url    = (util.get_host() + url_for('handle_withings_authorization') 
    request_token   = withings_client.get_request_token(callback=callback_url)
    session[SESSION_WITHINGS_TOKEN] = (
        request_token['oauth_token'],
        request_token['oauth_token_secret']
    )
    auth_url = withings_client.get_authorization_url(request_token) 
    return redirect(auth_url)

Withings should then redirect back to my handle_withings_authorization() URL handler that creates a WithingsClient (with the request token from the session), requests an access token, and saves the token as a property on the current User entity. By saving it in the datastore instead of session, I can access it at any time in the future too, not just for this session.

@app.route('/handle-withings-authorization')
def handle_withings_authorization():
    request_token   = session[SESSION_WITHINGS_TOKEN]
    withings_client = withings.WithingsClient(
        consumer_key       = WITHINGS_KEY,
        consumer_secret    = WITHINGS_SECRET,
        oauth_token        = request_token[0],
        oauth_token_secret = request_token[1])
    access_token       = withings_client.get_access_token(
        oauth_verifier = request.args['oauth_verifier'])
    withings_auth   = {
        'oauth_token':        access_token['oauth_token'],
        'oauth_token_secret': access_token['oauth_token_secret']
    }
    g.user.withings_auth   = util.serialize(withings_auth)
    g.user.withings_userid = access_token['userid']
    g.user.save()
    return redirect(url_for('device_settings'))

Whenever I want to use the Withings API for a user, I fetch their authentication information, create a WithingsClient, and fire off requests to the API. For example, I use this parse_withings() URL handler to respond to notifications from their API.

@app.route('/hook/parse-withings')
def parse_withings():
    user_id         = request.form.get('userid')
    user            = models.User.all().filter('withings_userid =', user_id).get()
    withings_auth   = util.deserialize(user.withings_auth)
    withings_client = withings.WithingsClient(
        consumer_key       = WITHINGS_KEY,
        consumer_secret    = WITHINGS_SECRET,
        oauth_token        = withings_auth['oauth_token'],
        oauth_token_secret = withings_auth['oauth_token_secret'],
        userid             = user.withings_userid)
    measurement_groups = withings_client.get_measurements(
        startdate=request.form.get('startdate'),
        enddate=request.form.get('enddate'))
    imports.import_withings(user, measurement_groups)
    return Response(status=200)

Now that I have the OAuth flow setup for Withings, I can easily support other APIs — whatever my users need most. ☺