Thursday, March 2, 2023

Hosting Python Web Apps on Azure: A Price-Off

When I started my job in June as a Microsoft Cloud Advocate for Python developers, one of my first goals was to port my old Google App Engine apps over to Azure. Those apps were doomed anyway, as they were using Python 2.7, so it was a great time to give them a make-over. I deploy most Azure samples to my corporate account, but I wanted to experience all the aspects of being an Azure developer, including the $$$, so I decided to host them on a personal Azure account instead. I also decided to deploy to a couple different hosting options, to see the differences.

The two apps:

  • pamelafox.org: My personal homepage, a Flask website that pulls data from a Google Spreadsheet (it's like a database, I swear!). It was previously on App Engine with memcached to cache the data pulls, so I ported it to Azure Container Apps with a CDN in front of the views.
  • translationtelephone.com: A game to translate a phrase between many languages. It was previously on App Engine with the default GAE database (BigTable-based), so I ported it to Azure App Service with a PostgreSQL Flexible Server.

Both of these are relatively low-traffic websites, so I would expect to pay very little for their hosting costs and for my traffic to be compatible with the cheaper SKUs of each Azure resource. Let's see how the costs have worked out for each of them.

Azure Container Apps + CDN

Here are the costs for January 2023, for all the resources involved in hosting pamelafox.org:

Azure resource SKU Monthly cost
Container Registry Basic $5.15
Azure Container Apps (No SKUs) $3.23
Content Delivery Network Microsoft CDN (Classic) $0.00

Perhaps surprisingly, the most expensive part is the Container Registry pricing. The least expensive SKU has a per-day pricing that can host up to 10 GB. My registry is storing only a single container that's only 0.33 GB, so I'm not maximizing that resource. If I had a few (or 30!) more container apps, I could re-use the same registry and share the cost.

The actual host, Azure Container Apps, is only $3.23, and that's likely helped by the Azure CDN in front. Azure Container Apps are priced according to usage (memory/vCPU), and the CDN means less usage of the ACA. The CDN cost only $0, which is my kind of number!

Azure App Service + PostgreSQL

Here are the costs for January 2023, for all the resources involved in hosting pamelafox.org:

Azure resource SKU Monthly cost
App Service Basic (B1) $12.11
DB for PostgreSQL Flexible Server Basic (B1MS) $0.00 (Free for now)

My costs for this website are higher due to App Service pricing per hour, regardless of requests/memory/CPU usage. For my region and currency, at the B1 tier, that's always around $12 per month. There is also a Free tier, but it doesn't support custom domains, so it's not an option for this site.

The PostgreSQL server is currently free for me, as I'm taking advantage of the first 12 months free. That only applies to one managed PostgreSQL server, any additional ones will cost me. Past the first year and first server, the cost would be ~$13 for the SKU and region I'm using.

Takeaways

Given the way that Azure Container Apps is priced, it seems like a better fit for my low-traffic websites, especially in conjunction with an aggressive CDN. I may port Translation Telephone over to ACA instead, to halve the costs there. However, I've actually already ported pamelafox.org to Azure Static Web Apps, which should be entirely free, since I've realized it's a bit of a waste to run a Flask app for a webpage that changes so infrequently. That's another great option for hobbyist websites.

If you're figuring our potential pricing for your Python apps on Azure, definitely read through the pricing pages, try the Azure pricing calculator, and make sure to set up a budget alert in your Azure account to remind you to continually monitor how much you're paying.
Monday, February 27, 2023

Testing APIFlask with schemathesis

When I asked developers on Mastodon "what framework do you use for building APIs?", the two most popular answers were FastAPI and Flask. So I set out building an API using Flask to see what the experience was like. I immediately found myself wanting a library like FastAPI to handle parameter validation for me, and I discovered APIFlask, a very similar framework that's still "100% compatible with the Flask ecosystem".


The Chart API

Using APIFlask, I wrote an API to generate Chart PNGs using matplotlib, with endpoints for both bar charts and pie charts. It could easily support many other kinds of charts, but I'll leave that as an exercise for the reader. 😉

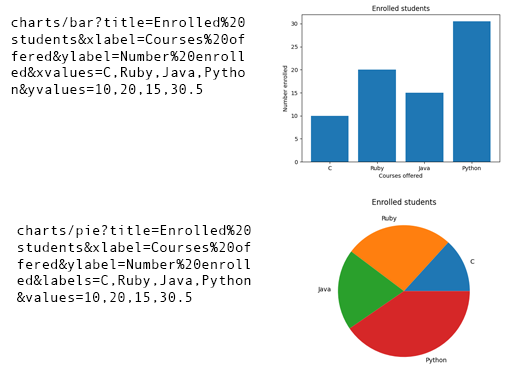
API URLs on left side and Chart API output on right side

The following code defines the pie chart endpoint and schema:

class PieChartParams(Schema):
    title = String(required=False, validate=Length(0, 30))
    values = DelimitedList(Number, required=True)
    labels = DelimitedList(String)

@app.get("/charts/pie")
@app.input(PieChartParams, location="query")
def pie_chart(data: dict):
    fig = Figure()
    axes: Axes = fig.subplots(squeeze=False)[0][0]
    axes.pie(data["values"], labels=data.get("labels"))
    axes.set_title(data.get("title"))

    buf = BytesIO()
    fig.savefig(buf, format="png")
    buf.seek(0)
    return send_file(buf, download_name="chart.png", mimetype="image/png")

Using property-based testing

I like all my code to be fully tested, or at least, "fully" to my knowledge. I started off writing standard pytest unit tests for the endpoint (with much thanks to Github Copilot for filling in the tests). But I wasn't sure whether there were edge cases that I was missing, since my code wraps on top of matplotlib and I'm not a matplotlib expert.

What I wanted was property-based testing: automatically generated tests based on function parameter types, which make sure to include commonly missed edge cases (like negative numbers). In the past, I've used the hypothesis library for property-based testing. I wondered if there was a variant that was specially built for API frameworks, where the parameter types are declared in schemas, and lo-and-hold, I discovered that exact creature: schemathesis. It's built on top of hypothesis, and is perfect for FastAPI, APIFlask, or any similar framework.

The schemathesis library can be used from the command-line or inside pytest, using a fixture. I opted for the latter since I was already using pytest, and after reading their WSGI support docs, I came up with this file:

import pytest
import schemathesis
import hypothesis

from src import app

schema = schemathesis.from_wsgi("/openapi.json", app)

@schema.parametrize()
@hypothesis.settings(print_blob=True, report_multiple_bugs=False)
@pytest.mark.filterwarnings("ignore:Glyph:UserWarning")
def test_api(case):
    response = case.call_wsgi()
    case.validate_response(response)

There are a few additional lines in that file that you may not need: the hypothesis.settings fixture, and the pytest.mark.filterwarnings fixture. I added settings to increase the verbosity of the output, to help me replicate the issues, and I added filterwarnings to ignore the many glyph-related warnings coming out of matplotlib.

The API improvements

As a result of the schemathesis tests, I identified several parameters that could use additional validation.

I added both a min and max to the Number field in the values parameter:

values = DelimitedList(Number(validate=Range(min=0, max=3.4028235e38)), required=True)

I also added a custom validator for situations which couldn't be addressed with the built-in validators. The custom validator checks to make sure that the number of labels matches the number of values provided, and disallows a single value of 0.

@validates_schema
def validate_numbers(self, data, **kwargs):
    if "labels" in data and len(data["labels"]) != len(data["values"]):
        raise ValidationError("Labels must be specified for each value")
    if len(data["values"]) == 1 and data["values"][0] == 0:
        raise ValidationError("Cannot create a pie chart with single value of 0")

The full code can be seen in __init__.py.

I added specific tests for the custom validators to my unit tests, but I didn't do so for the built-in min/max validators, since I'm relying on the library's tests to ensure those work as expected.

Thanks to the property-based tests, users of this API will see a useful error instead of a 500 error. I'm a fan of property-based testing, and I hope to find ways to use it in future applications.

Wednesday, February 22, 2023

Managing Python dependency versions for web projects

Though I've worked on several production Python codebases, I've never been in charge of managing the dependencies. However, I now find myself developing many templates to help Python devs get started with web apps on Azure, and I want to set those up with best practices for dependency management. After discussing with my fellow Python advocates and asking on Mastodon, this seems to be the most commonly used approach:

  1. Pin all the production requirements for the web app. (Not necessary to pin development requirements, like linters.)
  2. Use a service like PyUp or Github Dependabot to notify you when a dependency can be upgraded.
  3. As long as tests all pass with the newest version, update to the new version. This assumes full test coverage, and as Brian Okken says, "you’re not testing enough, probably, test more." And if you really trust your tests, use a tool like Anthony Shaw's Dependa-lot-bot to auto-merge Github PRs when all checks pass.

I've now gone through and made that change in my web app templates, so here's what that looks like in an example repo Let's use flask-surveys-container-app, a containerized Flask app with a PostgreSQL database.


Pin the production requirements

My app already had a requirements.txt, but without any versions:

Flask
Flask-Migrate
Flask-SQLAlchemy
Flask-WTF
psycopg2
python-dotenv
SQLAlchemy
gunicorn
azure-keyvault-secrets
azure.identity

To figure out the current versions, I ran python3 -m pip freeze and copied the versions in:

Flask==2.2.3
Flask-Migrate==4.0.4
Flask-SQLAlchemy==3.0.3
Flask-WTF==1.1.1
psycopg2==2.9.5
python-dotenv==0.21.1
SQLAlchemy==2.0.4
gunicorn==20.1.0
azure-keyvault-secrets==4.6.0
azure-identity==1.12.0

Add Github dependabot

The first time that I set up Dependabot for a repo, I used the Github UI to automatically create the dependabot.yaml file inside the .github folder. After that, I copied the same file into every repo, since all my repos use the same options. Here's what the file looks like for an app that uses pip and stores requirements.txt in the root folder:

version: 2
updates:
  - package-ecosystem: "pip" # See documentation for possible values
    directory: "/" # Location of package manifests
    schedule:
      interval: "weekly"

If your project has a different setup, read through the Github docs to learn how to configure Dependabot.


Ensure the CI runs tests

For this system to work well, it really helps if there's an automated workflow that runs test and checks test coverage. Here's a snippet from the Python workflow file for the Flask app:

- name: Install dependencies
  run: |
    python -m pip install --upgrade pip
    pip install -r requirements-dev.txt
- name: Run Pytest tests
  run: pytest
  env:
    DBHOST: localhost
    DBUSER: postgres
    DBPASS: postgres
    DBNAME: postgres

To make sure the tests are actually testing the full codebase, I use coverage and make the tests fail if the coverage isn't high enough. Here's how I configure pyproject.toml to make that happen:

[tool.pytest.ini_options]
addopts = "-ra --cov"
testpaths = [
    "tests"
]
pythonpath = ['.']

[tool.coverage.report]
show_missing = true
fail_under = 100

Install Depend-a-lot-bot

Since I have quite a few Python web app repos (for Azure samples), I expect to soon see my inbox flooded with Dependabot pull requests. To help me manage them, I installed Dependa-lot-bot, which should auto-merge Github PRs when all checks pass.

I added .github/dependabot-bot.yaml file to tell the bot which packages are safe to merge:

safe:
 - Flask
 - Flask-Migrate
 - Flask-SQLAlchemy
 - Flask-WTF
 - psycopg2
 - python-dotenv
 - SQLAlchemy
 - gunicorn
 - azure-keyvault-secrets
 - azure-identity

Notably, that's every single package in this project's requirements, which may be a bit risky. Ideally, if my tests are comprehensive enough, they should notify me if there's an actual issue. If they don't, and an issue shows up in the deployed version, then that indicates my tests need to be improved.

I probably would not use this bot for a live website, like khanacademy.org, but it is helpful for the web app demo repos that I maintain.

So that's the process! Let me know if you have ideas for improvement or your own flavor of dependency management.

Monday, February 20, 2023

Loading multiple Python versions with Pyodide

As described in my last post, dis-this.com is an online tool for disassembling Python code. After I shared it last week in the Python forum, Guido asked if I could add a feature to switch Python versions, to see the difference in disassembly across versions. I was able to get it working for versions 3.9 - 3.11, but it was a little tricky due to the way Pyodide is designed.

I'm sharing my learnings here for anyone else building a similar tool in Pyodide.

Pyodide version ↔ Python version

Pyodide doesn't formally support multiple Python versions at once. The latest Pyodide version has the latest Python version that they've been able to support, as well as other architectural improvements. To get to older Python versions, you need to load older Pyodide versions that happened to support that version.

Here's a JS object mapping Python versions to Pyodide versions:

const versionMap = {
    '3.11': 'dev',
    '3.10': 'v0.22.1',
    '3.9': 'v0.19.1',
};

As you can see, 3.11 doesn't yet map to a numbered release version. According to the repository activity, v0.23 will be the numbered release once it's out. I will need to update that in the future.

Once I know what Python version the user wants, I append the script tag and call loadPyodide once loaded:

const scriptUrl = `https://cdn.jsdelivr.net/pyodide/${pyodideVersion}/full/pyodide.js`;
const script = document.createElement('script');
script.src = scriptUrl;
script.onload = async () => {
    pyodide = await loadPyodide({
        indexURL: `https://cdn.jsdelivr.net/pyodide/${pyodideVersion}/full/`,
        stdout: handleStdOut,
    });
    // Enable the UI for interaction
    button.removeAttribute('disabled');
};

Loading multiple Pyodide versions in same page

For dis-this, I want users to be able to change the Python version and see the disassembly in that different version. For example, they could start on 3.11 and then change to 3.10 to compare the output.

Originally, I attempted just calling the above code with the new Pyodide version. Unfortunately, that resulted in some funky errors. I figured it related to Pyodide leaking globals into the window object, so my next attempt was deleting those globals before loading a different Pyodide version. That actually worked a lot better, but still failed sometimes.

So, to be on the safe side, I made it so that changing the version number reloads the page. The website already supports encoding the state in the URL (via the permalink), so it wasn't actually too much work to add the "&version=" parameter to the URL and reload.

This code listens to the dropdown's change event and reloads the window to the new permalink:

document.getElementById('version-select').addEventListener('change', async () => {
    pythonVersion = document.getElementById('version-select').value;
    permalink.setAttribute('version', pythonVersion);
    window.location.search = permalink.path;
});

That permalink element is a Web Component that knows how to compute the correct path. Once the page reloads, this code grabs the version parameter from the URL:

wpythonVersion = new URLSearchParams(window.location.search).get('version') || '3.11';

The codebase for dis-this.com is relatively small, so you can also look through it yourself or fork it if you're creating a similar tool.

Tuesday, February 14, 2023

Dis This: Disassemble Python code online

When I was a lecturer at UC Berkeley teaching Python to thousands of students, I got asked all kinds of questions that got me digging deep into Python's innards. I soon discovered the dis module, which outputs the corresponding bytecode for a function or code segment. When students asked me the difference between various ways of writing the "same" code, I would often run the variations through the dis module to see if there was an underlying bytecode difference.

To see how dis works, consider this simple function:

def miles_to_km(miles):
    return miles * 1.609344

When we call dis.dis(miles_to_km), we see this output:

  1           0 RESUME                   0

  2           2 LOAD_FAST                0 (miles)
              4 LOAD_CONST               1 (1.609344)
              6 BINARY_OP                5 (*)
             10 RETURN_VALUE

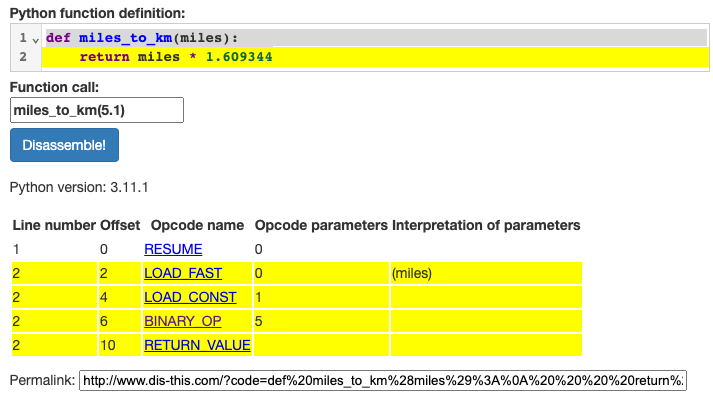
The first (optional) number is the line number, then the offset, then the opcode name, then any opcode parameters, and optionally additional information to help interpret the parameters. I loved this output but found I was constantly trying to remember what each column represented and looking up the meaning of different op codes. I wanted to make disassembly more accessible for me and for others.

So I created dis-this.com, a website for disassembling Python code which includes an interactive hyperlinked output table plus the ability to permalink the output.

Screenshot of dis-this.com for miles_to_km example

The website uses Pyodide to execute the Python entirely in the browser, so that I don't have to run any backend or worry about executing arbitrary user code on a server. It also uses Lit for interactive elements, a library that wraps over Web Components, CodeMirror 6 for the editor, and RollUp for bundling up everything.

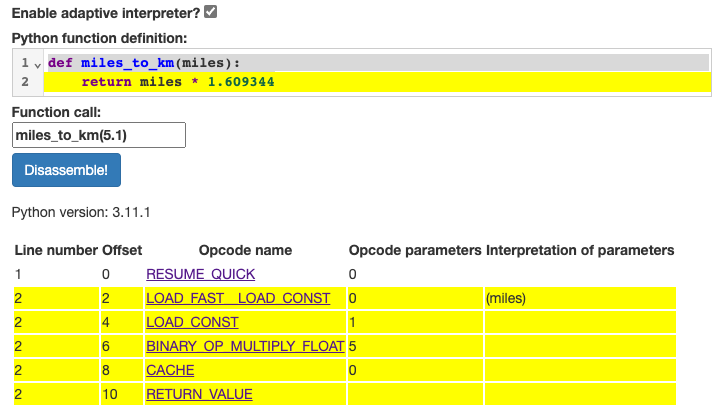
Since Pyodide has added support for 3.11 in its latest branch (not yet stable), the website optionally lets you enable the specializing adaptive interpreter. That's a new feature from the Faster CPython team that uses optimized bytecode operations for "hot" areas of code. If you check the box on dis-this.com, it will run the function 10 times and call dis.dis() with adaptive=True and show_caches=True.

For the example above, that results in a table with slightly different opcodes:

Screenshot of dis-this.com with miles_to_km example and specializing adaptive interpreter enabled

Try it out on some code and see for yourself! To learn more about the specializing adaptive interpreter, read the RealPython 3.11: New features article, PEP 659, or Python.org: What's New in Python 3.11.

Thursday, February 9, 2023

Writing a static maps API with FastAPI and Azure

As you may know if you've been reading my blog for a while, my first job in tech was in Google developer relations, working on the Google Maps API team. During my team there, we launched the Google Static Maps API. I loved that API because it offered a solution for developers who wanted a map, but didn't necessarily need the relatively heavy burden of an interactive map (with it's JavaScript and off-screen tiles).

Ever since using the py-staticmaps package to generate maps for my Country Capitals browser extension, I've been thinking about how fun it'd be to write an easily deployable Static Maps API as a code sample. I finally did it last week, using FastAPI along with Azure Functions and Azure CDN. You can fork the codebase here and deploy it yourself using the README instructions.

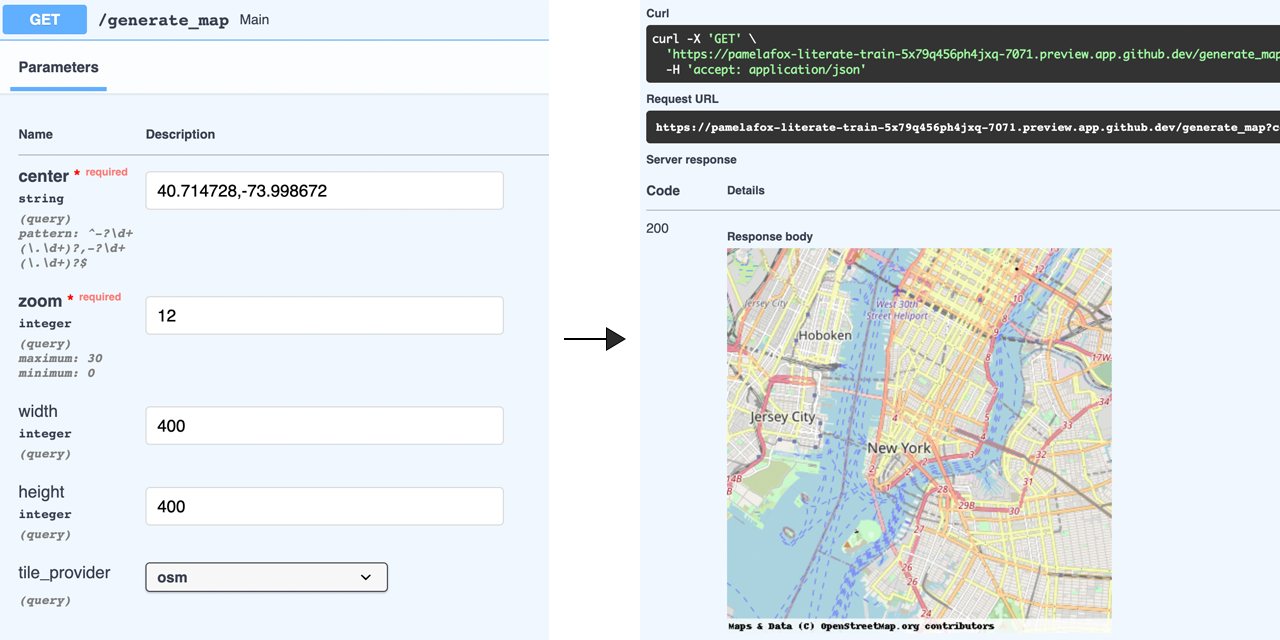
Screenshot with FastAPI documentation parameters on left and image map output on right

Here are some of the highlights from the sample.


Image responses in FastAPI

I've used FastAPI for a number of samples now, but only for JSON APIs, so I wasn't sure if it'd even work to respond with an image. Well, as I soon discovered, FastAPI supports many types of responses, and it worked beautifully, including the auto-generated Swagger documentation!

Here's the code for the API endpoint:


@router.get("/generate_map")
def generate_map(
    center: str = fastapi.Query(example="40.714728,-73.998672", regex=r"^-?\d+(\.\d+)?,-?\d+(\.\d+)?$"),
    zoom: int = fastapi.Query(example=12, ge=0, le=30),
    width: int = 400,
    height: int = 400,
    tile_provider: TileProvider = TileProvider.osm,
) -> fastapi.responses.Response:
    context = staticmaps.Context()
    context.set_tile_provider(staticmaps.default_tile_providers[tile_provider.value])
    center = center.split(",")
    center_ll = staticmaps.create_latlng(float(center[0]), float(center[1]))
    context.set_center(center_ll)
    context.set_zoom(zoom)

    # Render to PNG image and return
    image_pil = context.render_pillow(width, height)
    img_byte_arr = io.BytesIO()
    image_pil.save(img_byte_arr, format="PNG")
    return fastapi.responses.Response(img_byte_arr.getvalue(), media_type="image/png")

Notice how the code saves the PIL image into an io.BytesIO() object, and then returns it using the generic fastapi.responses.Response object with the appropriate content type.

Testing the image response

Writing the endpoint test took much longer, as I've never tested an Image API before and wasn't sure the best approach. I knew I needed to store a baseline image and check the generated image matched the baseline image, but what does it mean to "match"? My first approach was to check for exact equality of the bytes. That did work locally, but then failed when the tests ran on Github actions. Presumably, PIL saves images with slightly different bytes on the Github CI server than it does on my local machine. I switched to checking for a high enough degree of similarity using PIL.ImageChops, and that works everywhere:


def assert_image_equal(image1, image2):
    assert image1.size == image2.size
    assert image1.mode == image2.mode
    # Based on https://stackoverflow.com/a/55251080/1347623
    diff = PIL.ImageChops.difference(image1, image2).histogram()
    sq = (value * (i % 256) ** 2 for i, value in enumerate(diff))
    rms = math.sqrt(sum(sq) / float(image1.size[0] * image1.size[1]))
    assert rms < 90

def test_generate_map():
    client = fastapi.testclient.TestClient(fastapi_app)
    response = client.get("/generate_map?center=40.714728,-73.998672&zoom=12&width=400&height=400&tile_provider=osm")
    assert response.status_code == 200
    assert response.headers["content-type"] == "image/png"
    generated_image = PIL.Image.open(io.BytesIO(response.content))
    baseline_image = PIL.Image.open("tests/staticmap_example.png")
    assert_image_equal(generated_image, baseline_image)

I only tested a single baseline image, but in the future, it'd be easy to add additional tests for more API parameters and images.


Deploying to Azure

For deployment, I needed some sort of caching on the API responses, since most practical usages would reference the same image many times, plus the usage needs to adhere to the OpenStreetMap tile usage guidelines. I considered using either Azure API Management or Azure CDN. I went with the CDN mostly because I wanted to try it out, but API Management would also be a great choice, especially if you're interested in enabling more APIM policies.

All of my infrastructure is described declaratively in Bicep files in the infra/ folder, to make it easy for anyone to deploy the whole stack. This diagram shows what gets deployed:

Architecture diagram for CDN to Function App to FastAPI

Securing the function

Since I was putting a CDN in front of the Function, I wanted to prevent unauthorized access to the Function. Why expose myself to potential costly traffic on the Function's endpoint? The first step was changing function.json from an authLevel of "anonymous" to an authLevel of "function".


{
  "scriptFile": "__init__.py",
  "bindings": [
    {
      "authLevel": "function",
      ...

With that change, anyone hitting up the Function's endpoint without one of its keys gets served an HTTP 401. The next step was making sure the CDN passed on the key successfully. I set that up in the CDN endpoint's delivery rules, using a rule to rewrite request headers to include the "x-functions-key" header:


{
  name: 'Global'
  order: 0
  actions: [
    {
      name: 'ModifyRequestHeader'
      parameters: {
        headerAction: 'Overwrite'
        headerName: 'x-functions-key'
        value: listKeys('${functionApp.id}/host/default', '2019-08-01').functionKeys.default
        typeName: 'DeliveryRuleHeaderActionParameters'
      }
    }
  ]
}

Caching the API

In that same global CDN endpoint rule, I added an action to cache all the responses for 5 minutes:


    {
      name: 'CacheExpiration'
      parameters: {
          cacheBehavior: 'SetIfMissing'
          cacheType: 'All'
          cacheDuration: '00:05:00'
          typeName: 'DeliveryRuleCacheExpirationActionParameters'
      }
    }

That caching rule is really just for the documentation, however, as I also added a more specific rule to cache the images for a more aggressive 7 days:


{
  name: 'images'
  order: 1
  conditions: [
    {
      name: 'UrlPath'
      parameters: {
          operator: 'BeginsWith'
          negateCondition: false
          matchValues: [
            'generate_map/'
          ]
          transforms: ['Lowercase']
          typeName: 'DeliveryRuleUrlPathMatchConditionParameters'
      }
    }
  ]
  actions: [
    {
      name: 'CacheExpiration'
      parameters: {
          cacheBehavior: 'Override'
          cacheType: 'All'
          cacheDuration: '7.00:00:00'
          typeName: 'DeliveryRuleCacheExpirationActionParameters'
      }
    }
  ]
}

Check out the full CDN endpoint description in cdn-endpoint.bicep.

If you decide to use this Static Maps API in production, remember to adhere to the tile usage guidelines of the tile providers and minimize hitting up their server as much as possible. In the future, I'd love to spin up a full tile server on Azure, to avoid needing tile providers entirely. Next time!

Tuesday, January 31, 2023

Using Copilot with Python apps

I've been hesitant to try Github Copilot, the "AI pair programmer". Like many developers, I don't want to accidentally use someone's copyrighted code without proper attribution.

Fortunately, Github is continually adding more features to Copilot to make that possibility both rarer and easier to spot. Plus, I'm now on the Cloud advocacy team at Microsoft (Github's parent company), so I keep hearing about the benefits of Copilot from my colleagues. I decided that it was time to try it out! 🤖

I enabled Copilot while developing a Flask + PostgreSQL demo app, and wow, I am a huge fangirl already. 😍 Here's how it helped me out:

Writing ORM queries

My app uses SQLAlchemy, a popular package that's been through a few iterations. I've only used SQLAlchemy a few times, so I often find myself unsure how to form the correct ORM queries. I'm much better at SQL than SQLAlchemy, as it turns out. Fortunately, Copilot has seen enough examples of SQLAlchemy queries that it was able to form them for me.

Copilot wrote the queries after I provided the route function header and variable names. It's worth noting my models.py file already existed at this point.

@bp.route("/surveys/<int:survey_id>", methods=["GET"])
def survey_page(survey_id):
    survey = Survey.query.where(Survey.id == survey_id).first()
    answers = Survey.query.where(Answer.survey == survey_id)

Yes, those are pretty straightforward queries, but it still would have taken me a web search first to remember the SQLAlchemy ORM methods. It also was able to write queries with filters, especially if I wrote the comment first:

# Count matching answers in the database
answer_count = session.query(models.Answer).filter_by(
    selected_option="strawberry").count()

Would I have learned more of the SQLAlchemy API had I written those queries myself? Yes, probably, but 1) I don't know how long that knowledge would have lasted, given I bounce between multiple ORMs across projects, and 2) we're at the point of web development where there are too many APIs in play to memorize, and our time can be spent on gluing together apps.

Of course, we need to make sure these queries work! That brings me to my favorite use of Copilot...

Writing tests

My app uses Pytest to test the routes and models. I started by creating a test_routes.py file with this comment at the top:

# Test the routes in app.py using pytest

Copilot immediately took care of the imports for me. Interestingly, I didn't need pytest imported at first, since it's only necessary if you define fixtures or use other special features, but I did end up writing a few fixtures later.

import pytest

from app import app

Now I wrote the signature for the first test:

def test_index_redirect():

My goal was to test this route, whose code was already written:

@bp.route("/", methods=["GET"])
def index():
    return redirect(url_for("surveys.surveys_list_page"))

Copilot filled in the rest of the code:

with app.test_client() as client:
        resp = client.get("/")
        assert resp.status_code == 302
        assert resp.location == "http://localhost/surveys"

I ran the tests then, and discovered only one issue (which I suspected when I saw the suggested code): the location needed to be a relative URL, just "/surveys". I was very happy to have this test written, as I'm relatively new to Pytest and had already forgetten how to write Pytest tests against a Flask app. If Copilot hadn't written it, then I would have dug up a similar app of mine and adapted those tests.

For my next test, I wrote this function signature and comment:

def test_surveys_create_handler(client):
    # Test the create handler by sending a POST request with form data

Copilot filled in the next line, complete with a fake survey question. That's part of what makes Copilot particularly great for tests, it loves making up fake data. 😆

resp = client.post("/surveys", data={
        "survey_question": "What's your favorite color?",
        "survey_topic": "colors",
        "survey_options": "red\nblue\nyellow"})

For the rest of the tests, my general approach was to write a function signature, write comments for the stages of the test, and let Copilot fill in the rest. You can see many of those comments still, in my test_routes.py file. The only place it flailed was properly setting a cookie in Flask, so that was something I had to research myself. At some point, I refactored the common app.test_client() into a test fixture, since so many tests used it. Copilot may not always be the DRYest! 💦

Reflections

I like Copilot because it really is like a pair programmer, except without the feeling of being watched (which is uncomfortable for me, personally). There's also no judgment. I sometimes will correct a Copilot suggestion, run the tests, and then realize Copilot was actually right. I'm more amused than embarrassed when that happens, since I know Copilot really doesn't care at all.

I also don't feel like Copilot has copied the code of any particular developer out there, in the suggestions that it gave me. What I saw instead is a model that has seen a lot of similar code, and also has seen the code inside my project folder, and it's able to match those patterns together. The suggestions felt like the results of a StackOverflow search, but quicker and personalized.

I think it's interesting that using Copilot really encourages the writing of comments, and I wonder if this will lead to a future where code is more commented, because people leave in the comments they used to prompt the suggestions. I often strip mine out before committing, but not always. I also wonder if comments-first code writing will generally lead to people coding faster, because we will first think through our ideas in an abstracted sense (using English) and then implement them with syntactic constraints (code). I suspect that coding is actually easier when we describe it in our natural language first.

Those are my musings. I'd love to hear about your experimentation and how you think it will affect the future of coding.