The Azure SDK team recently asked if I could create a sample using Flask to stream ChatGPT completions to the browser over SSE. I said, "sure, but what's SSE?" As I've now discovered, server-sent events (SSE) are a technology that has been supported in modern browsers for a few years, and they're a great way for a server to stream a long response to a client. They're similar to websockets, but the streaming only happens in one direction. SSE is a good fit for ChatGPT responses since they can come in chunk-by-chunk, and displaying that way in a web UI makes for a more chat-like experience.
You can check out the repo here:
https://github.com/Azure-Samples/chatgpt-quickstart
Let's break it down.
Overall architecture
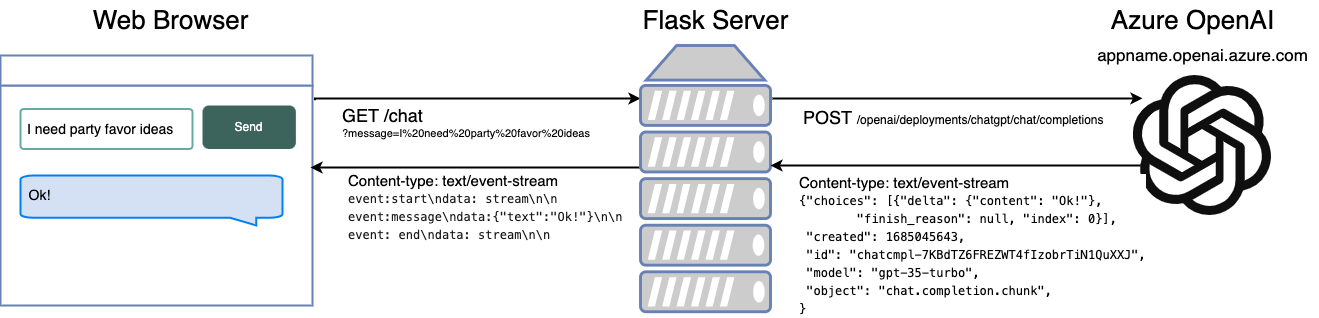
When a user submits a message from the webpage, the browser uses EventSource to connect to the /chat endpoint, sending the message in the query parameters. The Flask server receives the request, then requests the ChatGPT SDK to respond with a stream. The SDK opens a network connection to the deployed ChatGPT model on Azure, and whenever it receives another chunk, it sends it back as JSON. The Flask app extracts the text from that chunk and streams it to the client. Whenever the browser receives a new server-sent event, it appends it to the current message.
The client-side JavaScript code
For the client-side code, I considered using HTMX with the SSE extension but I decided to use the built-in EventSource object for maximal flexibility.
Whenever the form is submitted, I create a new message DIV and set up a new EventSource instance.
That instance listens to three events: the standard "message" event, and two custom events of my own invention, "start" and "end". I added the start event so that I could know when to clear a loading indicator from the message area, and I added the end event so that I could close the stream.
eventSource = new EventSource(`/chat?message=${message}`);
eventSource.addEventListener("start", function(e) {
  messageDiv.innerHTML = "";
});
eventSource.addEventListener("message", function(e) {
  const message = JSON.parse(e.data);
  messageDiv.innerHTML += message.text.replace("\n", "<br/>");
  messageDiv.scrollIntoView();
});
eventSource.addEventListener('end', function(e) {
  eventSource.close();
});
See the full code in index.html
The Flask server Python code
In the Flask server code, I did a few key things differently in order to send back server-sent events:
- The response object is a Python generator, a type of function that can continually yield new values. That is natively supported by Flask as the way to stream data.
- The call to the OpenAI SDK specifies
stream=Trueand then uses an iterator on the SDK's response. - The response content-type is "text/event-stream".
@bp.get("/chat")
def chat_handler():
    request_message = request.args.get("message")

    @stream_with_context
    def response_stream():
        response = openai.ChatCompletion.create(
            engine=os.getenv("AZURE_OPENAI_CHATGPT_DEPLOYMENT", "chatgpt"),
            messages=[
                {"role": "system", "content": "You are a helpful assistant."},
                {"role": "user", "content": request_message},
            ],
            stream=True,
        )
        for event in response:
            current_app.logger.info(event)
            if event["choices"][0]["delta"].get("role") == "assistant":
                yield "event:start\ndata: stream\n\n"
            if event["choices"][0]["delta"].get("content") is not None:
                response_message = event["choices"][0]["delta"]["content"]
                json_data = json.dumps({"text": response_message})
                yield f"event:message\ndata: {json_data}\n\n"
        yield "event: end\ndata: stream\n\n"

    return Response(response_stream(), mimetype="text/event-stream")
It's also worth pointing out that the generator is wrapped with the stream_with_context decorator. I added that so that the code inside the generator could access current_app for logging purposes.
See full code in chat.py
Taking it further
This is intentionally a very minimal example, since the goal is to just get developers up and running with a ChatGPT deployment. There are a lot of ways this could be improved:
- POST vs. GET: I used a single HTTP GET request to both send the message and receive the response. An alternative approach is to use an HTTP POST to send the message, use a session to associate the message with the ChatGPT response, and open a GET request to a /response endpoint for with that session.
- Message history: This app only sends the most recent message, but ChatGPT can often give better answers if it remembers previous messages. You could use sessions on the server side or local storage on the browser side to remember the last few messages. That does have budget implications (more tokens == more $$) but could provide a better user experience.
- Message formatting: I've seen some ChatGPT samples that apply Markdown formatting to the message. You could bring in a library to do the Markdown -> HTML transformation in the client. It'd be interesting to see how that works in combination with server-sent events.
No comments:
Post a Comment