Friday, January 13, 2023

Tips for writing Bicep files for Azure deployment

In the last few months, I've gotten very into the world of deploying apps to Azure using Bicep files, and I probably spend more time writing Bicep than Python lately. Bicep is a declarative language for describing the Azure resources that should be provisioned. It's similar to Terraform, but is specific to Azure.

I love the end result of Bicep: a highly replicable deploy to multiple interdependent resources with custom configurations. However, the journey isn't always so fun, since it's often not clear how to write Bicep to achieve the desired result. I'm writing up my tips for Bicep file writing to help others. Let me know if you have any to add!


Install the Bicep extension

I use VS Code when writing Bicep files (since I use VS Code for nearly everything these days), and it fortunately has a Bicep extension. The extension will add syntax highlighting to your files, point out in real-time when something isn't correct, and it even includes a snippet feature (which I haven't used personally).
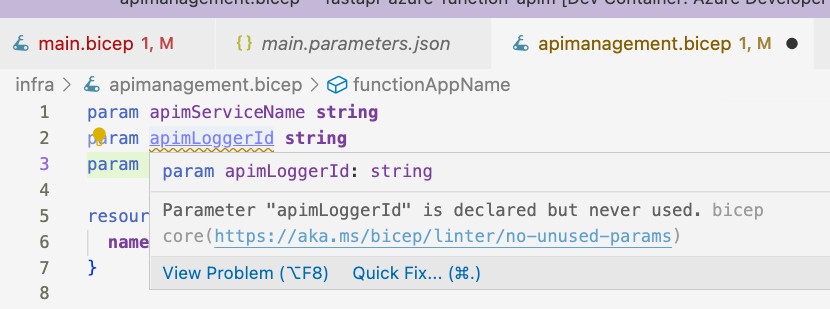
Screenshot of Bicep extension erroring on dead code

Open the Bicep reference

I don't recommend the Bicep reference for leisure reading, but it's always good to check the authoritative source. I typically find the right page by searching the web for a specific resource, like "Azure Bicep reference Key Vault" or if I know it, referencing the namespace "Azure Bicep reference Microsoft.Web/sites", which brings me to this page. Each reference page has an example with all the properties, then descriptions for each property, and at the very botton, a bunch of examples available in both ARM/Bicep.


Find related samples

My general approach for programming is to find something that's as close as possible to what I want to do, and then tweak it from there. My favorite source for samples is the AZD Templates Gallery, since you can filter by language, framework, or Azure resource. Use the AND/OR toggle in the top right to change how the filtering works. Once you find an appropriate sample, find the infra folder in the Github repo and see how it's written. Another source of samples is the Bicep reference, as I just mentioned.


Search Github for examples

If I still can't find a sample that shows what I'm looking for, I turn to Github code search. There's a fancy new code search in beta now, but the old code search is good enough for our purposes. I typically search for either a resource namespace or a particular configuration property name, and then I add on either "lang:bicep" or "path:bicep". The "lang" searches for files tagged as the Bicep language, while path searches for files that contain bicep in the path. Probably "lang:bicep" is the more proper filter to use. So my full search might be "Microsoft.Web/sites lang:bicep" or "appCommandLine lang:bicep". Keep in mind that you may find samples using deprecated settings, but you can cross-check with the reference to make sure they're modern.
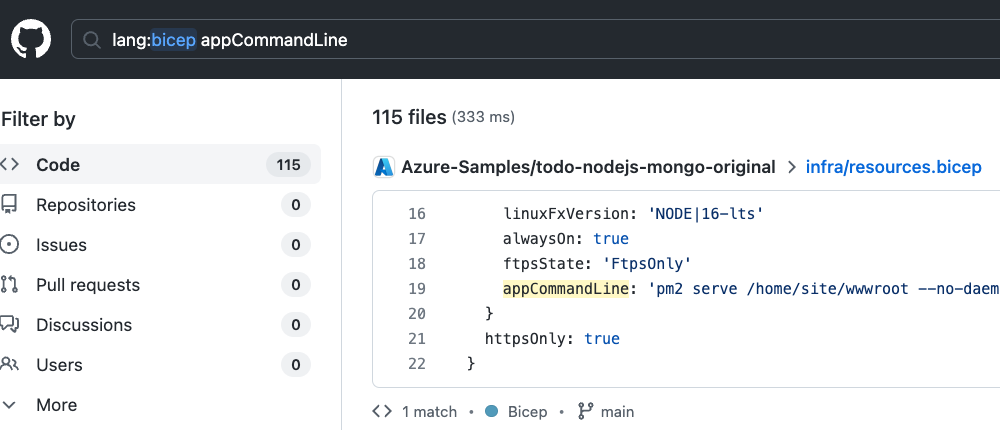
Screenshot of Github code search for lang:bicep

Generate with NubesGen

NubesGen is a tool built by some of my Cloud Advocacy teammates. You tick a few boxes describing the app you're trying to make, and NubesGen will create the configuration files for you. It doesn't include every Azure resource ever, but it does include the most commonly used services. Since it's open source, so you can file requests or submit pull requests to add more options. You can also browse out its Bicep templates to see how it builds out the final Bicep files.


Create the resource manually

Sometimes I'm trying to Bicep-ify an app I've already deployed another way, like via the VS Code extension or AZ CLI commands. In that case, I open the existing resources in the Azure Portal and either:

  • Select "JSON view" from a specific resource's Overview page, and search through that JSON for the setting I'm interested in.
  • Use "Export template" on either the entire resource group or a particular resource, which downloads an ARM JSON file. I can search through that JSON or decompile it into a Bicep. This is often my last resort, because exporting the ARM for an entire resource group takes a decent amount of time and often creates a bunch of unnecessary ARM cruft. It is not the minimal configuration needed to create that resource (more like the maximal!). It's a good tool to have in the toolbox though, just in case.

I will also often create a single resource from scratch in the Azure Portal, like a PostgreSQL server, just so I can see the default configuration. That way, I know what I actually need to override in my own Bicep file, and what I can leave out, if I'm happy with the default value.

Ask the mailing list

If you are a Microsoft employee, there's an "ARM-Bicep Deployment Experts" mailing list which fields lots of questions each week. You can sort through the archives or ask your question if it's never been asked. If you're not a MS employee, then you can post on StackOverflow and add the azure-bicep tag.

Wednesday, January 4, 2023

Tips for debugging Django deployments to Azure App Service

I've been working on deploying various Django apps to Azure App Service this week and have run into a few issues since I'm customizing the app configuration quite a bit. Both as a reminder for myself and a resource for others, I figured I'd write up my tips for debugging Django app deployments and App Service.

After you finish deploying, first visit the app URL to see if it loads. If it does, amazing! If it doesn't, here are steps you can take to figure out what went wrong.

Check the deployment logs

Select Deployment Center from the side navigation menu, then select Logs. You should see a timestamped list of recent deploys:

Check whether the status of the most recent deploy is "Success (Active)" or "Failed". If it's success, the deployment logs might still reveal issues, and if it's failed, the logs should certainly reveal the issue.

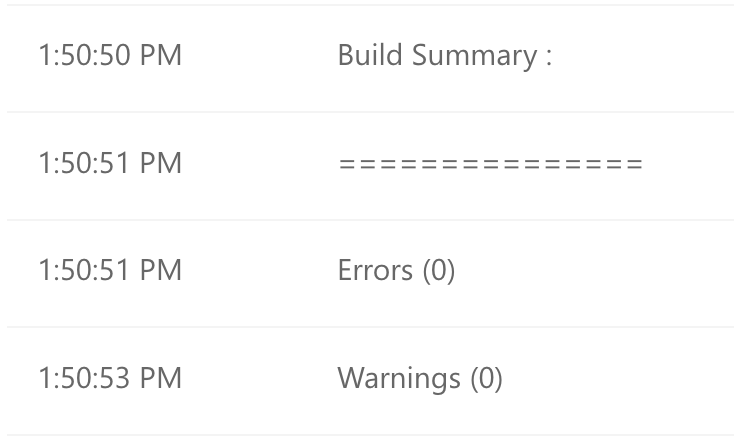
Click the commit ID to open the logs for the most recent deploy. First scroll down to see if any errors or warnings are reported at the end. This is what you'll hopefully see if all went well:

Now scroll back up to find the timestamp with the label "Running oryx build". Oryx is the open source tool that builds apps for App Service, Functions, and other platforms, across all the supported MS languages. Click the Show logs link next to that label. That will pop open detailed logs at the bottom. Scroll down.

Here's what a successful Oryx build looks like for a Django application:


Command: oryx build /tmp/zipdeploy/extracted -o /home/site/wwwroot --platform python --platform-version 3.10 -p virtualenv_name=antenv --log-file /tmp/build-debug.log  -i /tmp/8dad4af021551b0 --compress-destination-dir | tee /tmp/oryx-build.log
Operation performed by Microsoft Oryx, https://github.com/Microsoft/Oryx
You can report issues at https://github.com/Microsoft/Oryx/issues

Oryx Version: 0.2.20220825.1, Commit: 24032445dbf7bf6ef068688f1b123a7144453b7f, ReleaseTagName: 20220825.1

Build Operation ID: |BrSlkWT7Cgo=.afae917a_
Repository Commit : 0aed8982-e84a-4573-9ed8-82d46e9056c4

Detecting platforms...
Detected following platforms:
  python: 3.10.8

Using intermediate directory '/tmp/8dad4af021551b0'.

Copying files to the intermediate directory...
Done in 0 sec(s).

Source directory     : /tmp/8dad4af021551b0
Destination directory: /home/site/wwwroot

Python Version: /tmp/oryx/platforms/python/3.10.8/bin/python3.10
Creating directory for command manifest file if it does not exist
Removing existing manifest file
Python Virtual Environment: antenv
Creating virtual environment...
Activating virtual environment...
Running pip install...
[21:49:24+0000] Collecting Django==4.1.1
[21:49:24+0000]   Using cached Django-4.1.1-py3-none-any.whl (8.1 MB)
[21:49:25+0000] Collecting psycopg2
[21:49:25+0000]   Using cached psycopg2-2.9.5-cp310-cp310-linux_x86_64.whl
[21:49:25+0000] Collecting python-dotenv
[21:49:25+0000]   Using cached python_dotenv-0.21.0-py3-none-any.whl (18 kB)
[21:49:25+0000] Collecting whitenoise[brotli]
[21:49:25+0000]   Using cached whitenoise-6.2.0-py3-none-any.whl (19 kB)
[21:49:25+0000] Collecting asgiref<4,>=3.5.2
[21:49:26+0000]   Using cached asgiref-3.5.2-py3-none-any.whl (22 kB)
[21:49:26+0000] Collecting sqlparse>=0.2.2
[21:49:26+0000]   Using cached sqlparse-0.4.3-py3-none-any.whl (42 kB)
[21:49:26+0000] Collecting Brotli
[21:49:26+0000]   Using cached Brotli-1.0.9-cp310-cp310-manylinux_2_5_x86_64.manylinux1_x86_64.manylinux_2_12_x86_64.manylinux2010_x86_64.whl (2.7 MB)
[21:49:27+0000] Installing collected packages: Brotli, whitenoise, sqlparse, python-dotenv, psycopg2, asgiref, Django
[21:49:38+0000] Successfully installed Brotli-1.0.9 Django-4.1.1 asgiref-3.5.2 psycopg2-2.9.5 python-dotenv-0.21.0 sqlparse-0.4.3 whitenoise-6.2.0

[notice] A new release of pip available: 22.2.2 -> 22.3.1
[notice] To update, run: pip install --upgrade pip

Content in source directory is a Django app
Running collectstatic...

132 static files copied to '/tmp/8dad4af021551b0/staticfiles', 643 post-processed.
Done in 21 sec(s).
Not a vso image, so not writing build commands
Preparing output...

Copying files to destination directory '/tmp/_preCompressedDestinationDir'...
Done in 22 sec(s).
Compressing content of directory '/tmp/_preCompressedDestinationDir'...
Copied the compressed output to '/home/site/wwwroot'

Removing existing manifest file
Creating a manifest file...
Manifest file created.
Copying .ostype to manifest output directory.

Done in 103 sec(s).

Look for these important steps in the Oryx build:

  • Detected following platforms: python: 3.10.8
    That should match your runtime in the App Service configuration.
  • Running pip install...
    That should install all the requirements in your requirements.txt - if it didn't find your requirements.txt, then you won't see the packages installed.
  • Content in source directory is a Django app
    This message means that Oryx detected your app is a Django app, based on the presence of Django in requirements.txt, and will now run the next step.
  • Running collectstatic... This step is running `manage.py collectstatic`, a necessary step for most Django apps. It can be disabled via the DISABLE_COLLECTSTATIC environment variable if desired.

If you see all those steps in the Oryx build, then that's a good sign that the build went well, and you can move on to checking the App Service logs.

Check the log stream

Under the Monitoring section of the side nav, select Log stream. Scroll to the timestamp corresponding to your most recent deploy.

The logs should start with pulling Docker images:

Here are the full logs for a Django app successfully starting in an App Service container:


2023-01-04T18:20:46.723Z INFO  - 3.10_20221128.12.tuxprod Pulling from appsvc/python
2023-01-04T18:20:46.731Z INFO  -  Digest: sha256:03576ed3edbc1bd69db8826f2cb5bbbdcfd483da4dab4f51f5050972491afef3
2023-01-04T18:20:46.733Z INFO  -  Status: Image is up to date for mcr.microsoft.com/appsvc/python:3.10_20221128.12.tuxprod
2023-01-04T18:20:46.760Z INFO  - Pull Image successful, Time taken: 0 Minutes and 0 Seconds
2023-01-04T18:20:47.273Z INFO  - Starting container for site
2023-01-04T18:20:47.285Z INFO  - docker run -d --expose=8000 --name djangocc-vssonnwxjqvw2-app-service_2_4555c318 -e WEBSITE_SITE_NAME=djangocc-vssonnwxjqvw2-app-service -e WEBSITE_AUTH_ENABLED=False -e PORT=8000 -e WEBSITE_ROLE_INSTANCE_ID=0 -e WEBSITE_HOSTNAME=djangocc-vssonnwxjqvw2-app-service.azurewebsites.net -e WEBSITE_INSTANCE_ID=37c77572be775c3da9e718e75bdd3dcd6c69246656e6f77972070ce4bfef6455 -e HTTP_LOGGING_ENABLED=1 -e WEBSITE_USE_DIAGNOSTIC_SERVER=True appsvc/python:3.10_20221128.12.tuxprod python manage.py migrate && gunicorn --workers 2 --threads 4 --timeout 60 --access-logfile '-' --error-logfile '-' --bind=0.0.0.0:8000 --chdir=/home/site/wwwroot config.wsgi
2023-01-04T18:21:01.494Z INFO  - Initiating warmup request to container djangocc-vssonnwxjqvw2-app-service_2_4555c318_msiProxy for site djangocc-vssonnwxjqvw2-app-service
2023-01-04T18:21:01.524Z INFO  - Container djangocc-vssonnwxjqvw2-app-service_2_4555c318_msiProxy for site djangocc-vssonnwxjqvw2-app-service initialized successfully and is ready to serve requests.
2023-01-04T18:21:01.531Z INFO  - Initiating warmup request to container djangocc-vssonnwxjqvw2-app-service_2_4555c318 for site djangocc-vssonnwxjqvw2-app-service
2023-01-04T18:21:17.476Z INFO  - Waiting for response to warmup request for container djangocc-vssonnwxjqvw2-app-service_2_4555c318. Elapsed time = 16.0211255 sec
2023-01-04T18:21:33.263Z INFO  - Waiting for response to warmup request for container djangocc-vssonnwxjqvw2-app-service_2_4555c318. Elapsed time = 31.8082536 sec
2023-01-04T18:21:37.548Z INFO  - Container djangocc-vssonnwxjqvw2-app-service_2_4555c318 for site djangocc-vssonnwxjqvw2-app-service initialized successfully and is ready to serve requests.
2023-01-04T18:21:00.181237975Z    _____
2023-01-04T18:21:00.181266077Z   /  _  \ __________ _________   ____
2023-01-04T18:21:00.181271277Z  /  /_\  \\___   /  |  \_  __ \_/ __ \
2023-01-04T18:21:00.181274977Z /    |    \/    /|  |  /|  | \/\  ___/
2023-01-04T18:21:00.181278277Z \____|__  /_____ \____/ |__|    \___  >
2023-01-04T18:21:00.181281678Z         \/      \/                  \/
2023-01-04T18:21:00.181284978Z A P P   S E R V I C E   O N   L I N U X
2023-01-04T18:21:00.181288278Z
2023-01-04T18:21:00.181291278Z Documentation: http://aka.ms/webapp-linux
2023-01-04T18:21:00.181294478Z Python 3.10.4
2023-01-04T18:21:00.181297678Z Note: Any data outside '/home' is not persisted
2023-01-04T18:21:01.465437465Z Starting OpenBSD Secure Shell server: sshd.
2023-01-04T18:21:01.683907061Z Site's appCommandLine: python manage.py migrate && gunicorn --workers 2 --threads 4 --timeout 60 --access-logfile '-' --error-logfile '-' --bind=0.0.0.0:8000 --chdir=/home/site/wwwroot config.wsgi
2023-01-04T18:21:02.113255325Z Starting periodic command scheduler: cron.
2023-01-04T18:21:02.115641859Z Launching oryx with: create-script -appPath /home/site/wwwroot -output /opt/startup/startup.sh -virtualEnvName antenv -defaultApp /opt/defaultsite -userStartupCommand 'python manage.py migrate && gunicorn --workers 2 --threads 4 --timeout 60 --access-logfile '-' --error-logfile '-' --bind=0.0.0.0:8000 --chdir=/home/site/wwwroot config.wsgi'
2023-01-04T18:21:02.513265532Z Found build manifest file at '/home/site/wwwroot/oryx-manifest.toml'. Deserializing it...
2023-01-04T18:21:02.518158007Z Build Operation ID: |83xYwqpdGr0=.fe7a9527_
2023-01-04T18:21:02.519884905Z Oryx Version: 0.2.20220825.1, Commit: 24032445dbf7bf6ef068688f1b123a7144453b7f, ReleaseTagName: 20220825.1
2023-01-04T18:21:02.520450236Z Output is compressed. Extracting it...
2023-01-04T18:21:02.533109549Z Extracting '/home/site/wwwroot/output.tar.gz' to directory '/tmp/8daee7f6ddb01b5'...
2023-01-04T18:21:22.545602410Z App path is set to '/tmp/8daee7f6ddb01b5'
2023-01-04T18:21:22.611376378Z Writing output script to '/opt/startup/startup.sh'
2023-01-04T18:21:24.124335826Z Using packages from virtual environment antenv located at /tmp/8daee7f6ddb01b5/antenv.
2023-01-04T18:21:24.125478895Z Updated PYTHONPATH to '/opt/startup/app_logs:/tmp/8daee7f6ddb01b5/antenv/lib/python3.10/site-packages'
2023-01-04T18:21:31.321664095Z Operations to perform:
2023-01-04T18:21:31.321750300Z   Apply all migrations: account, admin, auth, contenttypes, sessions, sites, socialaccount, users
2023-01-04T18:21:31.321758001Z Running migrations:
2023-01-04T18:21:31.321762401Z   No migrations to apply.
2023-01-04T18:21:33.977904663Z [2023-01-04 18:21:33 +0000] [80] [INFO] Starting gunicorn 20.1.0
2023-01-04T18:21:33.986985797Z [2023-01-04 18:21:33 +0000] [80] [INFO] Listening at: http://0.0.0.0:8000 (80)
2023-01-04T18:21:33.987019399Z [2023-01-04 18:21:33 +0000] [80] [INFO] Using worker: gthread
2023-01-04T18:21:34.016193616Z [2023-01-04 18:21:34 +0000] [81] [INFO] Booting worker with pid: 81
2023-01-04T18:21:34.093535167Z [2023-01-04 18:21:34 +0000] [82] [INFO] Booting worker with pid: 82
2023-01-04T18:30:36.727907506Z djangocc-vssonnwxjqvw2-app-service : [200ef84a-9498-4d8b-8023-11edbfe8251f] Incoming request on /healthcheck?api-version=2021-08-01
2023-01-04T18:30:36.740159926Z djangocc-vssonnwxjqvw2-app-service : [200ef84a-9498-4d8b-8023-11edbfe8251f] Request to TokenService: Endpoint 169.254.129.14:8081, Port 8081, Path /healthcheck, Query ?api-version=2021-08-01, Method GET, UserAgent HealthCheck/1.0
2023-01-04T18:30:37.201139217Z djangocc-vssonnwxjqvw2-app-service : [200ef84a-9498-4d8b-8023-11edbfe8251f] Returning response for Site , Endpoint 169.254.129.14:8081, Port 8081, Path /healthcheck, Method GET, Result = 200

A few notable logs:

  • 2023-01-04T18:21:01.683907061Z Site's appCommandLine: python manage.py migrate && gunicorn --workers 2 --threads 4 --timeout 60 --access-logfile '-' --error-logfile '-' --bind=0.0.0.0:8000 --chdir=/home/site/wwwroot config.wsgi
    This log shows up because my app overrides the app's startup command (`appCommandLine` in a Bicep file). If your app doesn't override the startup command, then Oryx will generate a startup script for you that calls `gunicorn` to start the server. The default startup script does not call manage.py migrate, so that's why my app overrides it.
  • 2023-01-04T18:21:31.321758001Z Running migrations:
    That proves that the container did indeed all `manage.py migrate` from my custom startup script.
  • 2023-01-04T18:21:33.977904663Z [2023-01-04 18:21:33 +0000] [80] [INFO] Starting gunicorn 20.1.0
    That's the start of the gunicorn server serving the Django app. After it starts, the logs should show HTTP requests.

If you aren't seeing the full logs, it's possible that your deploy happened too long ago and the portal has deleted some logs. In that case, open the Log stream and do another deploy, and you should see the full logs.

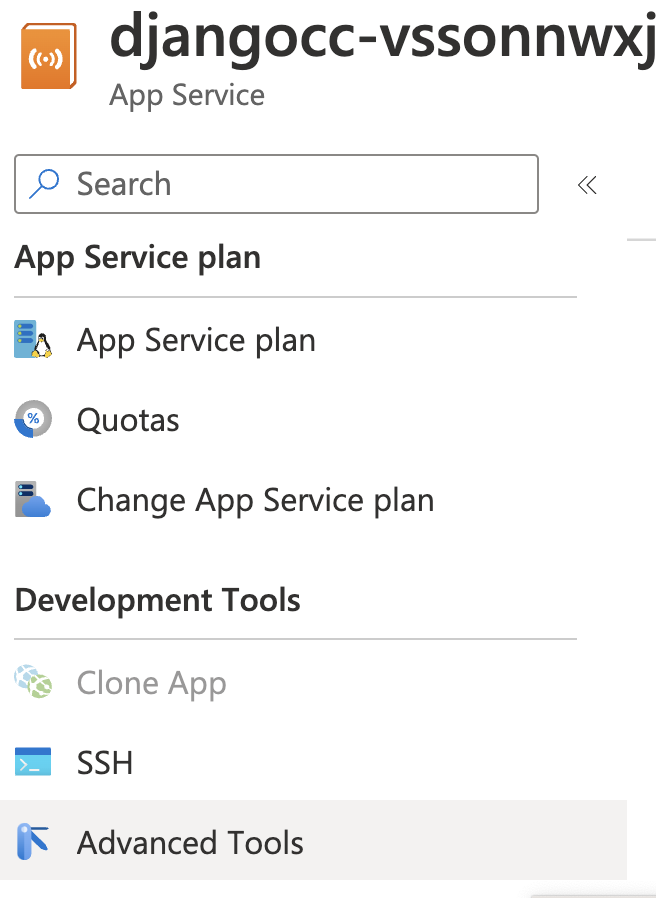
Alternatively, you can download the full logs from the Kudu interface. Select Advanced Tools from the side nav:

Screenshot of Azure Portal side nav with Advanced Tools selected

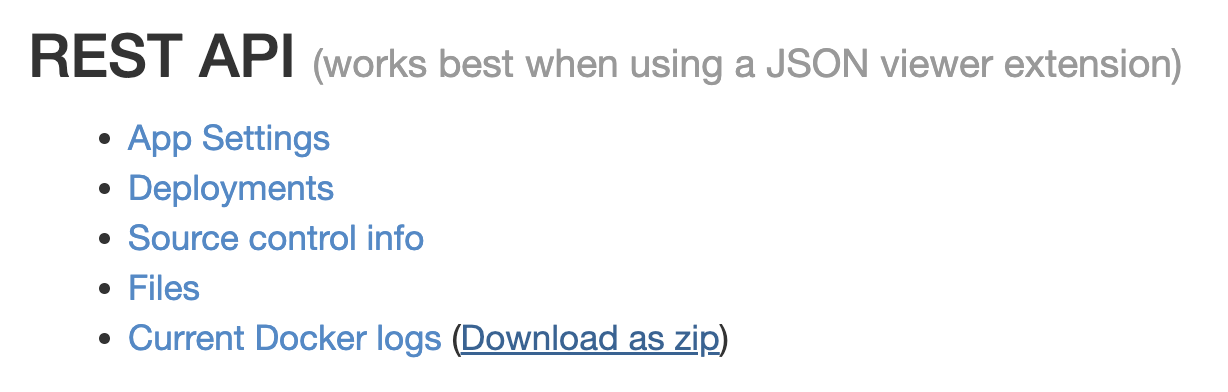
When the Kudu website loads, find the Current Docker Logs link and select Download as zip next to it:

Screenshot of website list of links

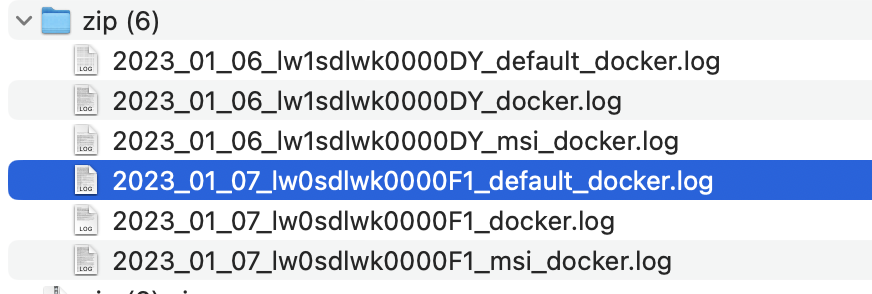
In the downloaded zip file, find the filename that starts with the most recent date and ends with "_default_docker.log":

Screenshot of extracted zip folder with files

Open that file to see the full logs, with the most recent logs at the bottom.

Tuesday, November 22, 2022

FastAPI on Azure Functions with Azure API Management

My very first job was on the Google Maps API, which was the world's most popular API at the time. We were still figuring out what made up a good API at the time, so we experimented with things like API keys, versioning, and auto-generated docs. We even created Google's first API quota system for rate-limiting keys, which was later used by all of Google's APIs. A lot of work went into creating a fully featured API!

That's why I love services like Azure API Management, since it makes it possible for any developer to create a fully featured API. (Other clouds have similar features, like AWS API Gateway and Google API Gateway). You can choose whether your API requires keys, then add API policies like rate-limiting, IP blocking, caching, and many more. At the non-free tier, you can also create a developer portal to receive API sign-ups.

That's also why I love the FastAPI framework, as it takes care of auto-generated interactive documentation and parameter validation.

I finally figured out how to combine the two together, along with Azure Functions as the backend, and that's what I want to dive into today.

This diagram shows the overall architecture:

Diagram of Azure API Management + Azure Functions + FastAPI architecture

Public vs Protected URLs

One of my goals was to have the documentation be publicly viewable (with no key) but the FastAPI API calls themselves require a subscription key. That split was the trickiest part of this whole architecture, and it started at the API Management level.

The API Management service consists of two "APIs" (as it calls them):

  • "simple-fastapi-api": This API is configured with subscriptionRequired: true and path: 'api'. All calls that come into the service prefixed with "api/" will get handled by this API.
  • "public-docs" This API isn't really an API, it's the gateway to the documentation and OpenAPI schema. It's configured with subscriptionRequired: false and path: 'public'.

The API Gateway uses the path prefixes to figure out how to handle the calls, but then it calls the API backend with whatever comes after the path.

This API Gateway URL calls this FastAPI URL:
"/api/generate_name" "/generate_name"
"/public/openapi.json" "/openapi.json"
"/public/docs" "/docs"

But that leads to a dreaded problem that you'll find all over the FastAPI issue tracker: when loading the docs page, FastAPI tries to load "/openapi.json" when it really needs to load "/public/openapi.json".

Fortunately, we can improve that by specifying root_path in the FastAPI constructor:

app = fastapi.FastAPI(root_path="/public")

Now, the docs will load successfully, but they'll claim the API calls are located at "/public/..." when they should be at "/api/...". That's fixed by another change to the FastAPI constructor, the addition of servers and root_path_in_servers:

app = fastapi.FastAPI(
        root_path="/public",
        servers=[{"url": "/api", "description": "API"}],
        root_path_in_servers=False,
      )

The servers option changes the OpenAPI schema so that all API calls are prefixed with "/api", whereas root_path_in_servers removes "/public" as a possible prefix for API calls. If that argument wasn't there, the FastAPI docs would present a dropdown with both "/api" and "/public" as options.

Since I only need this configuration when the API is running in production behind the API Management service, I setup my FastAPI app conditionally based on the current environment:

if os.getenv("FUNCTIONS_WORKER_RUNTIME"):
        app = fastapi.FastAPI(
            servers=[{"url": "/api", "description": "API"}],
            root_path="/public",
            root_path_in_servers=False,
        )
    else:
        app = fastapi.FastAPI()

It would probably also be possible to run some sort of local proxy that would mimic the API Management service, though I don't believe Azure offers an official local APIM emulator.


Securing the function

My next goal was to be able to do all of this with a secured Azure function, i.e. a function with an authLevel: 'function'. A secured function requires a "x-functions-key" header to be sent on every request, and for the value to be one of the key values in the function configuration.

Fortunately, API management makes it easy to always send a particular header along to an API's backend. Both of the APIs shared the same function backend, which I configured in Bicep like this:

resource apimBackend 'Microsoft.ApiManagement/service/backends@2021-12-01-preview' = {
  parent: apimService
  name: functionApp.name
  properties: {
    description: functionApp.name
    url: 'https://${functionApp.properties.hostNames[0]}'
    protocol: 'http'
    resourceId: '${environment().resourceManager}${functionApp.id}'
    credentials: {
      header: {
        'x-functions-key': [
          '{{function-app-key}}'
        ]
      }
    }
  }
}

But where does {{function-app-key}} come from? It refers to a "Named Value", a feature of API Management, which I configured like so:


resource apimNamedValuesKey 'Microsoft.ApiManagement/service/namedValues@2021-12-01-preview' = {
  parent: apimService
  name: 'function-app-key'
  properties: {
    displayName: 'function-app-key'
    value: listKeys('${functionApp.id}/host/default', '2019-08-01').functionKeys.default
    tags: ['key' 'function' 'auto']
    secret: true
  }
}

I could have also set it directly in the backend, but it's nice to make it a named value so that we can denote it as a value that should be kept secret.

The final step is to connect the APIs to the backend. Every API has a policy document written in XML (I know, old school!) One of the possible policies is set-backend-service which can be set to an Azure resource ID. I add the policy XML to both the APIs:

<set-backend-service id="apim-generated-policy" backend-id="${functionApp.name}" />

And that does it! See all the Bicep for the API Management in apimanagement.bicep.


All together now

The two trickiest parts were the API/docs distinction and passing on the function key, but there were a few other interesting aspects as well, like testing all the code (100% coverage!) and setting up the project to work with the Azure Developer CLI.

Here's a breakdown of the API code:

  • __init__.py: Called by Azure Functions, defines a main function that uses ASGIMiddleware to call the FastAPI app.
  • fastapi_app.py: Defines a function that returns a FastAPI app. I used a function for better testability.
  • fastapi_routes.py: Defines a function to handle an API call and uses fastapi.APIRouter to attach it to the "generate_name" route.
  • test_azurefunction.py: Uses Pytest to mock the Azure Functions context, mock environment variables, and check all the routes respond as expected.
  • test_fastapi.py: Uses Pytest to check the FastAPI API calls.
  • functions.json: Configuration for Azure Functions, declares that this function responds to an HTTP trigger and has a wildcard route.
  • local.settings.json: Used by the local Azure Functions emulator to determine the function runtime.

There's also a lot of interesting components in the Bicep files.

I hope that helps anyone else who's trying to deploy FastAPI to this sort of architecture. Let me know if you come up with a different approach or have any questions!

Friday, November 18, 2022

Running PostgreSQL in a Dev Container with Flask/Django

Not familiar with Dev Containers? Read my first post about Dev Containers.

I recently added Dev Container support to a Flask+PostgreSQL sample and a Django+PostgreSQL sample. I really wanted to be able to run PostgreSQL entirely inside the Dev Container, since 1) I've had a hard time trying to setup PostgreSQL on my laptop in the past, and 2) I'd like to access the database when running the Dev Container inside Github Codespaces on the web. Fortunately, thanks to some Docker magic, I figured it out! 🐳

The first step is to create a docker-compose.yml file inside the .devcontainer folder:

version: "3"

services:
  app:
    build:
      context: ..
      dockerfile: .devcontainer/Dockerfile
      args:
        VARIANT: 3.9
        USER_UID: 1000
        USER_GID: 1000

    volumes:
      - ..:/workspace:cached

    # Overrides default so things don't shut down after the process ends
    command: sleep infinity

    # Runs app on the same network as the database container,
    # allows "forwardPorts" in devcontainer.json function
    network_mode: service:db

  db:
    image: postgres:latest
    restart: unless-stopped
    volumes:
      - postgres-data:/var/lib/postgresql/data
    environment:
      POSTGRES_USER: app_user
      POSTGRES_DB: app
      POSTGRES_PASSWORD: app_password

volumes:
  postgres-data:

That file declares an app service based off a Dockerfile (which we'll see next) as well as a db service based off the official postgres image that stores data in a mounted volume. The db service declares environment variables for the database name, username, and password, which must be used by any app that connects to that database.

The next step is the Dockerfile, also inside the .devcontainer folder:

FROM mcr.microsoft.com/vscode/devcontainers/python:0-3

RUN curl -fsSL https://aka.ms/install-azd.sh | bash

ENV PYTHONUNBUFFERED 1

RUN apt-get update && export DEBIAN_FRONTEND=noninteractive \
    && apt-get -y install --no-install-recommends postgresql-client

This file is particular to the needs of my sample, so it builds on a pre-built Python-optimized Dev Container from Microsoft and includes the azd tool. Your own file could start from any Docker image that includes Python. However, you will want the final command in the file that installs a PostgreSQL client.

The final file inside the .devcontainer folder is devcontainer.json, which is the entry point for Github Codespaces and the VS Code Dev Containers extension, and describes all the customizations. Here's a simplified version of mine:

{
    "name": "Python 3 & PostgreSQL",
    "dockerComposeFile": "docker-compose.yml",
    "service": "app",
    "workspaceFolder": "/workspace",
    "forwardPorts": [8000, 5432],
    "extensions": [
        "ms-python.python",
        "mtxr.sqltools",
        "mtxr.sqltools-driver-pg"
    ],
    "settings": {
        "sqltools.connections": [{
            "name": "Container database",
            "driver": "PostgreSQL",
            "previewLimit": 50,
            "server": "localhost",
            "port": 5432,
            "database": "app",
            "username": "app_user",
            "password": "app_password"
        }],
        "python.pythonPath": "/usr/local/bin/python"
    }
}

Let's break that down:

  • dockerComposeFile points at the docker-compose.yml from earlier.
  • service matches the name of the non-postgres service from that file.
  • workspaceFolder matches the location of the volume from that file.
  • forwardPorts instructs the Dev Container to expose port 8000 (for the Django app) and port 5432 (for the PostGres DB).
  • extensions includes a really neat extension, SQLTools, which provides a graphical UI for the database tables and allows you to run queries against the tables.
  • Inside settings, sqltools.connections specifies the same database name, username, and password that was declared in the docker-compose.yml.

The final step is to make sure that the app knows how to access the PostgreSQL database. In my sample apps, the DB details are set via environment variables, so I just use a .env file that looks like this:

DBNAME=app
DBHOST=localhost
DBUSER=app_user
DBPASS=app_password

...And that's it! If you'd like, here's a video where I run a Flask+PostgreSQL Dev Container inside Github Codespaces and also highlight the changes described above:

Check out the sample repos for full code, and let me know if you run into issues enabling a PostgreSQL DB in your own Dev Containers.

Monday, November 7, 2022

Deploying a Django app to Azure with the Azure Developer CLI

Azure recently announced a new developer tool, the Azure Developer CLI, and after using it for the last month, I'm in love. ❤️

AZD makes it really easy to deploy applications that require multiple Azure services (which is most non-trivial applications!). Instead of running multiple commands or visiting multiple places in the Azure portal, I can run a single command and have it take care of everything. The azd commands rely on configuration files written in Bicep that describe all the resources, plus an azure.yaml file that describes what code needs to be deployed to which server. The azd tool also helps with CI/CD pipelines and app monitoring, so it's helpfulness goes beyond just the initial deployment.

The team is working on providing lots of templates that are already "azd-ified" so that you can get started quickly with whatever infrastructure stack you prefer. Since I'm on the Python team, I've been working on templates for the top Python frameworks, Django, Flask, and FastAPI.

My first finished template is for a Django app with PostgreSQL database that gets deployed to Azure App Service with a PostgreSQL flexible server. The App Service app communicates with the server inside a private VNet, to make sure the database can't be easily accessed from the outside.

Check out the sample here:
github.com/pamelafox/msdocs-django-postgresql-sample-app-azd/

The readme has instructions for local development, deployment, monitoring, and pipeline setup. If you run into any issues following the steps, let me know in the project discussions tab. The `azd` tool is still in preview, so this is a great time to get feedback about what is and isn't working.

I also put together this video showing me running azd up on the repo and setting up Django admin:

Monday, October 17, 2022

A template for new Python projects with Dev Container support

I've recently been learning more about Dev Containers, Codespaces, and Github templates, and just put together a project using them all.

A Dev Container is a way to use a Docker container as a development environment. The container can already be initialized with all the necessary environment dependencies, like the right version of Python and the desired development tools, so you can get to work immediately inside the container. As Python developers, we often achieve a similar outcome using virtual environments (venv) but Dev Containers work for any development environment, and can specify more than just the language and package dependencies. A Dev Container can even describe desired settings for the editor.

VS Code has support for Dev Containers via the Dev Containers extension. Github Codespaces is built around the idea of containers, since it's basically a VS Code editor that opens up the Dev Container for the given repository.

Since there was a lot of interest in my post on setting up a Python project, I've made a Dev Container version of my standard Python project setup:

https://github.com/pamelafox/python-project-template

You can open that repository in Codespaces immediately to see what it's like (by clicking the Code dropdown), or you can make a new repository based off that repository (since I've marked it as a template), and start writing your own code inside it.

I personally make a lot of new Python projects lately, since I'm experimenting with so much Python for my job, so I'm looking forward to having a 1-click project setup with all my favorite tools for code quality and testing baked right in. Yay for programmer productivity! 🎉

Wednesday, October 5, 2022

Happy Hacktoberfest!

Every year, DigitalOcean runs an event called Hacktoberfest to encourage more folks to contribute to open source. They've introduced new rules this year to avoid the issues last year of floods of trivial not-helpful pull requests, and they're making sure all projects explicitly opt-in to participate. A lot of open source maintainers are doing it on their own time, and we'd love contributions, but we want the contributions to be in good faith.

Here are the projects and repositories that I've opted into Hacktoberfest this year:

For each of those repositories, I've tried to make sure there are at least a few issues in the issue tracker for people looking for ideas. I also welcome your own ideas too! As long as they're unit-tested, of course. 😄

Check out this blog post from my colleague to see what Python repositories we've opted in from the Microsoft organization, like the picologging library I've been hacking on lately.