Tuesday, November 22, 2022

FastAPI on Azure Functions with Azure API Management

My very first job was on the Google Maps API, which was the world's most popular API at the time. We were still figuring out what made up a good API at the time, so we experimented with things like API keys, versioning, and auto-generated docs. We even created Google's first API quota system for rate-limiting keys, which was later used by all of Google's APIs. A lot of work went into creating a fully featured API!

That's why I love services like Azure API Management, since it makes it possible for any developer to create a fully featured API. (Other clouds have similar features, like AWS API Gateway and Google API Gateway). You can choose whether your API requires keys, then add API policies like rate-limiting, IP blocking, caching, and many more. At the non-free tier, you can also create a developer portal to receive API sign-ups.

That's also why I love the FastAPI framework, as it takes care of auto-generated interactive documentation and parameter validation.

I finally figured out how to combine the two together, along with Azure Functions as the backend, and that's what I want to dive into today.

This diagram shows the overall architecture:

Diagram of Azure API Management + Azure Functions + FastAPI architecture

Public vs Protected URLs

One of my goals was to have the documentation be publicly viewable (with no key) but the FastAPI API calls themselves require a subscription key. That split was the trickiest part of this whole architecture, and it started at the API Management level.

The API Management service consists of two "APIs" (as it calls them):

  • "simple-fastapi-api": This API is configured with subscriptionRequired: true and path: 'api'. All calls that come into the service prefixed with "api/" will get handled by this API.
  • "public-docs" This API isn't really an API, it's the gateway to the documentation and OpenAPI schema. It's configured with subscriptionRequired: false and path: 'public'.

The API Gateway uses the path prefixes to figure out how to handle the calls, but then it calls the API backend with whatever comes after the path.

This API Gateway URL calls this FastAPI URL:
"/api/generate_name" "/generate_name"
"/public/openapi.json" "/openapi.json"
"/public/docs" "/docs"

But that leads to a dreaded problem that you'll find all over the FastAPI issue tracker: when loading the docs page, FastAPI tries to load "/openapi.json" when it really needs to load "/public/openapi.json".

Fortunately, we can improve that by specifying root_path in the FastAPI constructor:

app = fastapi.FastAPI(root_path="/public")

Now, the docs will load successfully, but they'll claim the API calls are located at "/public/..." when they should be at "/api/...". That's fixed by another change to the FastAPI constructor, the addition of servers and root_path_in_servers:

app = fastapi.FastAPI(
        root_path="/public",
        servers=[{"url": "/api", "description": "API"}],
        root_path_in_servers=False,
      )

The servers option changes the OpenAPI schema so that all API calls are prefixed with "/api", whereas root_path_in_servers removes "/public" as a possible prefix for API calls. If that argument wasn't there, the FastAPI docs would present a dropdown with both "/api" and "/public" as options.

Since I only need this configuration when the API is running in production behind the API Management service, I setup my FastAPI app conditionally based on the current environment:

if os.getenv("FUNCTIONS_WORKER_RUNTIME"):
        app = fastapi.FastAPI(
            servers=[{"url": "/api", "description": "API"}],
            root_path="/public",
            root_path_in_servers=False,
        )
    else:
        app = fastapi.FastAPI()

It would probably also be possible to run some sort of local proxy that would mimic the API Management service, though I don't believe Azure offers an official local APIM emulator.


Securing the function

My next goal was to be able to do all of this with a secured Azure function, i.e. a function with an authLevel: 'function'. A secured function requires a "x-functions-key" header to be sent on every request, and for the value to be one of the key values in the function configuration.

Fortunately, API management makes it easy to always send a particular header along to an API's backend. Both of the APIs shared the same function backend, which I configured in Bicep like this:

resource apimBackend 'Microsoft.ApiManagement/service/backends@2021-12-01-preview' = {
  parent: apimService
  name: functionApp.name
  properties: {
    description: functionApp.name
    url: 'https://${functionApp.properties.hostNames[0]}'
    protocol: 'http'
    resourceId: '${environment().resourceManager}${functionApp.id}'
    credentials: {
      header: {
        'x-functions-key': [
          '{{function-app-key}}'
        ]
      }
    }
  }
}

But where does {{function-app-key}} come from? It refers to a "Named Value", a feature of API Management, which I configured like so:


resource apimNamedValuesKey 'Microsoft.ApiManagement/service/namedValues@2021-12-01-preview' = {
  parent: apimService
  name: 'function-app-key'
  properties: {
    displayName: 'function-app-key'
    value: listKeys('${functionApp.id}/host/default', '2019-08-01').functionKeys.default
    tags: ['key' 'function' 'auto']
    secret: true
  }
}

I could have also set it directly in the backend, but it's nice to make it a named value so that we can denote it as a value that should be kept secret.

The final step is to connect the APIs to the backend. Every API has a policy document written in XML (I know, old school!) One of the possible policies is set-backend-service which can be set to an Azure resource ID. I add the policy XML to both the APIs:

<set-backend-service id="apim-generated-policy" backend-id="${functionApp.name}" />

And that does it! See all the Bicep for the API Management in apimanagement.bicep.


All together now

The two trickiest parts were the API/docs distinction and passing on the function key, but there were a few other interesting aspects as well, like testing all the code (100% coverage!) and setting up the project to work with the Azure Developer CLI.

Here's a breakdown of the API code:

  • __init__.py: Called by Azure Functions, defines a main function that uses ASGIMiddleware to call the FastAPI app.
  • fastapi_app.py: Defines a function that returns a FastAPI app. I used a function for better testability.
  • fastapi_routes.py: Defines a function to handle an API call and uses fastapi.APIRouter to attach it to the "generate_name" route.
  • test_azurefunction.py: Uses Pytest to mock the Azure Functions context, mock environment variables, and check all the routes respond as expected.
  • test_fastapi.py: Uses Pytest to check the FastAPI API calls.
  • functions.json: Configuration for Azure Functions, declares that this function responds to an HTTP trigger and has a wildcard route.
  • local.settings.json: Used by the local Azure Functions emulator to determine the function runtime.

There's also a lot of interesting components in the Bicep files.

I hope that helps anyone else who's trying to deploy FastAPI to this sort of architecture. Let me know if you come up with a different approach or have any questions!

Friday, November 18, 2022

Running PostgreSQL in a Dev Container with Flask/Django

Not familiar with Dev Containers? Read my first post about Dev Containers.

I recently added Dev Container support to a Flask+PostgreSQL sample and a Django+PostgreSQL sample. I really wanted to be able to run PostgreSQL entirely inside the Dev Container, since 1) I've had a hard time trying to setup PostgreSQL on my laptop in the past, and 2) I'd like to access the database when running the Dev Container inside Github Codespaces on the web. Fortunately, thanks to some Docker magic, I figured it out! 🐳

The first step is to create a docker-compose.yml file inside the .devcontainer folder:

version: "3"

services:
  app:
    build:
      context: ..
      dockerfile: .devcontainer/Dockerfile
      args:
        VARIANT: 3.9
        USER_UID: 1000
        USER_GID: 1000

    volumes:
      - ..:/workspace:cached

    # Overrides default so things don't shut down after the process ends
    command: sleep infinity

    # Runs app on the same network as the database container,
    # allows "forwardPorts" in devcontainer.json function
    network_mode: service:db

  db:
    image: postgres:latest
    restart: unless-stopped
    volumes:
      - postgres-data:/var/lib/postgresql/data
    environment:
      POSTGRES_USER: app_user
      POSTGRES_DB: app
      POSTGRES_PASSWORD: app_password

volumes:
  postgres-data:

That file declares an app service based off a Dockerfile (which we'll see next) as well as a db service based off the official postgres image that stores data in a mounted volume. The db service declares environment variables for the database name, username, and password, which must be used by any app that connects to that database.

The next step is the Dockerfile, also inside the .devcontainer folder:

FROM mcr.microsoft.com/vscode/devcontainers/python:0-3

RUN curl -fsSL https://aka.ms/install-azd.sh | bash

ENV PYTHONUNBUFFERED 1

RUN apt-get update && export DEBIAN_FRONTEND=noninteractive \
    && apt-get -y install --no-install-recommends postgresql-client

This file is particular to the needs of my sample, so it builds on a pre-built Python-optimized Dev Container from Microsoft and includes the azd tool. Your own file could start from any Docker image that includes Python. However, you will want the final command in the file that installs a PostgreSQL client.

The final file inside the .devcontainer folder is devcontainer.json, which is the entry point for Github Codespaces and the VS Code Dev Containers extension, and describes all the customizations. Here's a simplified version of mine:

{
    "name": "Python 3 & PostgreSQL",
    "dockerComposeFile": "docker-compose.yml",
    "service": "app",
    "workspaceFolder": "/workspace",
    "forwardPorts": [8000, 5432],
    "extensions": [
        "ms-python.python",
        "mtxr.sqltools",
        "mtxr.sqltools-driver-pg"
    ],
    "settings": {
        "sqltools.connections": [{
            "name": "Container database",
            "driver": "PostgreSQL",
            "previewLimit": 50,
            "server": "localhost",
            "port": 5432,
            "database": "app",
            "username": "app_user",
            "password": "app_password"
        }],
        "python.pythonPath": "/usr/local/bin/python"
    }
}

Let's break that down:

  • dockerComposeFile points at the docker-compose.yml from earlier.
  • service matches the name of the non-postgres service from that file.
  • workspaceFolder matches the location of the volume from that file.
  • forwardPorts instructs the Dev Container to expose port 8000 (for the Django app) and port 5432 (for the PostGres DB).
  • extensions includes a really neat extension, SQLTools, which provides a graphical UI for the database tables and allows you to run queries against the tables.
  • Inside settings, sqltools.connections specifies the same database name, username, and password that was declared in the docker-compose.yml.

The final step is to make sure that the app knows how to access the PostgreSQL database. In my sample apps, the DB details are set via environment variables, so I just use a .env file that looks like this:

DBNAME=app
DBHOST=localhost
DBUSER=app_user
DBPASS=app_password

...And that's it! If you'd like, here's a video where I run a Flask+PostgreSQL Dev Container inside Github Codespaces and also highlight the changes described above:

Check out the sample repos for full code, and let me know if you run into issues enabling a PostgreSQL DB in your own Dev Containers.

Monday, November 7, 2022

Deploying a Django app to Azure with the Azure Developer CLI

Azure recently announced a new developer tool, the Azure Developer CLI, and after using it for the last month, I'm in love. ❤️

AZD makes it really easy to deploy applications that require multiple Azure services (which is most non-trivial applications!). Instead of running multiple commands or visiting multiple places in the Azure portal, I can run a single command and have it take care of everything. The azd commands rely on configuration files written in Bicep that describe all the resources, plus an azure.yaml file that describes what code needs to be deployed to which server. The azd tool also helps with CI/CD pipelines and app monitoring, so it's helpfulness goes beyond just the initial deployment.

The team is working on providing lots of templates that are already "azd-ified" so that you can get started quickly with whatever infrastructure stack you prefer. Since I'm on the Python team, I've been working on templates for the top Python frameworks, Django, Flask, and FastAPI.

My first finished template is for a Django app with PostgreSQL database that gets deployed to Azure App Service with a PostgreSQL flexible server. The App Service app communicates with the server inside a private VNet, to make sure the database can't be easily accessed from the outside.

Check out the sample here:
github.com/pamelafox/msdocs-django-postgresql-sample-app-azd/

The readme has instructions for local development, deployment, monitoring, and pipeline setup. If you run into any issues following the steps, let me know in the project discussions tab. The `azd` tool is still in preview, so this is a great time to get feedback about what is and isn't working.

I also put together this video showing me running azd up on the repo and setting up Django admin:

Monday, October 17, 2022

A template for new Python projects with Dev Container support

I've recently been learning more about Dev Containers, Codespaces, and Github templates, and just put together a project using them all.

A Dev Container is a way to use a Docker container as a development environment. The container can already be initialized with all the necessary environment dependencies, like the right version of Python and the desired development tools, so you can get to work immediately inside the container. As Python developers, we often achieve a similar outcome using virtual environments (venv) but Dev Containers work for any development environment, and can specify more than just the language and package dependencies. A Dev Container can even describe desired settings for the editor.

VS Code has support for Dev Containers via the Dev Containers extension. Github Codespaces is built around the idea of containers, since it's basically a VS Code editor that opens up the Dev Container for the given repository.

Since there was a lot of interest in my post on setting up a Python project, I've made a Dev Container version of my standard Python project setup:

https://github.com/pamelafox/python-project-template

You can open that repository in Codespaces immediately to see what it's like (by clicking the Code dropdown), or you can make a new repository based off that repository (since I've marked it as a template), and start writing your own code inside it.

I personally make a lot of new Python projects lately, since I'm experimenting with so much Python for my job, so I'm looking forward to having a 1-click project setup with all my favorite tools for code quality and testing baked right in. Yay for programmer productivity! 🎉

Wednesday, October 5, 2022

Happy Hacktoberfest!

Every year, DigitalOcean runs an event called Hacktoberfest to encourage more folks to contribute to open source. They've introduced new rules this year to avoid the issues last year of floods of trivial not-helpful pull requests, and they're making sure all projects explicitly opt-in to participate. A lot of open source maintainers are doing it on their own time, and we'd love contributions, but we want the contributions to be in good faith.

Here are the projects and repositories that I've opted into Hacktoberfest this year:

For each of those repositories, I've tried to make sure there are at least a few issues in the issue tracker for people looking for ideas. I also welcome your own ideas too! As long as they're unit-tested, of course. 😄

Check out this blog post from my colleague to see what Python repositories we've opted in from the Microsoft organization, like the picologging library I've been hacking on lately.

Friday, September 30, 2022

Deploying a containerized Flask app to Azure Container Apps

I've used Docker for many years as a local development environment (first for Khan Academy and then Berkeley CS61A), but until this week, I'd never personally made a Docker image or deployed one to production.

One of our offerings at Microsoft is Azure Container Apps, a way to run Docker containers in the cloud, which gives me a great excuse to get my feet wet in the world of containerization. 🐳

To share what I've learnt, I'll walkthrough the process of containerizing a Flask app and running it on Azure.

First, some Docker jargon:

  • A Docker image is a multi-layered environment that is exactly the environment your app thrives in, such as a Linux OS with Python 3.9 and Flask installed. You can also think of an image as a snapshot or a template.
  • A Docker container is an instance of an image, which could run locally on your machine or in the cloud.
  • A registry is a place to host images. There are cloud hosted registries like DockerHub and Azure Container Registry. You can pull images down from those registries, or push images up to them.

These are the high-level steps:

  1. Build an image of the Flask application locally and confirm it works when containerized.
  2. Push the image to the Azure Container Registry.
  3. Run an Azure Container App for that image.

Build image of Flask app

I started from a very simple app, the Flask app used by other Azure tutorials:
https://github.com/Azure-Samples/msdocs-python-flask-webapp-quickstart

Flask's development server is not suitable for production, so I brought in the Gunicorn server as a requirement in requirements.txt:

Flask==2.0.2
gunicorn

I put Gunicorn settings in gunicorn_config.py:

bind = "0.0.0.0:5000"
workers = 4
threads = 4
timeout = 120

Then I added this Dockerfile file in the root:

# syntax=docker/dockerfile:1

FROM python:3.9.13

WORKDIR /code

COPY requirements.txt .

RUN pip3 install -r requirements.txt

COPY . .

EXPOSE 5000

ENTRYPOINT ["gunicorn", "-c", "gunicorn_config.py", "app:app"]

That file tells Docker to start from a base image which has python 3.9.13 installed, create a /code directory, install the package requirements, copy the code into the directory, expose port 5000 (Flask's default port, and then finally use Gunicorn run the Flask application..

I also added a .dockerignore file to make sure Docker doesn't copy over unneeded files:

.git*
**/*.pyc
.venv/

You can download the full code from this repository.

I built a Docker image using the "Build image" option from the VS Code Docker extension. However, it can also be built from the command line:

docker build --tag flask-demo .

Now that the image is built, I can run a container using it:

docker run -d -p 5000:5000 flask-demo

The Flask default port is 5000, so the run command must specify that for the connections to work.

Deploying Option #1: az containerapp up

The Azure CLI has a single command that can take care of all the common steps of container app deployment: az container up.

From the app folder, I run the up command:

az containerapp up \
  -g flask-aca-rg \
  -n flask-aca-app \
  --ingress external \
  --target-port 5000 \
  --source .

That command does the following:

  1. Creates an Azure resource group named "flask-aca-rg". A resource group is basically a folder for all the resources it creates after.
  2. Creates a Container App Environment and Log Analytics workspace inside that group.
  3. Builds the container image using the local Dockerfile.
  4. Creates a registry in the Azure Container Registry and pushes the image to the new registry.
  5. Creates a Container App "flask-aca-app" that uses the pushed image and allows external ingress on port 5000 (public HTTP access).

When the steps are successful, the public URL is displayed in the output:

Browse to your container app at:
http://flask-aca-app.salmontree-4f877506.northcentralusstage.azurecontainerapps.io 

Whenever I update the app code, I run that command again and it repeats the last three steps. Easy peasy! Check the az containerapp up reference to see what additional options are available.


Deploying Option #2: Step-by-step az commands

If you need more customization of the deploying process than is possible with up, it's also possible to do each of those steps yourself using specific Azure CLI commands.

Push image to registry

I followed this tutorial to push an image to the registry, with some customizations.

I created a resource group:

az group create --location eastus --name flask-container-apps

Then I created a registry using a unique name and logged in to that registry:

az acr create --resource-group flask-container-apps \
  --name pamelascontainerregistry --sku Basic

az acr login --name pamelascontainerregistry

Now comes the tricky part: pushing an image to that repository. I am working on a Mac with an M1 (ARM 64) chip, but Azure Container Apps (and other cloud-hosted container runners) expect images to be built for an Intel (AMD 64) chip. That means I can't just push the image that I built in the earlier step, I actually have to build specifically for AMD 64 and push that image.

One way to do that is with the docker buildx command, specifying the target architecture and target registry location:

docker buildx build --push --platform linux/amd64 \
    -t pamelascontainerregistry.azurecr.io/flask-demo:latest .

However, a much faster way to do it is with the az acr build command, which uploads the code to cloud and builds it there:

az acr build --platform linux/amd64 \
    -t pamelascontainerregistry.azurecr.io/flask-demo:latest \
    -r pamelascontainerregistry .

⏱ The `docker buildx` command took ~ 10 minutes, whereas the `az acr build` command took only a minute. Nice!

Create Azure Container App

Now that I have an image uploaded to a registry, I can create a container app for that image. I followed this tutorial.

I upgraded the extension and registered the necessary providers:

az extension add --name containerapp --upgrade
az provider register --namespace Microsoft.App
az provider register --namespace Microsoft.OperationalInsights

Then I created an environment for the container app:

az containerapp env create --name flask-container-environment \
    --resource-group flask-container-apps --location eastus

Next, I generated credentials so that the command line tool could log in to my registry:

az acr credential show --name pamelascontainerregistry

Finally, I created the container app:

az containerapp create --name my-container-app \
    --resource-group flask-container-apps \
    --image pamelascontainerregistry.azurecr.io/flask-demo:latest \
    --environment flask-container-environment \
    --registry-server pamelascontainerregistry.azurecr.io \
    --registry-username pamelascontainerregistry \
    --registry-password $REGISTRY_PASSWORD \
    --ingress external \
    --target-port 5000

Once that deployed, I followed the URL from the Azure portal to view the website in the browser and verified it was all working. 🎉 Woot!

If I make any Flask code updates, all I need to do is re-build the image and tell the container app to update:

az acr build --platform linux/amd64 \
    -t pamelascontainerregistry.azurecr.io/flask-demo:latest \
    -r pamelascontainerregistry .

az containerapp update --name my-container-app \
  --resource-group my-container-apps \
  --image pamelascontainerregistry.azurecr.io/flask-demo:latest 

⏱ Those commands are fairly fast, about 30 seconds each.

🐳 Now I'm off to containerize more apps!

Thursday, September 22, 2022

Returning an image from an Azure Function App in Python

I wrote a tiny icon-writer package this week that uses pillow to generate simple text-only icons, and used that to generate images to replace the fancy logo'd icons on my Mac OS X dock.

After generating the icons on my own machine, I wanted to make a website that others could use to generate them, so I started off by writing an Azure Function App.

I considered a few options for what the function could return:

  1. It could store the image in an Azure Storage container and return the URL to the created image.
  2. It could return a base-64 encoded string, and I could serve that in a webpage img tag using a data URI.
  3. It could return an actual binary image with the mime-type set appropriately, to be used directly as the src of the img.

I went for option three, since I liked the idea of being able to test the API in the browser and instantly see an image, plus I wanted to make sure it could be done.

Here's the relevant code in the function:

img = icon_writer.write_icon(text, size=size, bgcolor=bgcolor, fontcolor=fontcolor)
img_byte_arr = io.BytesIO()
img.save(img_byte_arr, format='PNG')
img_byte_arr = img_byte_arr.getvalue()
return func.HttpResponse(img_byte_arr, mimetype='image/png')

It creates a new pillow Image using my write_icon function and saves that into a BytesIO object as a PNG. It converts that object into a bytes array using BytesIO.getvalue(). Finally, it returns an HttpResponse with the bytes array as the body and a mime-type of 'image/png'.

See the full function code on Github.

Then I can call the function in a webpage just like this:

const image = document.createElement("img");
image.src = `https://iconwriterfunction-apim.azure-api.net/icon-writer-function/IconWriter?${params}`;
document.getElementById("output").appendChild(image);

That src attribute actually uses an API Management service URL, which protects the Funtions App endpoint with a CORS policy.

You can try the website here.

Wednesday, September 21, 2022

Preparing a Django app for deployment on Azure App Service

I recently went through the process of creating a simple Django app and deploying it to Azure App Service, and discovered I had to make several changes to get the app working in a production environment. Many of those changes are common across production environments and described in the Django deployment checklist, but a few details are Azure-specific.

Use environment variables

A best practice is to store settings in environment variables, especially sensitive settings like database authentication details. You can set environment variables locally with export on the command-line, but a more repeatable local strategy is to put them in a file and load them from that file using the python-dotenv package.

First, add python-dotenv to your requirements.txt. Here's what mine looked like:

Django==4.1.1
psycopg2
python-dotenv

Then create a .env file with environment variables and their local settings:

FLASK_ENV=development
DBNAME=quizsite
DBHOST=localhost
DBUSER=pamelafox
DBPASS=

Note that it's completely fine for this file to get checked in, since these are only the local values, and your production DB should definitely have a different password than your local DB. 😬

Now adjust your current settings.py to use these environment variables (if it wasn't already):

DATABASES = {
    "default": {
        "ENGINE": "django.db.backends.postgresql_psycopg2",
        'NAME': os.environ['DBNAME'],
        'HOST': os.environ['DBHOST'],
        'USER': os.environ['DBUSER'],
        'PASSWORD': os.environ['DBPASS']
    }
}

To make sure those environment variables are actually loaded in when running locally, you need to edit manage.py. Only the local environment should get its variables from that file, so add a check to see if 'WEBSITE_HOSTNAME' is a current environment variable. That variable gets set by the Azure build system when it deploys an app, so it will always be set on production and it should not get set locally.

import os
import sys

from dotenv import load_dotenv

def main():
    """Run administrative tasks."""
    
    is_prod = 'WEBSITE_HOSTNAME' in os.environ
    if not is_prod:
        print("Loading environment variables from .env file")
        load_dotenv('./.env')

    try:
        from django.core.management import execute_from_command_line
    except ImportError as exc:
        raise ImportError(
            "Couldn't import Django. Are you sure it's installed and "
            "available on your PYTHONPATH environment variable? Did you "
            "forget to activate a virtual environment?"
        ) from exc
    execute_from_command_line(sys.argv)


if __name__ == '__main__':
    main()

Use production settings

After those changes, the app should run fine locally, but it's not ready for production. There are a number of settings that should be different in production mode, such as DEBUG, SECRET_KEY,ALLOWED_HOSTS, CSRF_TRUSTED_ORIGINS, and DATABASES.

A typical way to customize the settings for production is to add a new file that imports all the previous settings and overrides only the handful needed for production. Here's what my production.py looks like:

from .settings import *
import os

DEBUG = False
SECRET_KEY = os.environ['SECRET_KEY']

# Configure the domain name using the environment variable
# that Azure automatically creates for us.
ALLOWED_HOSTS = [os.environ['WEBSITE_HOSTNAME']]
CSRF_TRUSTED_ORIGINS = ['https://'+ os.environ['WEBSITE_HOSTNAME']] 


DATABASES = {
    'default': {
        'ENGINE': 'django.db.backends.postgresql',
        'NAME': os.environ['DBNAME'],
        # DBHOST is only the server name, not the full URL
        'HOST': os.environ['DBHOST'] + ".postgres.database.azure.com",
        'USER': os.environ['DBUSER'],
        'PASSWORD': os.environ['DBPASS']
    }
}

That file also uses the 'WEBSITE_HOSTNAME' environment variable, this time for setting the values of 'ALLOWED_HOSTS' and 'CSRF_TRUSTED_ORIGINS'.

Now you need to make sure the production settings get used when the app is running in a production environment.

First modify wsgi.py, since Azure uses WSGI to serve Django applications.

from django.core.wsgi import get_wsgi_application

is_prod = 'WEBSITE_HOSTNAME' in os.environ
settings_module = 'quizsite.production' if is_prod else 'quizsite.settings'
os.environ.setdefault("DJANGO_SETTINGS_MODULE", settings_module)

application = get_wsgi_application()

You also need to modify manage.py since Azure calls it to run Django commands on the production server, like manage.py collectstatic.

import os
import sys

from dotenv import load_dotenv

def main():
    is_prod = 'WEBSITE_HOSTNAME' in os.environ
    if not is_prod:
        print("Loading environment variables from .env file")
        load_dotenv('./.env')

    settings_module = "quizsite.production" if is_prod else 'quizsite.settings'
    os.environ.setdefault('DJANGO_SETTINGS_MODULE', settings_module)
    
    try:
        from django.core.management import execute_from_command_line
    except ImportError as exc:
        raise ImportError(
            "Couldn't import Django. Are you sure it's installed and "
            "available on your PYTHONPATH environment variable? Did you "
            "forget to activate a virtual environment?"
        ) from exc
    execute_from_command_line(sys.argv)

if __name__ == '__main__':
    main()

Deploy!

Your app should be ready for deployment, code-wise. You can follow the instructions in a tutorial like Deploy a Python web app with PostgreSQL in Azure, but with your own app instead of the sample app. That tutorial includes instructions for setting environment variables on production, using either the VS Code extension or the Azure portal.

You may decide to store the SECRET_KEY value inside the Azure Key vault and retrieve it from there instead, following this KeyVault tutorial.

If you want to see all the recommended changes in context, check out the repository for my sample app .

Tuesday, September 20, 2022

How I setup a Python project

As I prepare for my new role at Microsoft Cloud Advocacy for Python, I've been spinning up a bunch of Python projects over the last few months and learning about tools to improve my development workflow. I'm sharing my project setup process in this post to help other developers start new Python projects and to find out how my process can improve.

My setup process always takes place in a Mac OS X environment, but much of this should be the same across operating systems.

Setup IDE

I use vim when editing single files, but when working on multi-file projects I much prefer VS Code. It's fast, it's got great built-in capabilities, and the extensions are incredibly helpful for domain specific tasks.

If it's my first time on a machine, then I need to:

Create folder

Now I make a folder for my project, either via the command line:

mkdir my-python-project 

Or in VS Code, by selecting File > Open Folder … and clicking New Folder in the window that pops up.

Initialize version control

I always use Git for version control in my projects for local source code history, and then use Github to backup the code to the cloud.

First I create the local Git repository:

git init

Then I create a new Github repo and add it as a remote for my local repo:

git remote add origin https://github.com/pamelafox/my-python-project-sept7.git 

Finally I create a .gitignore file to tell Git what files/folders to exclude from source control. I'll start it off with a single line to ignore any __pycache__ folders created automatically by the interpreter.

__pycache__/ 

You can learn more on Git/Github from this Github tutorial.

Setup virtual environment

A virtual environment makes it easy to install the dependencies of one Python project without worrying about conflict with dependencies of other projects. It is possible to develop in Python outside of a virtual environment (in the global environment of your system), but that has bitten me so many times that I now always jump into a virtual environment.

Python 3 has built-in support for virtual environments using the venv module. I run this command to create a virtual environment:

python3 -m venv .venv

That creates the environment in the .venv folder, so that's where all the project dependencies will get installed. You can name that folder something else, but .venv or venv are the most standard.

Next I need to actually start the virtual environment, to make sure my terminal is issuing all commands from inside it:

source .venv/bin/activate 

I don't want to check the project's third-party dependencies into my own Git repo, however, both because that's a lot of files to track and because that code should stay in the third-party repos, so I add another line to the .gitignore file:

.venv/

Install requirements

I always install project dependencies with pip, which downloads them from the Python package index at pypi.org. However, it's best practice to declare dependencies in a requirements.txt file and install from that file, so that anyone else setting up the project will end up with the same dependencies.

I create the requirements.txt file and seed it with any packages I know I need:

numpy
opencv-python
scikit-image
matplotlib

It's also possible to specify the version of each package, but I typically use the latest stable version.

Once that file exists, I ask pip to install everything in it:

pip install -r requirements.txt 

Coding time!

This might be the point where I start writing code, or I may wait until I've done the full setup.

Regardless of when I start code writing, this is a typical folder layout for a non-web Python project:

I have one main module, the entry point, which imports functions or classes from helper modules. Then I put all my tests in a folder, with one test file per module.

At this point, I should be able to actually run the code I've written:

python main.py 

I don't have to worry about distinguishing between the python command vs. python3 command anymore, as I'm running that command inside my virtual environment, and it will always use the version of Python that initialized it.

Install development requirements

Our code might work, but is it good code?

Fortunately, there are many tools in the Python ecosystem to help us write better code with a consistent code style.

My favorite tools are all third-party packages, so they need to be installed before I can use them. A best practice is to list them in a separate file, like requirements-dev.txt, to make a distinction between the packages needed for production and the additional packages needed for local development.

I create requirements-dev.txt and list the tool dependencies:

-r requirements.txt 
black==22.3.0
pytest==7.1.2 
coverage==6.4.1 
pytest-cov==3.0.0 
pre-commit 
ruff 

*I only include version numbers for the tools here so that you can see how that's specified.

The first line tells pip to also install everything in requirements.txt. By including that line, I can now run this single command to install both the prod and dev dependencies:

pip install -r requirements-dev.txt 

Tool configuration

The Python community recently decided on a best practice for tool configuration: putting all options for all tools inside a single file, pyproject.toml, so I now create an empty pyproject.toml in my root folder.

Run linter

A linter is a tool that looks for "lint" in your code: common coding errors or style issues. The most commonly used Python linter is flake8 but there's a new faster linter available called ruff. It's possible to just use ruff out of the box with its default configuration, but many developers (including myself) like to customize it.

I configure ruff by adding this section to pyproject.toml:

[tool.ruff] 
line-length = 100
ignore = ["D203"]
show-source = true
  • Theignore option tells it what error codes to ignore (that particular one is just a whitespace style nit).
  • The line-length option specifies the maximum number of characters for each line (a very personal decision!).
  • The show-source option makes it show the code responsible for any errors.

Now I can run ruff. I actually run it twice, for different levels of errors, first checking for the most serious issues:

ruff . --select=E9,F63,F7,F82 

The error code E9 comes from the pycodestyle library error codes and refers to any parse errors (IndentationError/SyntaxError) or detectable IO errors.

The other error codes are from the pyflakes library: F63 checks for common issues with comparison operators, F7 covers misplaced statements, and F82 looks for undefined names.

Now I run it again, this time checking for all issues, where the rest is more likely to be style issues. The style violations are based on the official PEP 8 style guide, so they are fairly agreed upon in the Python community.

ruff . 

If I see style issues at this point, I might fix them or I might wait until I introduce the next tool which can autofix many style issues for me. 😀

Run formatter

A formatter is a tool that will reformat code according to its own standards and your configured options. The most popular formatter is black, which is PEP 8 compliant and highly opinionated.

I configure black by adding this section to pyproject.toml:

[tool.black] 
line-length = 100 
target-version = ['py39'] 

Those options tell black that I'd like code lines to be no longer than 100 characters and that I'm writing code in Python 3.9.

Now, before I run black for the first time, I like to make sure all my code is committed, so that I can easily see the effect of black. I might also run it in --check mode first, to make sure it doesn't make any undessiirable changes or edit unexpected files:

black --verbose --check . tests 

Sometimes I discover I need to explicitly exclude some Python files from black's formatting rampage. In that case, I add an exclude option to pyproject.toml:

extend-exclude = ''' 
( 
  ^/migrations\/ 
) 
''' 

If all looks good, I'll run black for real:

black --verbose . tests/ 

Run tests

The built-in testing framework for Python is unittest, but another popular framework is pytest. That's my new preferred framework.

I configure that by adding another section to pyproject.toml:

[tool.pytest.ini_options] 
addopts = "-ra --cov"
testpaths = ["tests"] 
pythonpath = ['.']

The addopts option adds arguments to the pytest command, --ra for displaying extra test summary info and --cov for running coverage.py while running tests. That --cov option works only because I coverage and pytest-cov earlier. The testpaths option tells pytest where to find the tests, and pythonpath helps tests figure out where to import the modules from.

Now I can run all the tests:

pytest 

That will show me which tests passed or failed. If I want to see the coverage report, I can run:

coverage report

Install pre-commit hook

All of those tools are great, but it's way too easy to forget to run them. That's why pre-commit hooks are handy; they'll run commands before allowing a git commit to go through.

I like to use the pre-commit framework to set up hooks as it supports a wide range of commands across multiple languages (and many of my projects are multi-language, like Python + JS).

I create a .pre-commit-config.yaml file to describe my desired hooks:

repos:
-   repo: https://github.com/pre-commit/pre-commit-hooks
    rev: v2.3.0
    hooks:
    -   id: check-yaml
    -   id: end-of-file-fixer
    -   id: trailing-whitespace
-   repo: https://github.com/psf/black
    rev: 22.3.0
    hooks:
    -   id: black
        args: ['--config=./pyproject.toml']
-   repo: https://github.com/charliermarsh/ruff-pre-commit
    rev: v0.0.116
    hooks:
      - id: ruff

Those hooks run black, ruff, as well as some generally useful checks for YAML syntax and trailing whitespace issues.

Now I have to actually install the hooks, which will update my local Git configuration:

pre-commit install

I can do a test commit now to see if it spots any issues. Most likely I'll have already seen any issues in earlier commits, but it's good to make sure the hooks are run.

You might have noticed that I did not run any tests in the pre-commit hooks. That's because tests can often take a number of minutes to run, and for many repositories, running tests on every commit would significantly slow down development and discouraging frequent commits. However, I will run tests using the next tool.

Setup Github action

Using Github actions, I can make sure certain commands are always run upon updates to the Github repo.

To configure an action, I create a python.yaml file inside a newly created .github/workflows folder and describe the desired action following their format:

name: Python checks
on: [push, pull_request]

jobs:
  build:
    runs-on: ubuntu-latest
    steps:
        - uses: actions/checkout@v3
        - name: Set up Python 3
          uses: actions/setup-python@v3
          with:
            python-version: 3.9
        - name: Install dependencies
          run: |
            python -m pip install --upgrade pip
            pip install -r requirements-dev.txt
        - name: Lint with ruff
          run: |
            # stop the build if there are Python syntax errors or undefined names
            ruff . --select=E9,F63,F7,F82
            # exit-zero treats all errors as warnings.
            ruff . --exit-zero
        - name: Check formatting with black
          uses: psf/black@stable
          with:
            src: ". tests/"
            options: "--check --verbose"
        - name: Run unit tests
          run: |
            pytest

The on: [push, pull_request] tells Github to run the action whenever code is pushed to any branch or whenever pull requests are opened. The jobs section describes just one job, "build", which runs on an Ubuntu box with Python 3.9 installed, installs my project requirements, runs ruff, runs black, and finally, runs pytest.

All together now

You can see my sample repository here:
https://github.com/pamelafox/mypythonproject-sept7th

You can also make a new repo with a similar setup using this Github template repository. It's similar to the sample repo, but with less actual code, so it's easier to start fresh. It also may not exactly match the tools in this blog post, since I'm always finding ways to improve my workflow.

You can see how I've used this sort of setup in apps which involve other dependencies as well, like:

Let me know what your project setup is like and if you have suggestions for improving my workflow. I'm always learning! 😀

Friday, August 12, 2022

CS content inclusivity guide

First of all, I am not an expert in diversity and inclusion. However, I have tried over time to learn more about how to improve my Computer Science curriculum to be more inclusive, and I have noticed what makes me personally feel excluded from other CS curriculum. I wrote this guide based on my experiences at Khan Academy (online programming courses) and UC Berkeley (CS 61A, 169A), and have shared it privately with UC Berkeley TAs and other CS teachers. I'm now sharing it publicly in case it's helpful for other CS educators.

Once again, I am not an expert, so I encourage everyone interested in inclusive CS content to learn more from others, like at the CSTA or SIGCSE conferences.

Avoid sensitive topics

There are many topics which can trigger emotional reactions in people. If you are specifically teaching those topics, then you can present those topics with the appropriate context and create a space where students can process their reactions. However, if a sensitive topic just happens to be the theme of a problem but isn't necessary for the skill being assessed, then it is usually a good idea to avoid the topic entirely and pick a different theme.

Common sensitive topics

Violence/Death. Unnecessary violence / military violence is often the theme of video games and frequently makes it into CS assignments as well. Some specific examples:

  • Hangman: A classic game but pretty horrific, especially when you learn about America's recent history of hanging men. You can instead call the same type of game "Word Guesser", and show a visualization like eating a cupcake.
  • Free Bacon: A rule in the 61A Hog game (which has since been renamed). Since bacon is derived from dead pigs, this can be considered an instance of death. Non-pork eating students may find it strange to implement such a function.
  • Ants vs. SomeBees: A 61A game where ants kill bees (which isn't scientifically accurate) and which includes function names like death_callback and ants like the TankAnt. This project still exists, but the hope is to either replace it or provide alternative projects of equal difficulty (since many students don't mind insect destruction).

Current events. A lot of current events are emotionally charged for the people affected by them- wildfires, pandemics, protests, political elections. Some specific examples:

  • People's Park. CS61A has an old midterm review question about People's Park, a park in Berkeley that is the subject of controversary. The question did not specifically bring up the history and the current protests around it, but students could still find it distracting, especially on an exam, since it could bring up a lot of their feelings about the issues.
  • Swain v. Alabama: An example used in the Data 8 textbook of bias in the jury selection for a Black man on trial. The example wasn't presented with the full historical context behind the conviction, and could easily lead to stereotyping and stereotype threat. It is difficult to bring in an isolated example of racism if you haven't fully delved into the racist history leading to that event.

Memes. Memes can be funny, but the humor can often be at the expense of someone or some group of people. For example:

  • "Karen": A 61A exam review question initially used a function named karen in an environment diagram problem about anti-maskers, based on the "karen" meme. We actually have students named Karen in our class, and I would hate for them to feel made fun of or singled out due to sharing a name with the meme. The function has since been renamed.

Harry Potter. This is a common enough theme that it's worth addressing specifically. Lots of people seem to love Harry Potter and injecting HP references, but there are two problems:

  • The author's political views: JK Rowling has publicly stated many views that are transphobic, so seeing Harry Potter references can remind students of those views and threaten their feeling of belonging. CS61A used to have Potter references in an OOP assignment but changed it in 2021.
  • Assumed cultural content: Not everyone has seen Harry Potter, so assuming that everyone has can alienate those who haven't, since they aren't in on all the references. Khan Academy used to hold a Harry Potter themed company hackathon for many years, and I was always perplexed by the many references throughout the week (like the houses), but they finally changed the theme in 2020.

Historical figures. Quite a few of the inventors of the past (and even the present) have held views that are racist, sexist, or discriminatory in some fashion. If you do mention a specific historical figure in the content (either as the theme or because they invented a theory), first research their views and see if they have publicly espoused discriminatory views. You might then decide to remove the mention of them, de-emphasize them (versus their invention), or acknowledge the impact of their views. For example, Isaac Newton came up with theories in support of scientific racism, so physics departments have started to call his physics laws the "fundamental laws of physics" versus "Newton's laws".

Cultural relevance

Something has cultural relevance if it relates to our culture in some way, helping us connect CS topics to the rest of our lives and society. However, we have a diverse student body and may not share the same cultures. Thus, in a class of mixed cultures, there are several aspects to making content more culturally relevant:

  1. Check what culture your content currently assumes.
  2. Remove unneeded assumptions about cultural knowledge
  3. Diversify the cultural connections in the content

Step 1: Audit the default culture

Generally, the default culture in US content is White, European, Heterosexual, Male.

For example, 61A has many Shakespeare quotes in the textbook, lectures, and assignments. Shakespeare is certainly not the only poet in the world, and his poems don't make a ton of sense unless you've studied them. However, there's an assumption that everyone knows/likes Shakespeare if they're in the US.

Screenshot of a textbook chapter about Python that starts with a Shakespeare quote

Here's another example from a tutorial I made for Khan Academy, where I assumed that our mascot Winston would of course get married to a woman and have some kids. Now, as someone who's made the decision to not get married but am too nervous to tweet that in a marriage-normative society, I sure wish I had made a different choice!

Screenshot of a JS program that assigns a wife to a Winston object

Of course, lots of people do like Shakespeare and lots of men and women do get married, but it's too easy to write content in such a way that assumes that as the universal truth and does not make space for non-default culture.

If you audit your content to ask "what is the default culture?", you can be aware of what your content assumes and can then decide whether to reword or replace cultural references.

Step 2: Remove assumptions about shared cultural knowledge

It's fun to use cultural references when developing CS content, and it should be totally okay to bring in a cultural reference that's near and dear to you but may not be familiar to students from other cultures. However, when you do bring it in, be careful how you word it and be sure to provide any necessary context.

Consider these examples:

  • Magic 8-ball: I have a project on Khan Academy where students code a Magic 8-ball. I discovered that international learners struggled to complete the assignment, because they had never encountered a magic 8-ball toy. So I added an introductory sentence along with a graphic, and it was much easier for them.
  • Riffle shuffle: A 61A problem started with "The familiar riffle shuffle results in a deck of cards where…". Any sentence that starts with "the familiar" should raise flags, since familiarity is culturally dependent. I personally had never heard of it, and wasn't helped by the GIF that only showed the second half of the shuffle. I reworded to "A common way of shuffling cards is known as the riffle shuffle" and replaced the GIF with a video of the shuffle from start to finish.
  • Magic the Lambda-ing: This 61A problem assumed Magic experience in multiple ways, failing to explain how cards were drawn and using abbreviations like "stat" and "ATK". Generally, any non-course specific abbreviations should either be avoided or be explicitly defined. I revised the problem by adding clarifications, removing abbreviations, and adding a reference for students who wanted to learn more: "This game is inspired by the similarly named Magic: The Gathering."

Those were all fairly subtle rewords, but a subtle reword can turn a problem from one that alienates a student into one that introduces them to some new cool thing.

Step 3: Diversify the cultural references

If you have the means to authentically do so, you can now start to bring in more cultural references. A TA that loves cooking can bring in cooking examples, a TA that loves hair braiding can show how to make braids with loops. It's difficult and risky to bring in authentic cultural references from a culture that isn't experienced by any of the content creators. That's why it's important to have a diverse team, since each of your team members can make different cultural connections that might resonate with different students.

Here's a word cloud of interests from 61A students. Seeing the wide range of interests can inspire ideas for connecting content to student interests:

A word cloud of interests, like cooking, reading, video games, etc

One way to bring in culture that's relevant to your students is to get them to bring it in themselves!

  • In lectures, when live coding, you can ask students for examples, like "Okay, what are 5 song titles we can store in this array?"
  • In coding assignments, find ways for students to express themselves. For example, Khan Academy includes projects like drawing a dinner plate or making a recipes webpage, where students can show off their favorite foods. It is harder to evaluate the correctness and skill level of more open-ended projects, especially in massive courses. However, even if you can find small ways for students to customize their program output, it can increase their sense of ownership. (See this great research on creativity, customization, and ownership)

If your curriculum references historical figures (e.g. the inventor of an algorithm), they are very often white/male/European due to the bias of historical texts and a long history of patriarchy. See if you can find lesser known figures that also made contributions (a few examples here), or consider whether it's really necessary to emphasize the inventor (versus the invention).


Mirrors and windows

Another way to think about your content is to make sure it both offers mirrors (reflections of each student) and windows (views of other students), and gives equal weight to all the possible mirrors and windows.

Names. On Khan Academy, we use names in many word problems. To make sure we're not just picking the names that we personally know, we use a random name generator:

Three screenshots, two of word problems with names Hong Lien and Lakeisha, the third of a random name generator

Gender. Considering that gender is "a non-binary association of characteristics within the broad spectrum between masculinities and femininities," we should avoid encoding gender as binary in any content examples, like database tables, classes, or UI elements.

Consider instead a class like:


class Person() {

constructor(string name, []string gender, string pronoun) {
        this.name = name;
        this.gender = gender;
        this.pronoun = pronoun;
     }
}

new Person("Hunter", ["male"], "he");
new Person("Lee", ["female", "non-binary"], "they");
new Person("Emily", ["female"], "she");

Or a UI like:

A screenshot of a UI with a gender-picker that allows selection of multiple genders and offers a lot of possible genders

Pronouns.Similarly, refrain from relying on “he/him” as the default or assumed pronoun. Instead, be sure to use a natural, diverse selection of pronouns. I received bug reports for using "they" as the pronoun for a non-binary character in some AP CSP word problems on Khan Academy, but I kept "they" as I think/hope that people will become more accepting as their exposure to non-binary pronouns increases.

Sexual orientation. As discussed earlier, heterosexual is often the presumed default in our culture, but many people are homosexual, pansexual, asexual, etc. If you have content where it's appropriate to refer to people and their relationships, consider shining a light on the many kinds of relationships. We have a famous grammar problem on Khan Academy that brings in a ton of hate mail, but also brings in a lot of love mail from learners who have never before seen their relationships reflected in an educational website before! Here it is:

A fill-in-the blank problem with the sentence 'Brittany and Sofia went to lunch with their _ every Saturday' and options 'wifes' or 'wives'

Thursday, August 11, 2022

A browser-based runner for Faded Parsons Problems

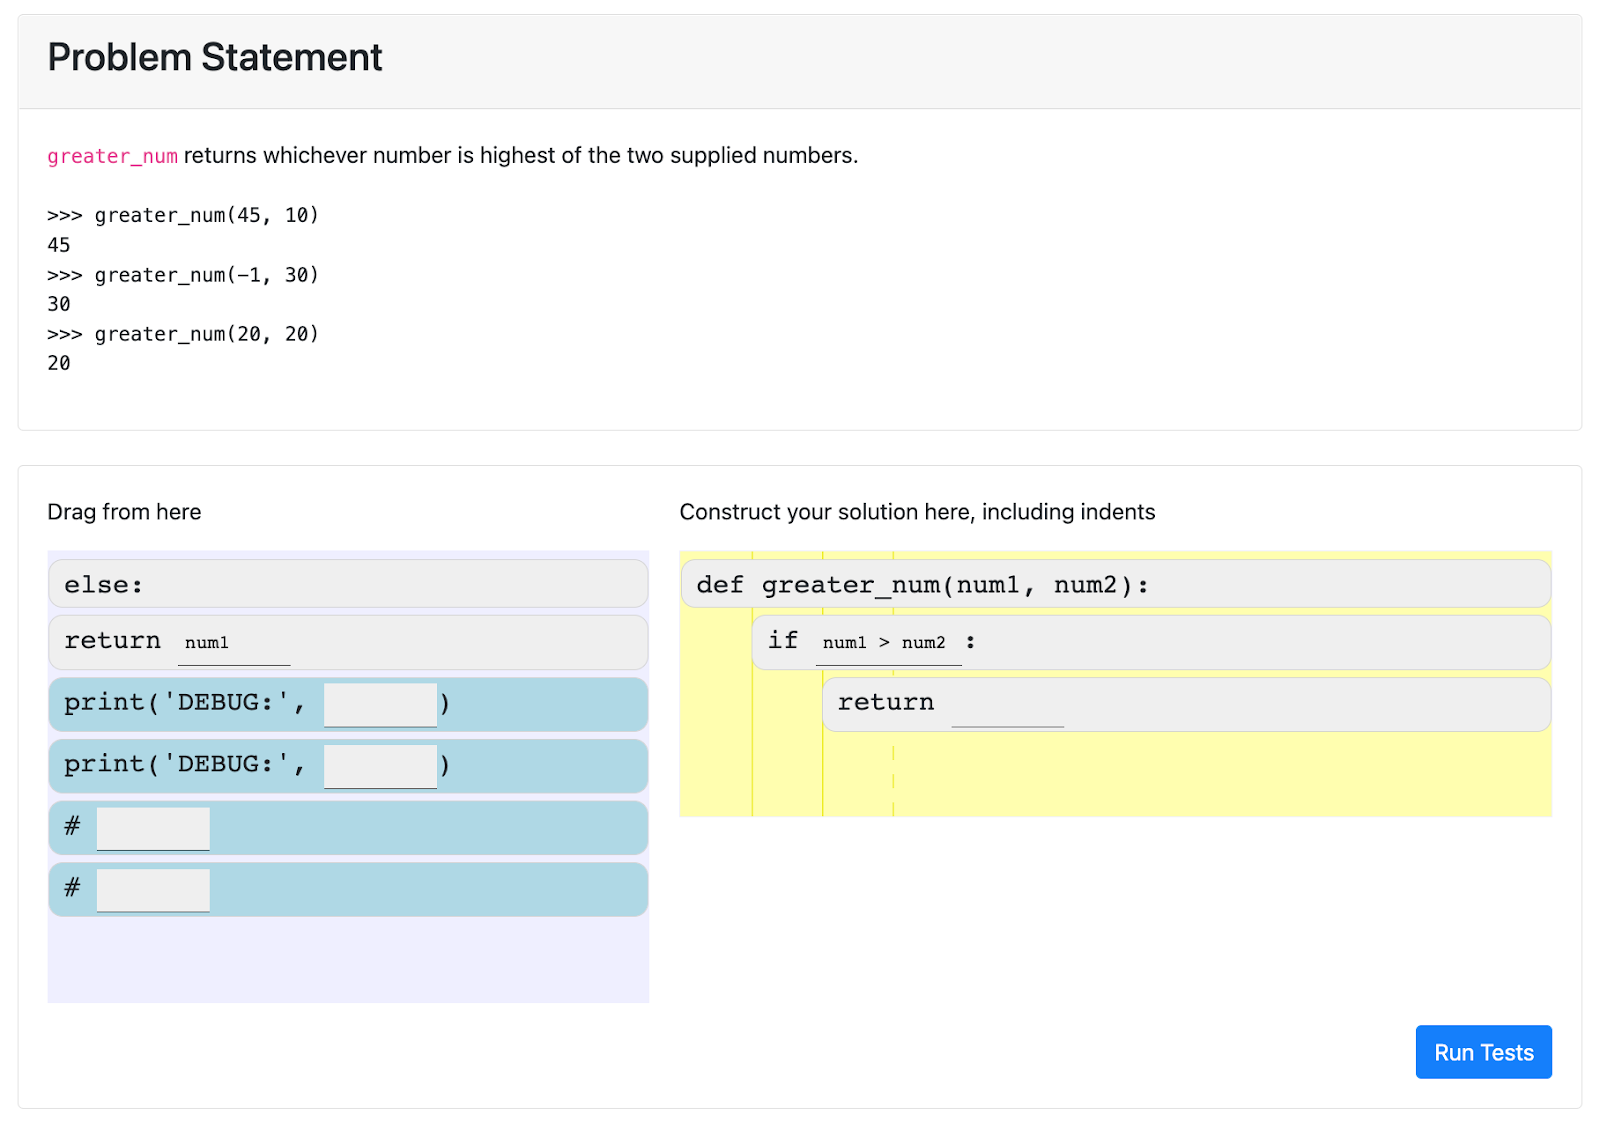
A Parsons Problem is a kind of programming exercise where learners rearrange blocks of code in order to create functional programs, and has been shown by CS Ed researchers to be an effective way to learn code writing skills. One particularly helpful aspect is that students are re-creating an expert solution, versus writing sub-optimal or messy solutions, so they pick up better programming practices along the way. [See Barbara Ericson's dissertation for more details.]

However, one issue with Parsons Problems is that some learners may brute force the solution, trying all possible orders without thinking. Fortunately, UC Berkeley Ph.D. student Nate Weinman invented Faded Parsons Problems, a variant where the blocks sometimes have blanks in them, and learners must fill in the blanks after arranging the blocks. Learners are no longer able to brute force, but they still receive the other benefits of Parsons Problems. [See Weinman's CHI 2021 research paper for more details.]

While I was teaching CS61A at UC Berkeley, we experimented with integrating Faded Parsons Problems into our Python class assignments. To complete the problems, students ran a local Flask server on their own machine that sent data to our OKPy grading infrastructure. It seems to have been a positive addition to the course, though we discovered it was difficult for many students to run a local Flask server on their personal laptop. [A research paper is in the works with more details on what we learned.]

I wanted to try using Faded Parsons Problems in my upcoming Python course and to make it generally easier for any teacher to use them, so I've made a website that can run Faded Parsons Problems entirely in the browser (no backend). The website uses Pyodide to run the Python code and localStorage to remember learner progress.

The website checks the correctness of the learner's solution using Python doctests and displays pass/fail results. It also shows syntax errors, which can happen if they indent the blocks incorrectly or write something syntactically incorrect in the blanks.

The website is deployed on my Github pages currently, but it can be deployed on any static website hosting platform. If you're a Python teacher and would like to make up your own problems, you can learn more from the Github project README. Let me know if you end up using this in a class; I'd love to see your problems and hear how it goes.

If you teach a different language besides Python, it may be possible for you to get it working if there's a way to run that language in the browser. Forks or pull requests are welcome.

Tuesday, August 9, 2022

My bed-sharing setup

When I had my first baby, we struggled a lot with finding a sleep strategy that worked for both me and the baby. I talked about that journey in a blog post a few years ago, and how I ended up deciding to share a bed with my baby. I've now had another baby, and we're using the same bed-sharing approach again. Thanks to making the decision early on, I'm much better rested this time around.

Just like people share their office setups filled with geek gear, I'm going to share my bed-sharing setup. Maybe it'll help other breastfeeding mothers out there, or perhaps inspire someone to invent better gear!

Here's the sleeping setup:

Photo of floor mattress with sheets and pillows

Let's break down the sleeping components:

  • Floor mattress: 6" full-sized firm memory foam mattress. I bought the same one for baby #2, since baby #1 is still using it as a three year old. I figure these will be their mattresses for life, or at least their life in my house.
  • Slats: With my first baby, we had the mattress directly on the hardwood floor, and that led to black mold. I found some Korean-made slats on Etsy that fit the mattress size well enough and bought slats for both our mattresses. They're super low down so they don't make the mattress significantly higher (i.e. more dangerous in case of rolling), but hopefully they'll help prevent mold. Sadly, their Etsy shop is closed now, so you'd have to find similar ones or construct them yourself.
  • Bedsheets: You have to be super careful with bedsheets/blankets around babies, since they don't have the dexterity to move them away from their face. I wrap the sheet just around me, and often only use the blanket on the bottom half of my body. (Making milk keeps me pretty warm at night anyway, I often awake at 2AM in a sweat!)
  • Kindle: My favorite thing, both to help me fall asleep and to entertain me while nursing. I lean it against a pillow so that I don't have to hold it and can just flick it with whatever finger/limb is available.
  • Burp cloths: For late night spit ups. Yay.
  • Noise machine: The little elephant makes a heartbeat-like white noise. I'm not sure if it helps her, but it does help my partner to get less distracted by her little grunts and cries at night. We also have a humidifier in the room, as that's often recommended by doctors.
  • Alarm clock: I haven't set an alarm on it for years, but I do use it to make sure we haven't slept too long, since babies are supposed to nurse every 4 hours. Whenever I wake up, either due to my internal clock or her restlessness, I check the clock and decide if it's time to nurse.

So now let's talk about the nursing setup:

Photo of floor mattress with sheets and pillows in nursing position
  • Back support pillow: I lean against the wall while nursing, so this pillow makes that position more comfortable for me.
  • Boppy pillow: This is my favorite nursing pillow, and is the same model I use during the day.
  • Adjustable height pillow: I bought this to try as a nursing pillow (its intended use), but the form factor didn't work out that well for me. However, it's the perfect height/firmness to put under my knee when nursing, to elevate whichever side of the body my baby's nursing on.
  • Cooler: This stores an icepak and a Haakaa, a manual pump that works via suction only. I use the Haakaa to get extra milk out of whatever side my baby isn't nursing on, especially if she isn't eating much that night, and then I transfer the milk to a freezer bag in the morning. The Haakaa is an amazing invention, I still can't believe it works!
  • Nightlight: It helps to have a little light when positioning the baby. I also use my Kindle for additional illumination as needed.

That's my setup! I'd love to see more mothers sharing their gear. Let's nerd out on nursing! :D

Monday, August 8, 2022

Porting a project from spaces to tabs

I'm currently working on a JavaScript codebase that has some old crusty code, and I'm modernizing it in various ways, like upgrading to ES6 syntax and linting with ESLint. I also like to add in Prettier to every codebase, as an automated step, so that my code is always consistently formatted, and so that future pull requests from other developers can easily follow the same conventions.

But I had a dilemma: half my code was written with 2 space indents, the other half was written with 4 space indents, and I needed to tell Prettier what to use. What's a girl to do?? Well, I considered averaging it for nice 3-space indents everywhere (I kid, I kid), but I instead made a radical decision: just use tabs! I'd heard that Prettier is considering making tabs the default anyway, and after reading the many comments on their PR thread, I became convinced that tabs are better than spaces, at least for an autoformatted project.

Since my projects and editors have used spaces forever, there were a few things I needed to do in order to smoothly move over to tabs. Here's the steps I took:

  • Reformat files to use tabs. To change all my current files to tabs, I used Prettier. First I configured it by specifying "useTabs" in my .prettierrc.json:

    {
    	"useTabs": true
    }
    

    Then I ran the prettier command on all my JS/JSON files:

    prettier \"**/*.{js,json}\" --ignore-path ./.eslintignore --write
          
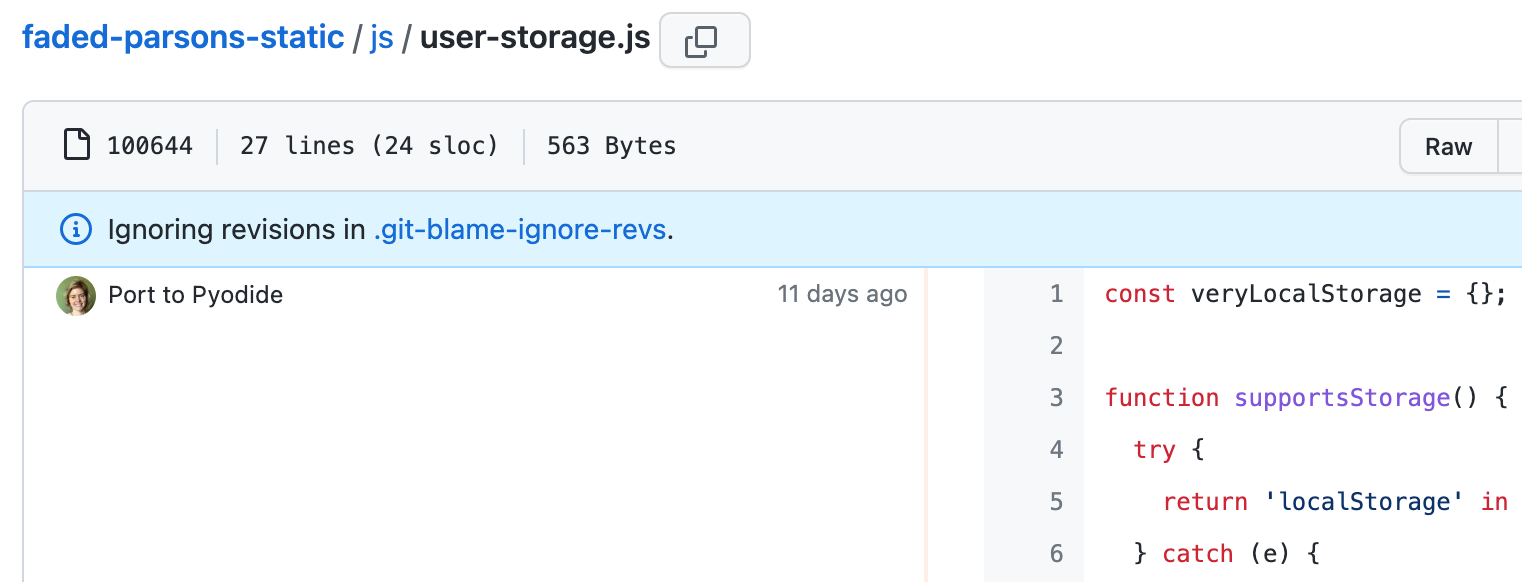
  • Ignore the reformat commit in git blame. I really hate when reformatting commits make it harder to use git blame to track logical changes, so I was thrilled to discover that there's a way for Git/Github to ignore particular revisions while blaming. I followed this blog post, adding a .git-blame-ignore-revs with my most recent commit:

    # Reformat js/json with Prettier, spaces to tabs
    a08f09aa7c4e9381ae2036754bd9311e78c3b40f
    

    Then I ran a command to tell my local git to ignore the revision:
    git config blame.ignoreRevsFile .git-blame-ignore-revs

    Once I pushed the commit with that file, I saw that Github does indeed ignore changes from that commit when I use the blame feature. So cool! Screenshot from Github blame UI

  • Make Github render tabs using 4 spaces.For whatever reason, Github defaults to 8 spaces for tabs, and that is too dang much. To make Github render the tabs in my projects with just 4 spaces, I added an .editorconfig file to my project:

    root = true
    
    [*]
    indent_style = tab
    indent_size = 4
    

    Github also allows users to customize tabs across all project repositories, and that user setting takes precedence over the per-project .editorconfig setting. That's likely for accessibility reasons, since some folks might require a large number of spaces for better readability. To change my account preference, I opened up Settings > Appearance and selected my desired number of spaces:

    Screenshot of Github settings

    So, if I visit my project in an incognito window, Github will render the tabs with 4 spaces, but if I visit the project from my logged in browser, Github will render the tab with 2 spaces.

  • Make VS Code insert tabs when I tab. VS Code tries to adjust its indentation style with autodetection based on the current file, but I wanted to make sure it always inserted a tab in new files in my project, too. It defaults to inserting spaces when it isn't sure, so I needed to explicitly override that setting. I could have changed the setting across all projects, but most of my other projects use spaces, so I instead figured out how to change it in just this project for now.

    To change it, I opened up Settings > Workspace, searched for "insert spaces", and un-checked the "Editor: Insert spaces" setting. That created a .vscode/settings.json file with an "editor.insertSpaces" property:

    {
    	"editor.insertSpaces": false
    }
    

    Another option for VS Code is to use a VS Code plugin that understands .editorconfig files. If you go that route, you don't need to finagle with the VS Code settings yourself.

Friday, July 22, 2022

Tips for planting milkweeds in the Bay area

Since the recent article about the endangerment of Monarch butterflies, a lot of people are interested in planting milkweeds for Monarch caterpillars. I've been doing that for the last few years in my garden in the east bay in California, so I thought I'd share my personal tips.

Milkweed species: Narrow-Leaf

There are many species of milkweed, but not all of them are native to California, and non-native milkweeds are associated with issues like disease and disrupting natural butterfly cycles. The two most commonly sold native milkweeds in CA are the Narrow-leaf milkweed and the Showy milkweed. I have planted both, and based on my observation of caterpillar behavior, I highly recommend the Narrow-leaf. My caterpillars will only eat the Showy as an absolute last resort, and sometimes not even then. They are ravenous for Narrow-leaf, however.


Where to buy

You can use Calscape.org to find local nurseries that sell narrow-leaf milkweed. Before you go to the nursery in person, check their website or give them a call to see if it's currently in stock. 

You can often get Narrow-leaf from a generic nursery that sells both native and non-native plants, but some of the generic nurseries spray their plants with insecticide or use soil with insecticides - no good! If you instead go to native nurseries, that shouldn't be an issue (but you should double check just in case). My favorite native nurseries are Oaktown Native and Watershed.

You can also grow it from seed fairly easily. My favorite native seed source is Larner Seeds. It will take some time for the plant to grow large, and small plants may get overwhelmed early by caterpillars, but I've found that even the small plants can bounce back after being devoured. 

Planting wildflowers

There are two reasons to plant native wildflowers near the milkweed: 1) munchies for the adult butterflies 2) familiar places for the caterpillars to pupate. We happened to plant a Salvia Clevelandii near our milkweed, and that's where a caterpillar happily pupated. 

Once again, I recommend purchasing native wildflowers either from local native-specializing nurseries or from seed. Use Calscape.org to make sure that a particular plant is actually native to your area.

Moving the caterpillars

I will often find that a caterpillar will have completely decimated milkweed in one part of my garden (since my milkweed are still quite small). In that case, I often move the caterpillar to a more milkweed-y part of the garden. To safely transport, I make sure that they're actively moving (i.e. not in a delicate phase of changing instars), snip off the milkweed segment with scissors, and place that segment near the new milkweed. Sometimes I even bring them to the neighbors' milkweed if we're all out.

Where do they pupate?

This is still my top question as a Monarch-raiser, as I love to watch the metamorphosis but can rarely find a chrysalis. In my garden, the only chrysalis I located was on our Salvia. 

Here's the butterfly that emerged from the chrysalis on the Salvia (and video of their  first flight):

For my neighbor's garden, they love to pupate on the underside of the top of their fence. 

It's important that wherever they pupate, they have enough room for their wings to unfold and dry out. I'm curious to hear where other Monarchs pupate; let me know what you've seen!