I gave a talk at the recent CitusCon about deploying PostgreSQL servers to Azure using Bicep, an infrastructure-as-code language. You can watch the talk on YouTube or go through the online slides.
For those of you that prefer reading, this blog post is a "blog-post-ification" of my talk. Hope it helps you with more repeatable PostgreSQL deploys!
Managed services for PostgreSQL on Azure
Azure has multiple offerings for PostgreSQL, and it can be confusing to know which one to use. Here's a quick overview:
| Option |
Description |
| Azure Database for PostgreSQL – Single Server |
Microsoft's original offering. No longer recommended for new apps. |
| Azure Database for PostgreSQL – Flexible Server |
Microsoft's most recent PostgreSQL offering. Fully managed service with vertical scaling.
|
| Azure Cosmos DB for PostgreSQL |
Distributed database using PostgreSQL and the Citus extension. Can scale horizontally.
|
For more details on the differences, check out these blog posts from the Azure team:
In this blog post, I am focusing on the PostgreSQL Flexible server offering,
since that's a great fit for Python web apps and it's what I have the most experience deploying.
The concepts covered here should be helpful for deploying other Azure database servers as well, however.
Ways to deploy
a PostgreSQL Flexible Server
There are quite a few ways to deploy a PostgreSQL Flexible Server to Azure:
Azure portal, Azure CLI, Azure PowerShell, Azure SDKs, ARM templates, Terraform, and Azure Bicep.
First, let me point out why I dislike many of those options.
Using the Azure Portal
Creating new resources using the Azure portal is a great way to get started with Azure, but it's not good for replicable deploys of similar resources.
I do recommend going through the Portal creation process once (for a throw-away server) just to get a feel for the options, but then immediately moving on to other approaches.
Using CLI commands
An improvement over the Portal is the Azure CLI or Powershell modules, which allow you to specify
all the parameters in a single command.
Azure CLI example:
az postgres flexible-server create --resource-group pg-grp \
    --name pg-srv --location westus \
    --sku-name GP_Gen5_2 --version 14 \
    --admin-user myadmin --admin-password NeverShowThis
Azure PowerShell example:
New-AzPostgreSqlFlexibleServer -ResourceGroupName pg-grp \
    -ServerName pg-srv -Location westus \
    -SkuName GP_Gen5_2 -Version 14 \
    -AdministratorLogin myadmin -AdministratorLoginPassword NeverShowThis
It's easier to replicate deploys now, since you can just copy the command.
However, if you realize you need to update the server configuration afterwards,
you have to run a different command (update),
so replication would then require multiple commands or a merging of the create
and update commands. 😩
Using ARM templates
ARM (Azure Resource Manager) templates are JSON files that
declaratively describe the resources you want to create.
{
    "type": "Microsoft.DBforPostgreSQL/flexibleServers",
    "apiVersion": "2021-06-01",
    "name": "pg-srv",
    "location": "westus",
    "sku": {
        "name": "Standard_B1ms",
        "tier": "Burstable"
    },
    "properties": {
        "administratorLogin": "admin-user",
        "administratorLoginPassword": "NeverShowThis",
        "version": "14"
     }
    ...
👁️ See full example in postgres_example.json
ARM templates are a great way to replicate deploys,
but using JSON as a file format leads to fairly unwieldy files
that are difficult to parameterize. That's why Azure invented...
Bicep
Bicep is a DSL (domain-specific language) that compiles down to ARM templates.
The example below shows a minimal configuration for a PostgreSQL Flexible server:
resource server 'Microsoft.DBforPostgreSQL/flexibleServers@2021-06-01' = {
    name: 'pg-srv'
    location: 'eastus'
    sku: {
        name: 'Standard_B1ms'
        tier: 'Burstable'
    }
    properties: {
        administratorLogin: 'myadmin'
        administratorLoginPassword: 'NeverShowThis'
        version: '14'
        storage: {
        storageSizeGB: 128
        }
    }
}
The Bicep language
Bicep offers quite a few language features that make it easier to write and maintain,
and we'll see examples of each of these in the rest of this post.
| Feature |
Example |
| Parameters |
param location string = 'eastus' |
| Types |
param storageSizeGB int = 128 |
| Logic |
skuTier == 'Burstable' ? 32 : 128 |
| Loops |
for i in range(0, serverCount): |
| Functions |
param adminUsername string = newGuid() |
| Modules |
module myServer 'flexserver.bicep' { } |
For a detailed introduction to the entire Bicep language, consult the
Bicep language documentation
.
A parameterized Bicep file
We can parameterize the Bicep file to make it easier to reuse,
using parameters for values that vary across deployments.
The example below parameterizes the server name, location, and admin password:
param serverName string = 'pg-srv'
param location string = 'eastus'
@secure()
param adminPassword string

resource srv 'Microsoft.DBforPostgreSQL/flexibleServers@2021-06-01' = {
    name: serverName
    location: location
    sku: {
        name: 'Standard_B1ms'
        tier: 'Burstable'
    }
    properties: {
        administratorLogin: 'myadmin'
        administratorLoginPassword: adminPassword
        version: '14'
        storage: { storageSizeGB: 128 }
    }
}
Deploying from Bicep
Once we have a Bicep file, we can deploy it using Azure CLI commands.
The az deployment group create command will either create or update resources in an existing resource group.
If the described resources already exist, it will just update their configuration (if any change detected).
If they don't exist, it will create the resources from scratch.
The example below shows what it's like to deploy the file above:
$ az deployment group create --resource-group pg-grp --template-file pg.bicep
Please provide securestring value for 'adminPassword' (? for help):
{   "name": "postgres_example1",
    "properties": {
    "outputResources": [{
        "id": "/subscriptions/32ea8a26-5b40-4838-b6cb-be5c89a57c16/resourceGroups/cituscon-examples-eastus/providers/Microsoft.DBforPostgreSQL/flexibleServers/pg-srv",
        "resourceGroup": "pg-grp"
        }], ...
The output contains a long JSON description of all the created resources (truncated here).
If needed, it's possible to specify parameters on the command line:
$ az deployment group create --resource-group pg-grp --template-file pg.bicep \
    --parameters adminPassword=ADMIN_PASSWORD
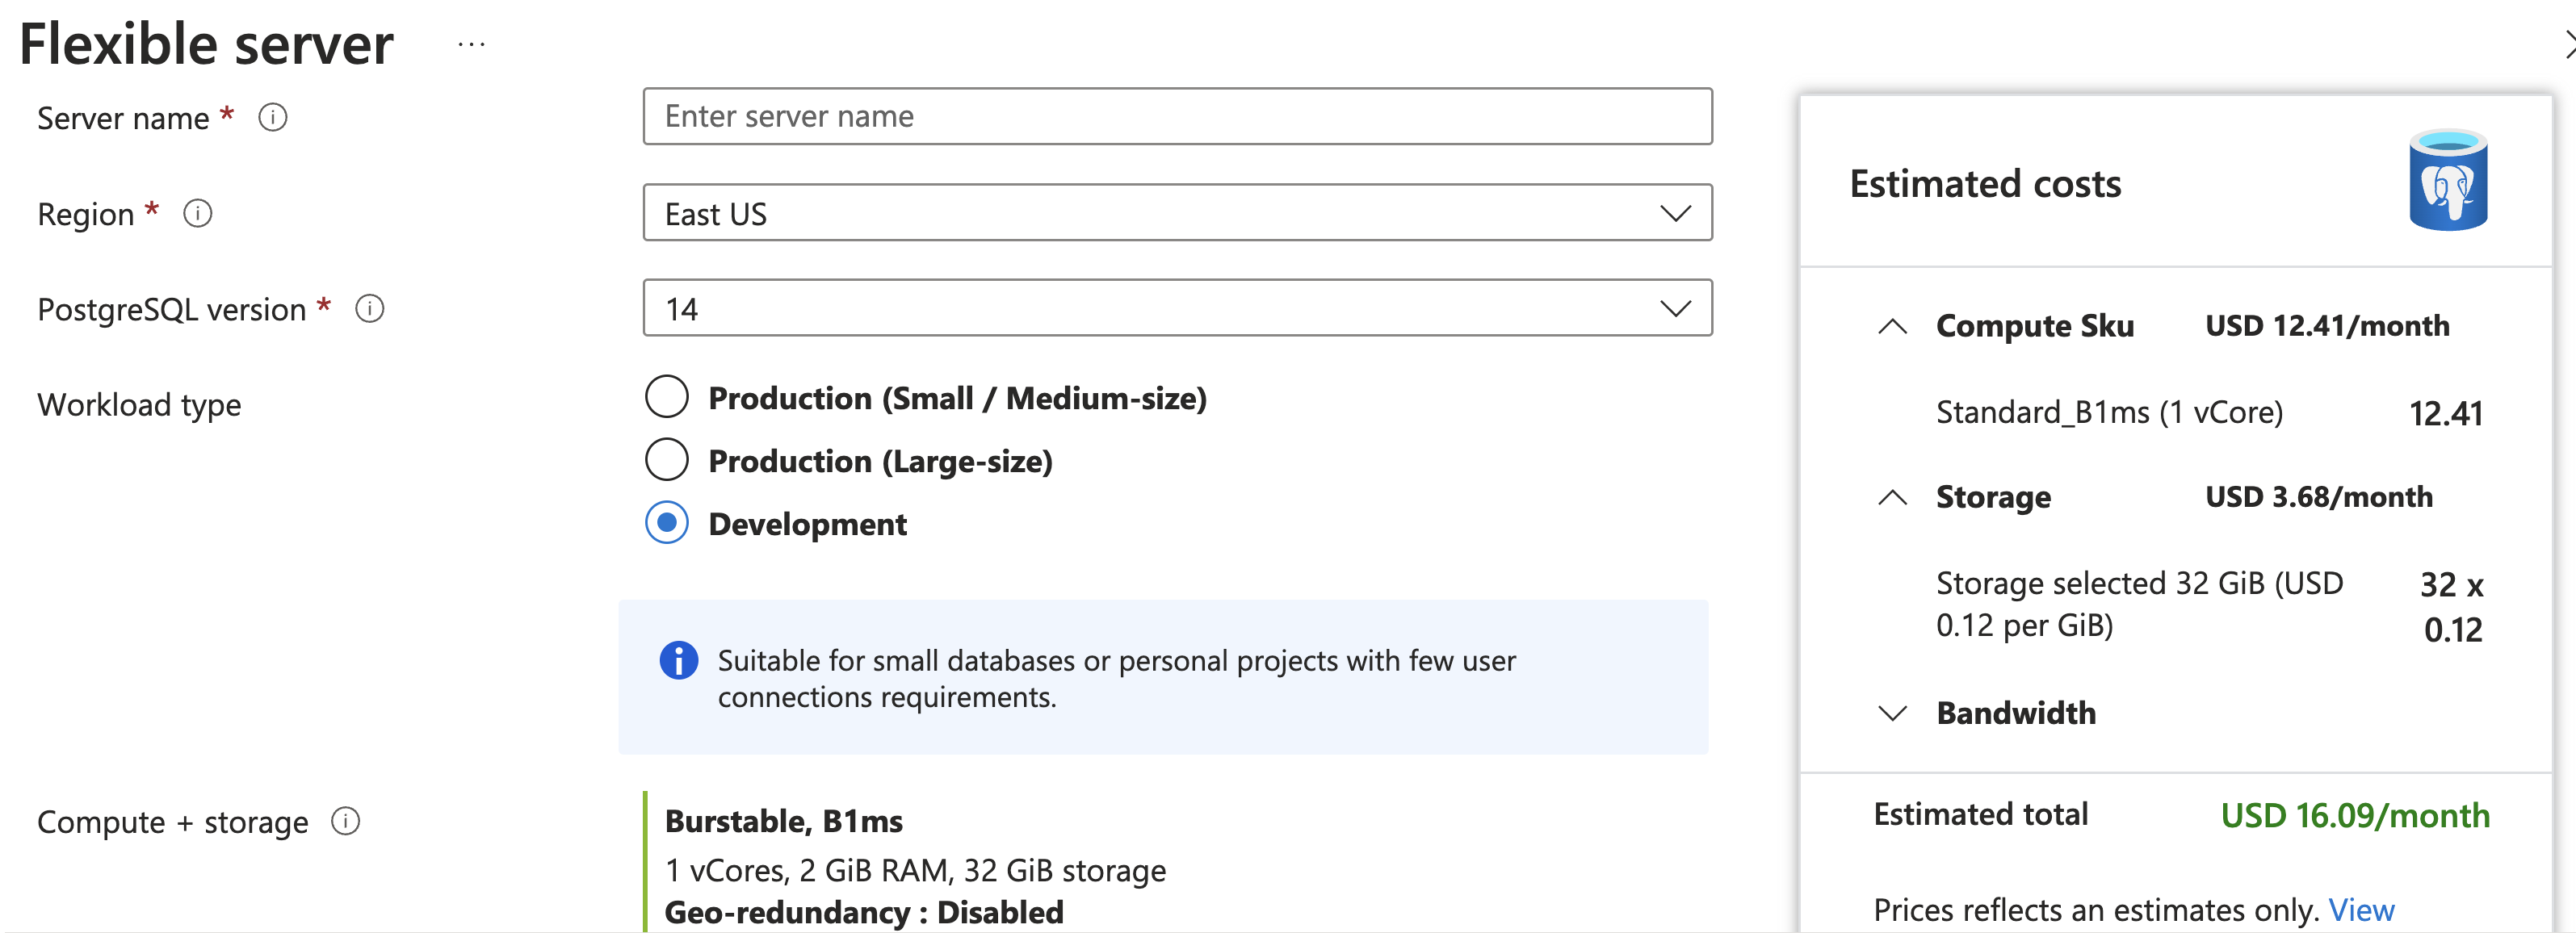
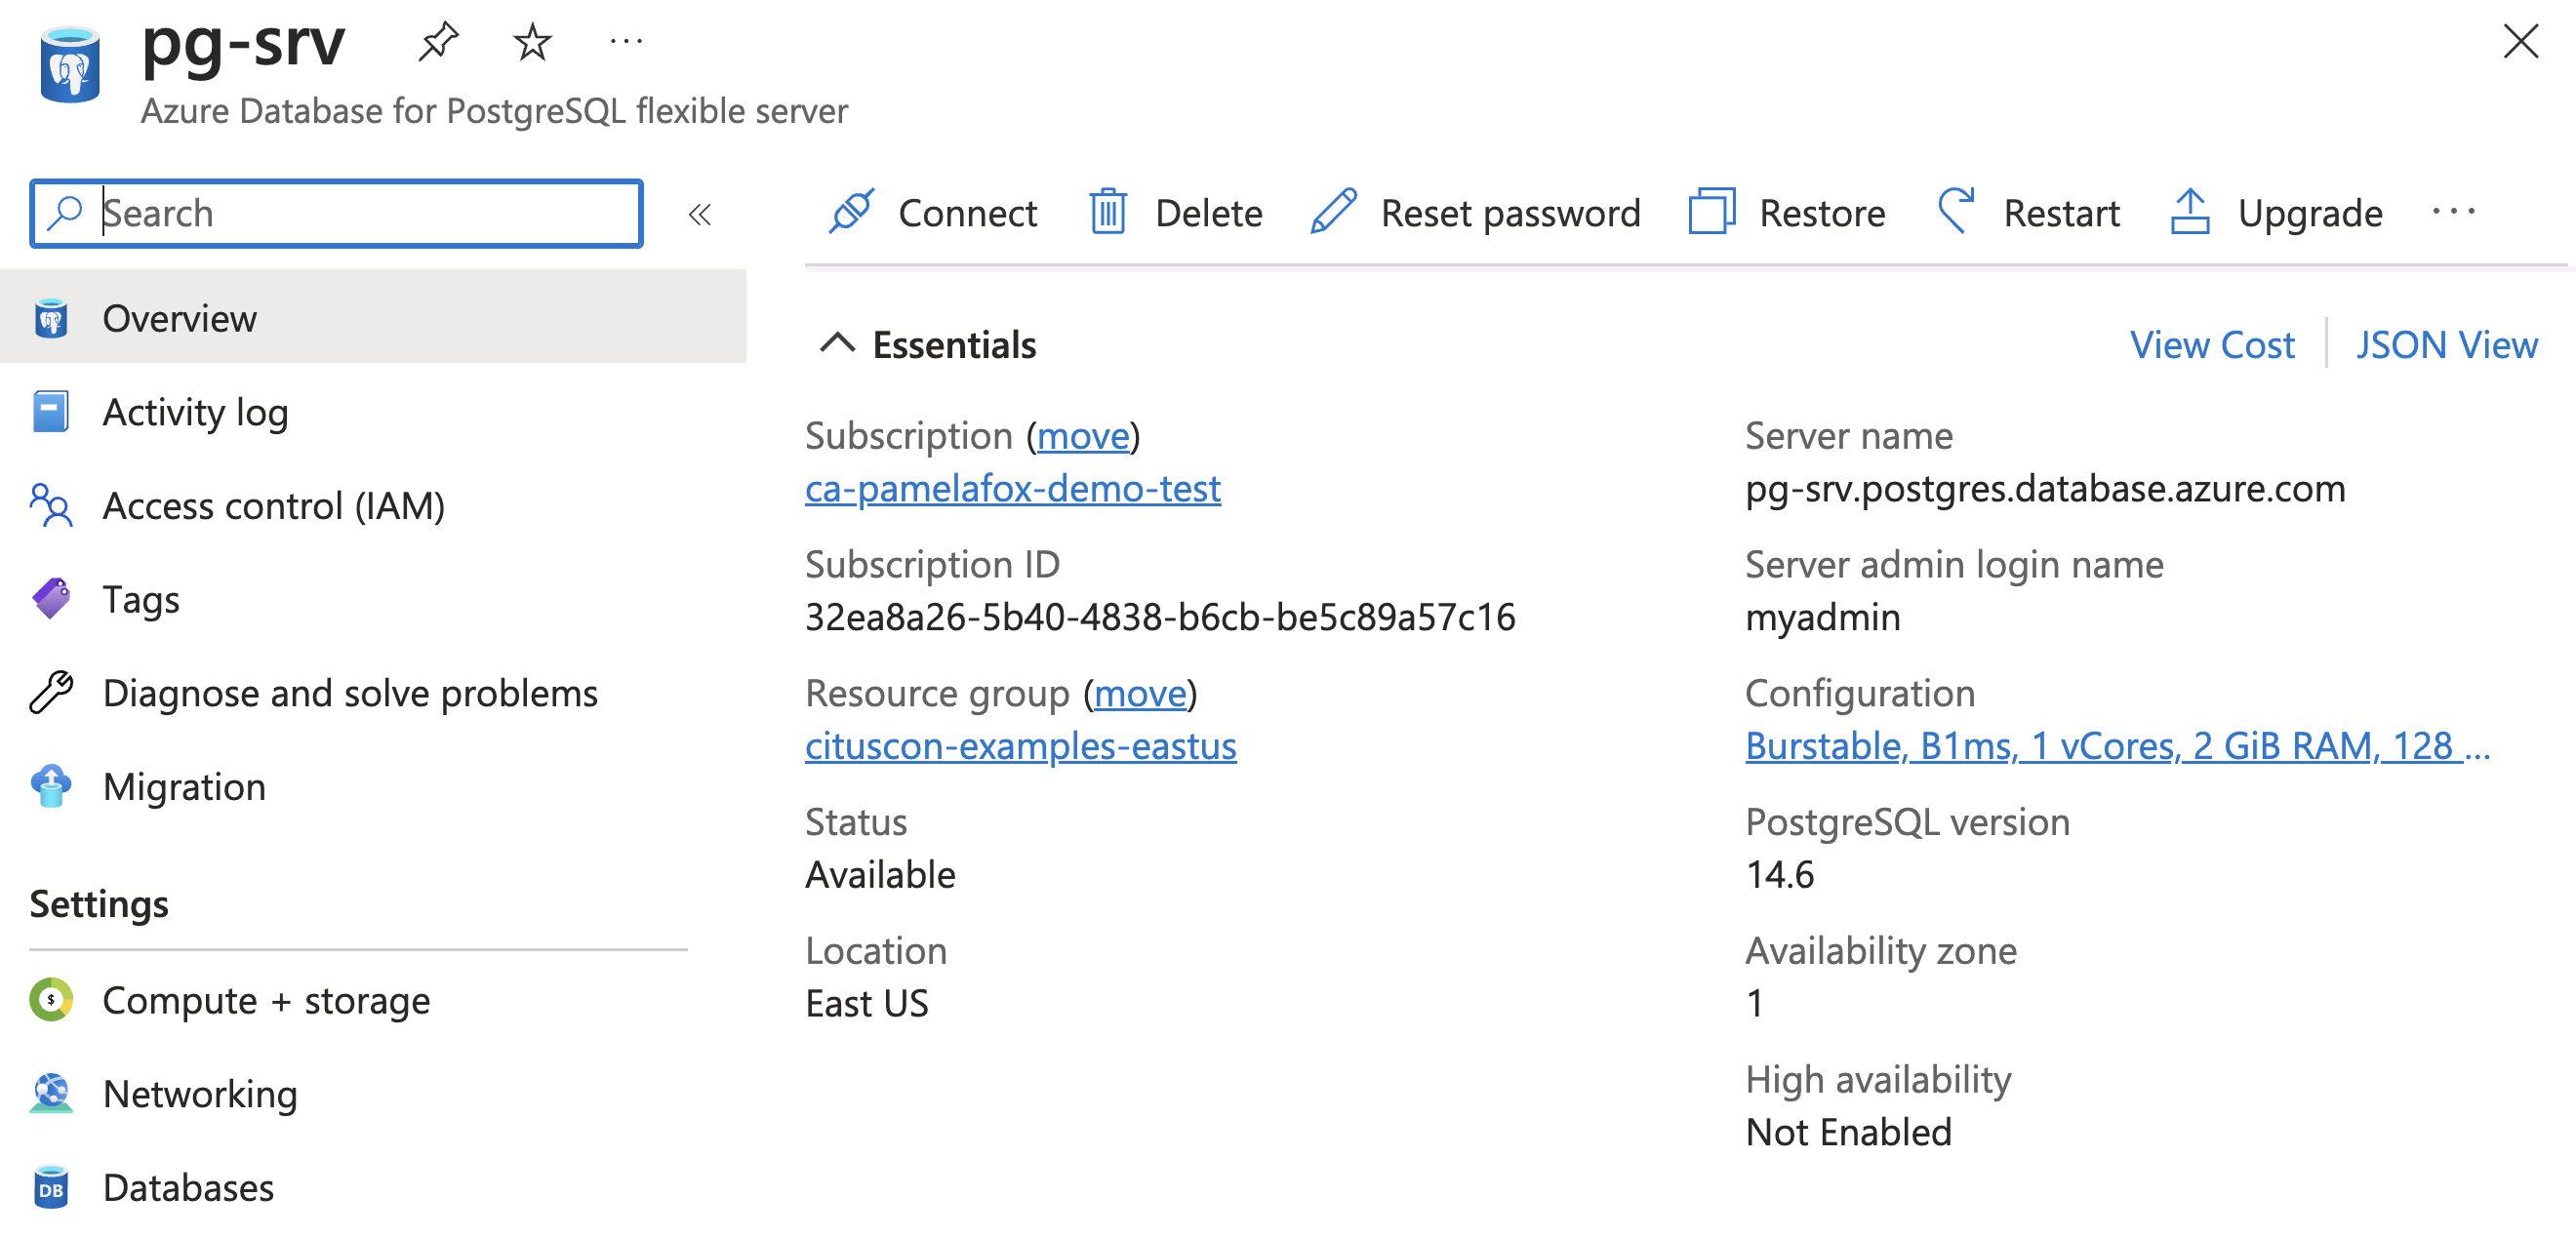
Once the command finishes, logging into the Portal shows the newly created server:
Child resources
A child resource exists solely within the scope of its parent resource.
These are the child resources that can be created for PostgreSQL Flexible servers:
administratorsconfigurationsdatabasesfirewallRulesmigrations
There are also a few read-only child resources that can be referenced in Bicep (but not created through Bicep):
advisors, backups, queryTexts.
Child resources: database
Each PostgreSQL Flexible server always includes a database called postgres
plus system databases azure_maintenance and azure_sys.
Additional databases can be created as child resources of the server,
as shown in the example below:
resource postgresServer 'Microsoft.DBforPostgreSQL/flexibleServers@2022-12-01' = {
    name: serverName
    location: location
    ...

    resource database 'databases' = {
        name: 'webapp'
    }
}
👁️ See full example in postgres_database.bicep
Child resources: databases
You may also want to create multiple databases at once.
That's a great time to use an array parameter type with a for loop:
param databaseNames array = ['webapp', 'analytics']

resource postgresServer 'Microsoft.DBforPostgreSQL/flexibleServers@2022-12-01' = {
    name: serverName
    location: location
    ...

    resource database 'databases' = [for name in databaseNames: {
        name: name
    }]
}
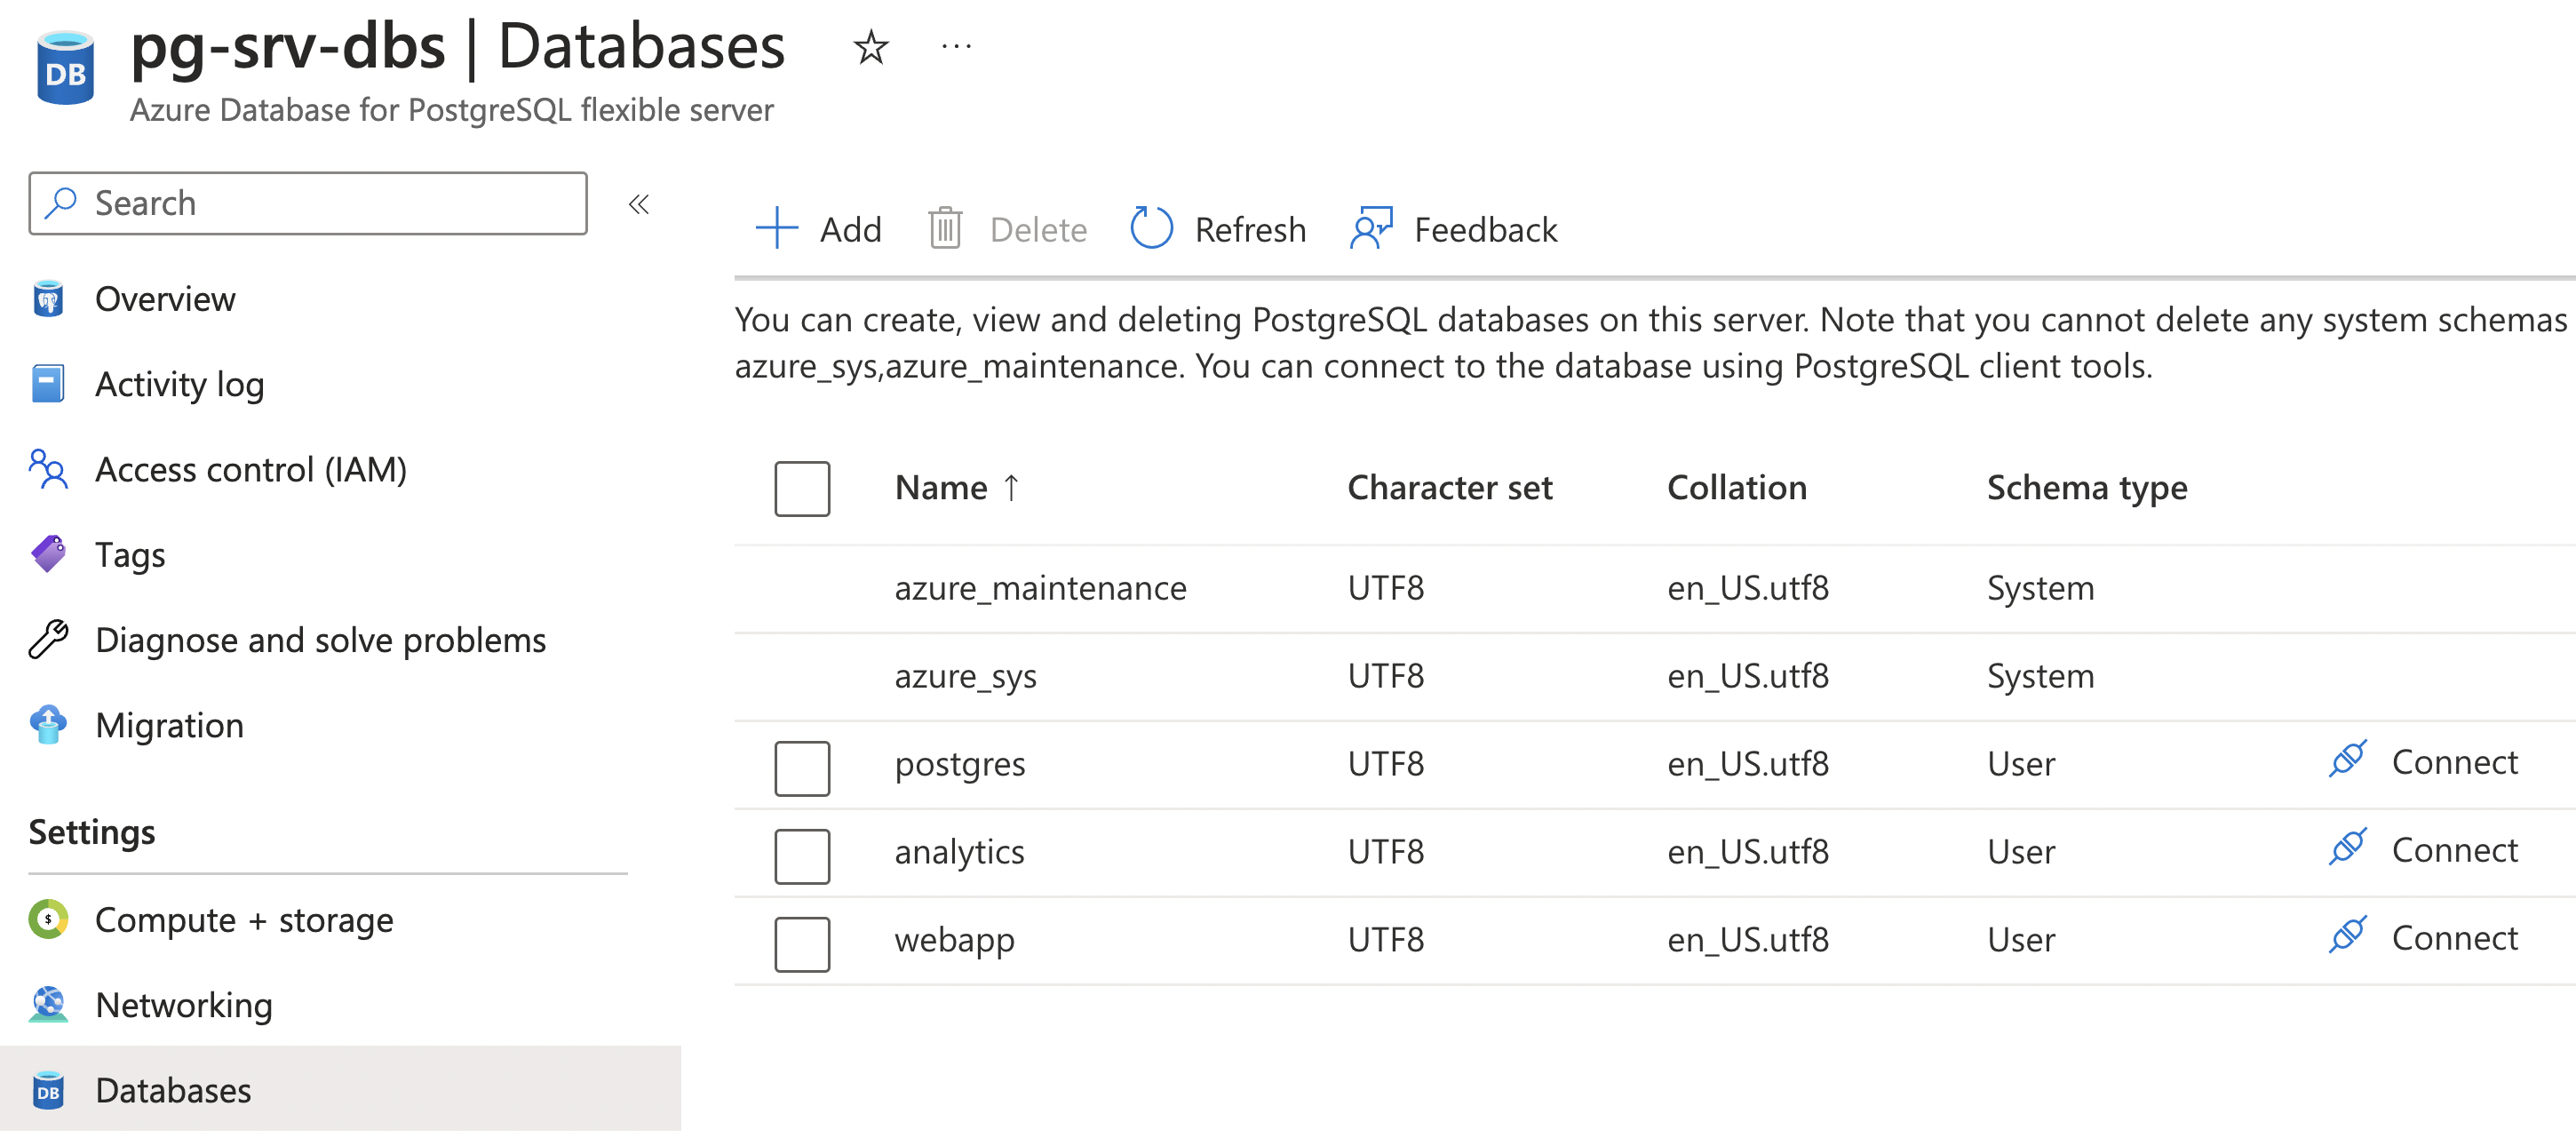
👁️ See full example in postgres_databases.bicep
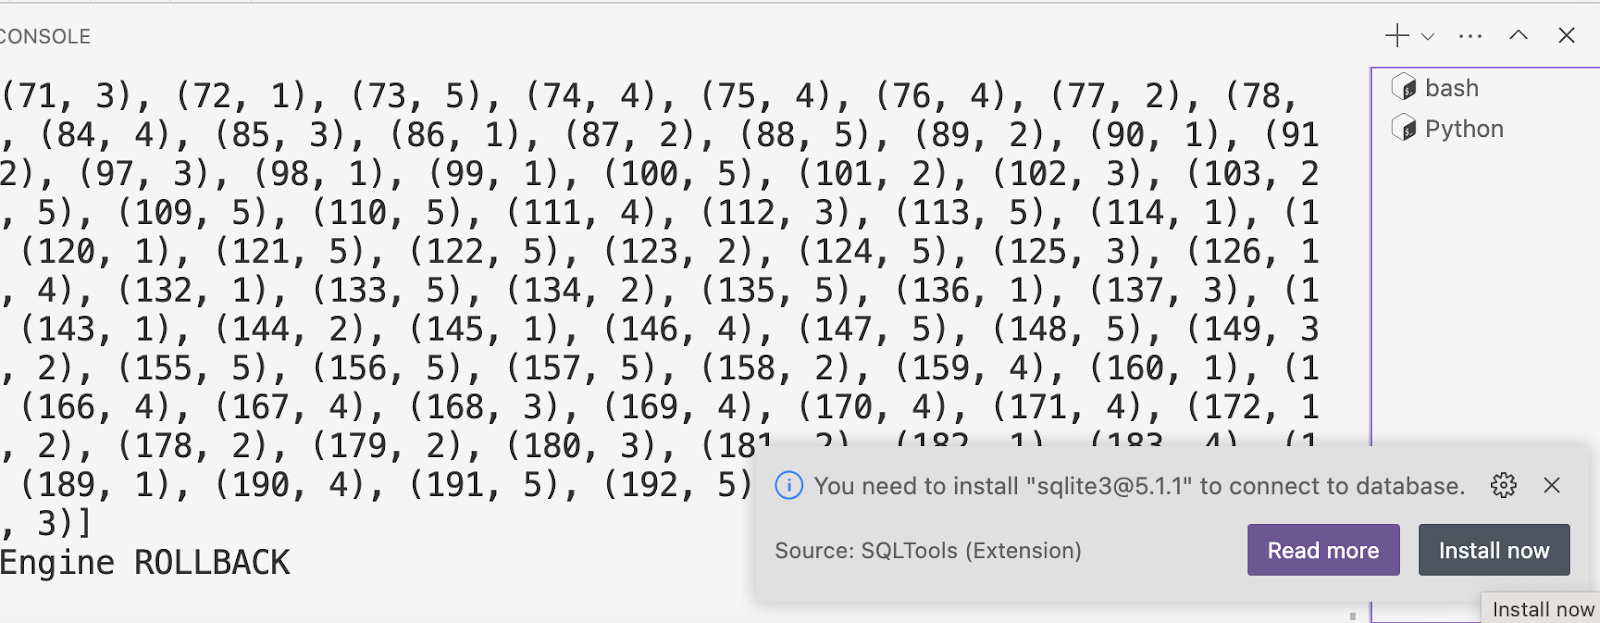
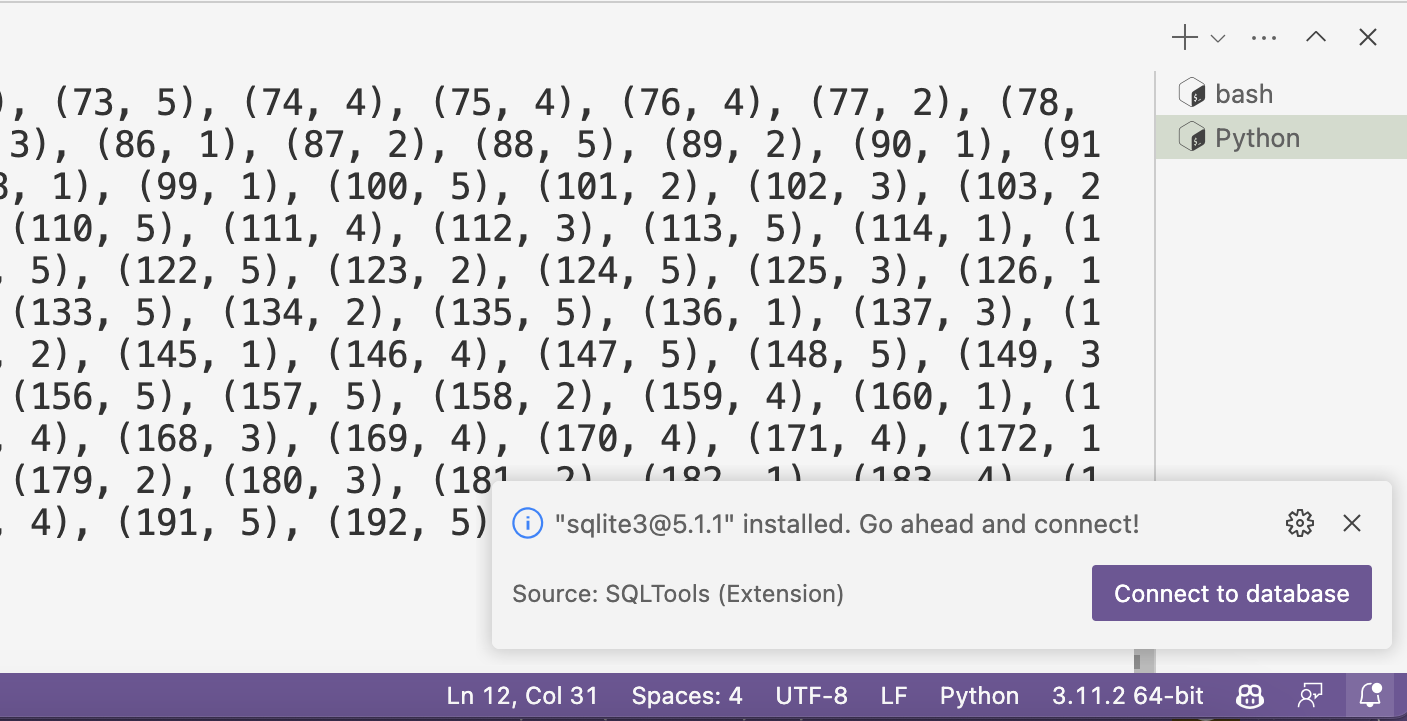
Once deployed, the databases will show up in the Portal,
along with an option to connect to them with a shell:
Child resources: firewall rule
By default, a PostgreSQL Flexible server is configured for "Public access" but it's not yet accessible from any IP ranges.
You can use firewallRules to allow access from particular IPs.
The example below allows access from any Azure service within Azure:
resource firewallAzure 'firewallRules' = {
    name: 'allow-all-azure-internal-IPs'
    properties: {
        startIpAddress: '0.0.0.0'
        endIpAddress: '0.0.0.0'
    }
}
👁️ See full example in postgres_azurefirewall.bicep
⚠️ This configuration means that any Azure developer can now access the server, if they somehow know the username and password.
Stay tuned to see how to deploy PostgreSQL within a Virtual network, the preferred approach.
You may want to allow access for just your work machine(s).
The example below creates rules for each IP in list using array with for:
param allowedSingleIPs array = ['103.64.88.254', '44.143.22.28']

resource postgresServer 'Microsoft.DBforPostgreSQL/flexibleServers@2022-12-01' = {
    ...

    resource firewallSingle 'firewallRules' = [for ip in allowedSingleIPs: {
        name: 'allow-single-${replace(ip, '.', '')}'
        properties: {
            startIpAddress: ip
            endIpAddress: ip
        }
    }]
}
👁️ See full example in postgres_loopfirewall.bicep
Once deployed, the firewall rules will show up in the Portal in the Networking section:

Adding a Virtual Network
As a security best practice, Azure recommends that you
deploy PostgreSQL servers in a Virtual Network (VNet),
along with other Azure resources that need access to it.
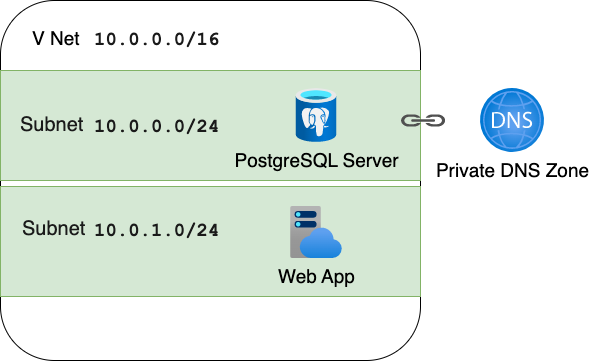
I'll step through the Bicep needed to
deploy both a PostgreSQL server and an App Service App
inside a VNet (each delegated to their own subnet),
and use a Private DNS Zone for name resolution between the App and PG server.
Virtual Network
The resource definition below creates a VNet with a private address space of 10.0.0.0 - 10.0.255.255:
resource virtualNetwork 'Microsoft.Network/virtualNetworks@2019-11-01' = {
    name: '${name}-vnet'
    location: location
    properties: {
        addressSpace: {
        addressPrefixes: [
            '10.0.0.0/16'
        ]
        }
    }
}
Virtual Network: subnets
The next step is to define subnets in the VNet, by adding child resources to that VNet resource.
The child resource below creates a subnet with address space of 10.0.0.1 - 10.0.0.255
and delegates it to PostgreSQL servers:
resource databaseSubnet 'subnets' = {
    name: 'database-subnet'
    properties: {
        addressPrefix: '10.0.0.0/24'
        delegations: [
        {
            name: '${name}-subnet-delegation'
            properties: {
            serviceName: 'Microsoft.DBforPostgreSQL/flexibleServers'
            }
        }]
    }
}
If you're new to '10.0.0.0/24' notation, see this post on
Configuring Azure VNet subnets with CIDR notation
Similarly, the child resource below creates a subnet with address space of 10.0.1.1 - 10.0.1.255
and delegates it to the other resource type (App Service):
resource webappSubnet 'subnets' = {
    name: 'webapp-subnet'
    properties: {
        addressPrefix: '10.0.1.0/24'
        delegations: [
        {
            name: '${name}-subnet-delegation-web'
            properties: {
            serviceName: 'Microsoft.Web/serverFarms'
            }
        }]
    }
}
Private DNS Zone
To make it easy for the App Service to connect to the PostgreSQL server,
create a private DNS Zone resource:
resource privateDnsZone 'Microsoft.Network/privateDnsZones@2020-06-01' = {
    name: '${pgServerPrefix}.private.postgres.database.azure.com'
    location: 'global'
    resource vNetLink 'virtualNetworkLinks' = {
        name: '${pgServerPrefix}-link'
        location: 'global'
        properties: {
            registrationEnabled: false
            virtualNetwork: { id: virtualNetwork.id }
        }
    }
}
The name of the resource must end in .private.postgres.database.azure.com.
For more details, read these reference materials:
Configure the PostgreSQL server
With the VNet and DNS zone created, the next step is to
modify the configuration of the PostgreSQL server to connect to both of them.
The Bicep below adds the network property of the server to inject it into the VNet and
connect it to the DNS Zone:
resource postgresServer 'Microsoft.DBforPostgreSQL/flexibleServers@2022-01-20-preview' = {
    name: pgServerPrefix
    ...

    properties: {
        ...
        network: {
            delegatedSubnetResourceId: virtualNetwork::databaseSubnet.id
            privateDnsZoneArmResourceId: privateDnsZone.id
        }
    }
}
Configure the Web App
The App Service also needs to be connected to the VNet (though it doesn't need to be connected to the DNS Zone).
This Bicep adds a networkConfig child resource on the Web App Service to inject it into the VNet:
resource web 'Microsoft.Web/sites@2022-03-01' = {
    name: '${name}-app-service'
    ...

    resource webappVnetConfig 'networkConfig' = {
        name: 'virtualNetwork'
        properties: {
            subnetResourceId: virtualNetwork::webappSubnet.id
        }
    }
}
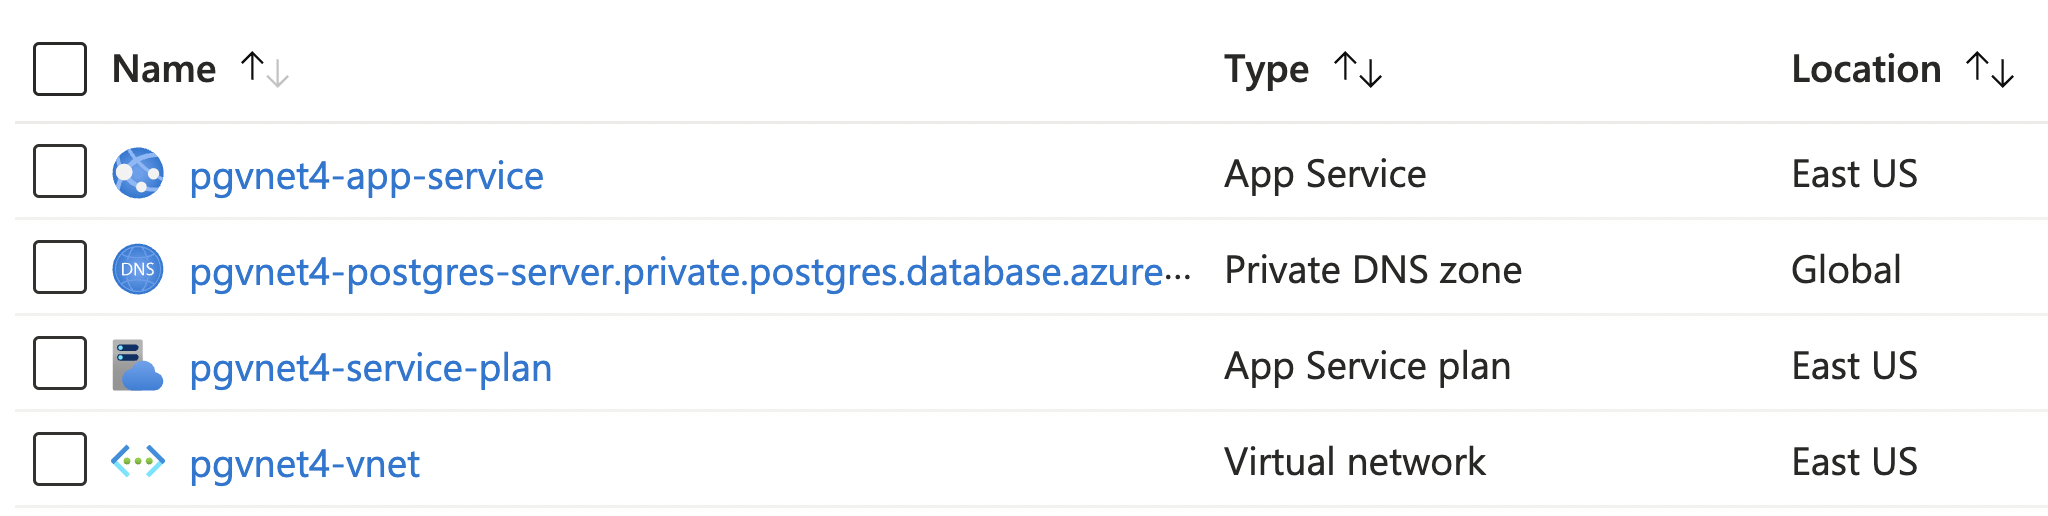
All together: PostgreSQL in VNet
That's everything needed!
👁️ See full example in postgres_vnet.bicep
After deploying the Bicep, the Azure Portal shows all four resources:
Tips & Tricks
Here are a few things I've learnt while deploying PostgreSQL with Bicep dozens of times over the last year.
PostgreSQL tips
- Managed identity is a more secure approach
than username/password. See sample at:
github.com/Azure-Samples/flask-postgresql-managed-identity
.
That example uses the service connector command, as it doesn't seem possible yet to
create a managed identity for PostgreSQL servers entirely with Bicep.
We are hoping that it becomes easier in the future.
- Location, location, location:
There are some location constraints for PostgreSQL servers,
especially for Microsoft employees. If you get a funky error,
try again with a new location (like "centralus").
- Many things can't be changed after creation:
admin username, PostgreSQL version, location, networking option, etc.
Give everything a good look before you start adding production data.
Bicep linting
I love linting all my code, and Bicep is no exception.
You can use az bicep build command to check file for errors:
$ az bicep build -f pg.bicep
You could use that in a pre-commit hook and/or setup a CI/CD workflow to always check for errors:
steps:
    - name: Checkout
    uses: actions/checkout@v2

    - name: Azure CLI script
    uses: azure/CLI@v1
    with:
        inlineScript: az bicep build -f infra/main.bicep
👁️ See whole file: azure-bicep.yaml
Bicep security validation
It's also possible to run automated checks for security issues and best practices
based solely on the Bicep files.
In CI/CD, you can use Microsoft Security DevOps action to find security issues in Bicep files:
- name: Run Microsoft Security DevOps Analysis
    uses: microsoft/security-devops-action@preview
    id: msdo
    with:
    tools: templateanalyzer
Here's an example of the kind of output it produces:
Error:      1. TemplateAnalyzer Error AZR-000284 - File: infra/main.bicep. Line: 54. Column 0.
Tool: TemplateAnalyzer: Rule: AZR-000284 (Azure.Deployment.AdminUsername).
https://azure.github.io/PSRule.Rules.Azure/en/rules/Azure.Deployment.AdminUsername/
Resource properties can be configured using a hardcoded value or Azure Bicep/ template
expressions. When specifing sensitive values, use secure parameters such as secureString
or secureObject.
👁️ See whole file: azure-dev-validate.yaml
AZD templates
You can use Bicep to create all of your Azure resources, and use the new Azure Developer CLI to take care of the whole deployment workflow.
It is my favorite way to deploy web apps on Azure these days.
To get started with the Azure Developer CLI, check out the many
aka.ms/azd-pg
templates that use PostgreSQL
in the AZD templates gallery.
For more Bicep tips, check out my previous blog post:
🔗 aka.ms/bicep-tips
Tips for writing Bicep files
Let me know if you have any questions or suggestions for the Azure team!