Way back in January, the very popular Python ORM SQLAlchemy released version 2.0. This version makes SQLAlchemy code much more compatible with Python type checkers.
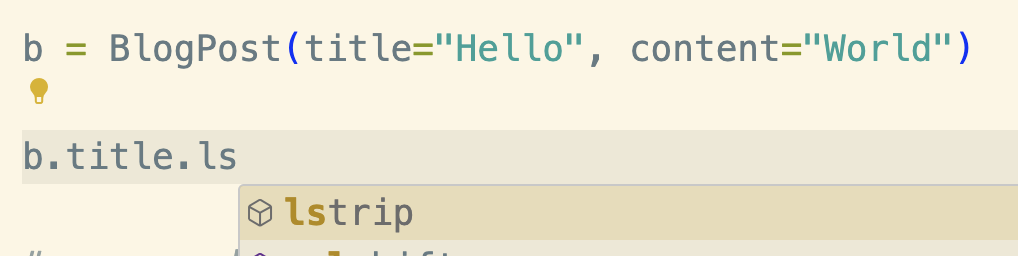
When you're using an IDE that understands type annotations (like VS Code with the Python extension), you can then get intellisense for those columns, like suggestions for functions that can be called on that data type.
You can also run a tool like mypy or pyright to find out if any of your code is using types incorrectly. For example, imagine I wrote a function to process the BlogPost model above:
def process_blog_posts(posts: list[BlogPost]):
    for post in posts:
        post.title = post.title.upper()
        post.id = post.id.upper()
Then running mypy would let me know if my code was using the typed columns incorrectly:
$ python3 -m mypy main_sqlalchemy.py
main_sqlalchemy.py:30: error: "int" has no attribute "upper"  [attr-defined]
Adding support to Flask-SQLAlchemy
I have recently begun to use type annotations more heavily in my code (especially for class and function signatures) so I was excited to try out SQLAlchemy 2.0. But then I realized that almost all of my usage of SQLAlchemy 2.0 was inside Flask apps, using the Flask-SQLAlchemy extension, and at the time, it did not support SQLAlchemy 2.0. What's a girl to do? Add support for it, of course!
I experimented with several ways to support SQLAlchemy 2.0 and eventually settled on a proposal that would be compatible with (hopefully all) the ways to customize SQLAlchemy 2.0 base classes. You can can choose for their base class to inherit from DeclarativeBase or DeclarativeBaseNoMeta, and you can add on MappedAsDataclass if they'd like to use dataclass-like data models.
A few examples:
class Base(DeclarativeBase):
  pass

db = SQLAlchemy(model_class=Base)

class Todo(db.Model):
     id: Mapped[int] = mapped_column(primary_key=True)
     title: Mapped[str] = mapped_column(nullable=True)
class Base(DeclarativeBase, MappedAsDataclass):
  pass

db = SQLAlchemy(model_class=Base)

class Todo(db.Model):
    id: Mapped[int] = mapped_column(init=False, primary_key=True)
    title: Mapped[str] = mapped_column(default=None)
The pull request was rather large, since we decided to default the documentation to 2.0 style classes, plus I parameterized every test to check all the possible base classes. Thanks to helpful reviews from the community (especially lead Flask maintainer David Lord), we were able to merge the PR and release SQLAlchemy 2.0 support on September 11th.
Porting Flask apps to SQLAlchemy 2.0
Since the release, I've been happily porting sample Flask applications over to use the new style models in SQLAlchemy 2.0, and also using the opportunity to make sure our code doesn't use the legacy way of querying data as well.
Here are a few pull requests that show the changes needed:
Of course, as those are samples, there wasn't a lot of code to change. In a complex production codebase, it will be a much bigger change to upgrade all your models. Hopefully you have tests written before making the change, so you can ensure they're made in a backwards compatible way.
Additional resources
As you're upgrading your models to new-style models, make sure you look through both the SQLAlchemy docs and the Flask-SQLAlchemy docs for examples of what you're trying to accomplish. You can even search through each GitHub repository for additional examples, as some situations that aren't in the docs are still covered in unit tests. The SQLAlchemy docs can be daunting in their scope, so I recommend bookmarking their ORM quickstart and Migration cheatsheet.
If you do run into any issues with porting your Flask app to SQLAlchemy 2.0, try to figure out first if it's a Flask-SQLAlchemy issue or a core SQLAlchemy issue. Many of the Flask-SQLAlchemy issue reports are in fact just SQLAlchemy issues. You can discuss SQLAlchemy issues in their GitHub discussions and discuss Flask-SQLAlchemy issues in our GitHub discussions or Discord.
As part of my role the Python advocacy team for Azure, I am a maintainer on several OpenAI samples, like this simple containerized chat app and this popular chat + search RAG app. In this series of blog posts, I'll share my learnings for writing chat-like applications. My experience is from apps with Python backends, but many of these practices apply cross-language.
Today's tip for OpenAI apps isn't really specific to OpenAI, but is a good practice for production-grade apps of any type: don't use API keys! If your app is using openai.com's OpenAI service, then you'll have to use keys, but if you're using Azure's OpenAI service, then you can authenticate with Azure Active Directory tokens instead.
The risks of keys
It's tempting to use keys, since the setup looks so straightforward - you only need your endpoint URL and key.
But using API keys in a codebase can lead to all kinds of issues. To name a few:
The key could be accidentally checked into a source control, by a developer who replaces the getenv() call with a hardcoded string, or a developer who adds a .env file to a commit.
Once checked into source control, keys are exposed internally and are also at a greater risk of external exposure by malicious actors who gain access to the codebase.
In a large company, multiple developers might unknowingly use the same key, use up each other's resources, and discover their services are failing due to quota errors.
I've seen all of these situations play out, and I don't want them to happen to other developers. A more secure approach is to use authentication tokens, and that's what I use in my samples.
Authenticating to Azure OpenAI with Entra identity
This code authenticates to Azure OpenAI with the openai Python package and Azure Python SDK:
The code authenticates to Azure using DefaultAzureCredential, which will iterate through many possible credential types until it finds a valid Azure login.
The code then gets an Azure OpenAI token provider based on that credential and sets that as the azure_ad_token_provider. The SDK will use that token provider to fetch access tokens when necessary, and even take care of refreshing the token for us.
Accessing OpenAI locally
The next step is to make sure that whoever is running the code has permission to access the OpenAI service. By default, you will not have permission, even if you created the OpenAI service yourself. That's a security measure to make sure you don't accidentally access production resources from a local machine (particularly helpful when your code deals with write operations on databases).
To access an OpenAI resource, you need the "Cognitive Services OpenAI User" role (role ID '5e0bd9bd-7b93-4f28-af87-19fc36ad61bd'). That can be assigned using the Azure Portal, Azure CLI, or ARM/Bicep.
Assigning roles with the Azure CLI
First, set the following environment variables:
PRINCIPAL_ID: The principal ID of your logged in account. You can get that with the Azure CLI by running az ad signed-in-user show --query id -o tsv or you can open the Azure Portal, search for "Microsoft Entra ID", select the Users tab, filter for your account, and copy the "object ID" under your email address.
SUBSCRIPTION_ID: The subscription ID of your logged in account. You can see that on the Overview page of your Azure OpenAI resource in the Azure Portal.
RESOURCE_GROUP: The resource group of the OpenAI resource.
Then run this command using the Azure CLI:
az role assignment create \
        --role "5e0bd9bd-7b93-4f28-af87-19fc36ad61bd" \
        --assignee-object-id "$PRINCIPAL_ID" \
        --scope /subscriptions/"$SUBSCRIPTION_ID"/resourceGroups/"$RESOURCE_GROUP" \
        --assignee-principal-type User
Assigning roles with ARM/Bicep
We use the Azure Developer CLI to deploy all of our samples, which relies on Bicep files to declare the infrastructure-as-code. That results in more repeatable deploys, so it's a great approach for deploying production applications.
This Bicep resource creates the role, assuming a principalId parameter is set:
You can also see how our sample's main.bicep uses a module to set up the role.
Assigning roles with the Azure Portal
If you are unable to use those automated approaches (preferred), it's also possible to use the Azure Portal to create the role:
Open the OpenAI resource
Select "Access Control (IAM)" from the left navigation
Select "+ Add" in the top menu
Search for "Cognitive Services OpenAI User" and select it in the results
Select "Assign access to: User, group, or service principal"
Search for your email address
Select "Review and assign"
Accessing OpenAI from production hosts
The next step is to ensure your deployed application can also use a DefaultAzureCredential token to access the OpenAI resource. That requires setting up a Managed Identity and assigning that same role to the Managed identity. There are two kinds of managed identities: system-assigned and user-assigned. All Azure hosting platforms support managed identity. We'll start with App Service and system-assigned identities as an example.
Managed identity for App Service
This is how we create an App Service with a system-assigned identity in Bicep code:
The role assignment process is largely the same for the host as it was for a user, but the principal ID must be set to the managed identity's principal ID instead and the principal type is "ServicePrincipal".
For example, this Bicep assigns the role for an App Service system-assigned identity:
It's also possible to use a system-assigned identity for Azure Container Apps, using a similar approach as above. However, for our samples, we needed to use user-assigned identities so that we could give the same identity access to Azure Container Registry before the ACA app was provisioned. That's the advantage of a user-assigned identity: reuse across multiple Azure resources.
First, we create a new identity outside of the container app Bicep resource:
When using a user-assigned identity, we need to modify our call to AzureDefaultCredential to tell it which identity to use, since you could potentially have multiple user-assigned identities (not just the single system-assigned identity for the hosting environment).
The following code retrieves the identity's ID from the environment variables and specifies it as the client_id for the Managed Identity credential:
At this point, you should be able to access OpenAI both for local development and in production. Unless, that is, you're developing with a local Docker container. By default, a Docker container does not have a way to access any of your local credentials, so you'll see authentication errors in the logs.
It used to be possible to use a workaround with volumes to access the credential, but after Azure started encrypting the local credential, it's now an open question as to how to easily authenticate inside a local container.
What are our options?
Use a key for local development in a Docker container. That has the drawback of keys that we discussed above, but you could use a key for a non-production deployment locally, to reduce the risk of using keys,
Run a local model (via llamafile or ollama) with an OpenAI-compatible endpoint. You will see fairly large differences in the model's answers, so you would not want to do that when working on prompt engineering aspects of the app.
Run the app outside the container for local development purposes. You can still run it inside a VS Code Dev Container, which does allow for Azure authentication, if you're looking for the benefits of local containerization. This is often the approach I Take.
All together now
As you can see, it's not entirely straightforward to authenticate to OpenAI without keys, depending on how you're developing locally and where you're deploying.
The following code uses a key when it's set in the environment, uses a user-assigned Managed Identity when the identity ID is set in the environment, and otherwises uses DefaultAzureCredential:
from azure.identity import DefaultAzureCredential, ManagedIdentityCredential
from azure.identity import get_bearer_token_provider

client_args = {}
if os.getenv("AZURE_OPENAI_KEY"):
  client_args["api_key"] = os.getenv("AZURE_OPENAI_KEY")
else:
  if client_id := os.getenv("AZURE_OPENAI_CLIENT_ID"):
    # Authenticate using a user-assigned managed identity on Azure
    azure_credential = ManagedIdentityCredential(
      client_id=client_id)
  else:
    # Authenticate using the default Azure credential chain
    azure_credential = DefaultAzureCredential()
  client_args["azure_ad_token_provider"] = get_bearer_token_provider(
    azure_credential, "https://cognitiveservices.azure.com/.default")

openai_client = openai.AsyncAzureOpenAI(
  api_version=os.getenv("AZURE_OPENAI_API_VERSION") or "2024-02-15-preview",
  azure_endpoint=os.getenv("AZURE_OPENAI_ENDPOINT"),
  **client_args,
)
Here are more examples to help you move to keyless authentication for your OpenAI projects:
azure-openai-keyless:Uses azd to provision the OpenAI and RBAC role for a local user account only.
openai-chat-backend-fastapi: Uses azd to provision the OpenAI and RBAC role for both local user account and Azure Container App user-assigned identity.
azure-search-openai-demo: Uses azd to provisions the OpenAI and RBAC role for both local user account and App Service system identity.
As part of my role the Python advocacy team for Azure, I am now one of the maintainers on several ChatGPT samples, like my simple chat app and this popular chat + search app. In this series of blog posts, I'll share my learnings for writing chat-like applications. My experience is from apps with Python backends, but many of these practices apply cross-language.
Today I want to talk about the importance of streaming in the UI of a chat app, and how we can accomplish that. Streaming doesn't feel like a must-have at first, but users have gotten so accustomed to streaming in ChatGPT-using interfaces like ChatGPT, Bing Chat, and GitHub CoPilot, that they expect it in similar experiences. In addition, streaming can reduce the "time to first answer", as long as your UI is calling the streaming OpenAI API as well. Given it can take several seconds for ChatGPT to respond, we welcome any approaches to answer user's questions faster.
Streaming from the APIs
The openai package makes it easy to optionally stream responses from the API, by way of a stream argument:
When stream is true, the response type is an asynchronous generator, so we can use async for to process each of the ChatCompletion chunk objects:
async for event in await chat_coroutine:
    message_chunk = event.choices[0].delta.content
Sending stream from backend to frontend
When we're making a web app, we need a way to send those objects as a stream from the backend to the browser. We can't use a standard HTTP response, since that sends everything at once and closes the connection. The most common approaches for streaming from backends are:
WebSockets: Bidirectional communication channel, client or server can push.
Readable streams: An HTTP response with a Transfer-encoding header of "chunked", signifying the browser must wait for all chunks.
All of these could potentially be used for a chat app, and I myself have experimented with both server-sent events and readable streams. Behind the scenes, the ChatGPT API actually uses server-sent events, so you'll find code in the openai package for parsing that protocol. However, I now prefer using readable streams for my frontend to backend communication. It's the simplest code setup on both the frontend and backend, and it supports the POST requests that our apps are already sending.
The key is to send the chunks from the backend using the NDJSON (jsonlines) format, and parse that format in the frontend. See my blog post on fetching JSON over streaming HTTP for Python and JavaScript example code.
Achieving a word-by-word effect
With all of that implemented, we have a frontend that reveals the answer gradually:
Here's what's interesting: despite our frontend receiving chunks of just a few tokens at a time, it appears to reveal almost entire sentences at a time. Why does the frontend UI seem to stream much larger chunks than what it receives? That's likely caused by the browser batching up repaints, deciding that it can wait to display the latest update to the innerHTML of the answer element. Normally that's a great performance enhancement on the browser's side, but it's not ideal in this case.
My colleague Steve Steiner experimented with various ways to force the browser to repaint more frequently, and settled on a technique that uses window.setTimeout() with a delay of 33 milliseconds for each chunk. That does mean that the browser takes overall more time to display a streamed response, but it doesn't end up faster than reading speed. See his PR for implementation details.
Now the frontend displays the answer at the same level of granularity that it receives from the chat completions API:
Streaming more of the process
Many of our sample apps are RAG apps that "chat on your data", by chaining together calls across vector databases (like Azure Cognitive Search), embedding APIs, and the chat completions API. That chain of calls will take longer to process than a single ChatCompletion call, of course, so users may end up waiting longer for their answers.
One suggestion from Steve Steiner is to stream more of the process. Instead of waiting until we had the final answer, we could stream the process of finding the answer, like:
Processing your question: "Can you suggest a pizza recipe that incorporates both mushroom and pineapples?"
Found three related results from our cookbooks: 1) Mushroom calzone 2) Pineapple ham pizza 3) Mushroom loaf
Generating answer to your question...
Sure! Here's a recipe for a mushroom pineapple pizza...
We haven't integrated that idea into any of our samples yet, but it's interesting to consider for anyone building chat apps, as a way to keep the user engaged while the backend does additional work.
Making it optional
I just spent all that time talking about streaming, but I want to leave you with one final recommendation: make streaming optional, especially if you are developing a project for others to deploy. There are some web hosts that may not support streaming as readily as others, so developers appreciate the option to turn streaming off. There are also some use cases where streaming may not make sense, and it should be easy for developers (or even users) to turn it off.
As part of my role the Python advocacy team for Azure, I am now one of the maintainers on several ChatGPT samples, like my simple chat app and this popular chat + search app. In this series of blog posts, I'll share my learnings for writing chat-like applications. My experience is from apps with Python backends, but many of these practices apply cross-language.
My first tip is to use an asynchronous backend framework so that your app is capable of fulfilling concurrent requests from users.
The need for concurrency
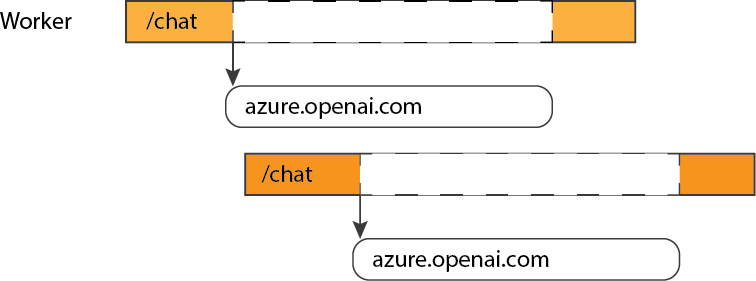
Why? Let's imagine that we used a synchronous framework, like Flask. We deploy that to a server using gunicorn and several workers. One of those workers receives a POST request to the "/chat" endpoint. That chat endpoint in turns makes a request to the Azure ChatCompletions API. The request can take a while to complete - several seconds! During that time, the worker is tied up and cannot handle any more user requests. We could throw more CPUs and thus workers and threads at the problem, but that's a waste of server resources.
Without concurrency, requests must be handled serially:
The better approach when our app has long blocking I/O calls is to use an asynchronous framework. That way, when a request has gone out to a potentially slow-to-respond API, the Python program can pause that coroutine and handle a brand new request.
With concurrency, workers can handle new requests during I/O calls:
When we deploy those apps, we still use gunicorn, but with the uvicorn worker, which is designed for Python ASGI apps. The gunicorn.conf.py configures it like so:
To really benefit from the port to an asynchronous framework, we need to make asynchronous calls to all of the APIs, so that a worker can handle a new request whenever an API call is being awaited.
First, we must use an async version of the OpenAI constructor, either AsyncOpenAI or AsyncAzureOpenAI:
Then, whenever we make API calls with methods on that client, we await their results:
chat_coroutine = await openai_client.chat.completions.create(
    deployment_id=os.environ["AZURE_OPENAI_CHAT_DEPLOYMENT"],
    messages=[{"role": "system", "content": "You are a helpful assistant."},
              {"role": "user", "content": request_message}],
    stream=True,
)
For the RAG sample, we also have calls to Azure services like Azure Cognitive Search. To make those asynchronous, we first import the async variant of the credential and client classes in the aio module:
from azure.identity.aio import DefaultAzureCredential
from azure.search.documents.aio import SearchClient
Then, like with the openai async clients, we must await results from any methods that make network calls:
As part of my role the Python advocacy team for Azure, I am now one of the maintainers on several ChatGPT samples, like my simple chat app and the very popular chat + search app. Both of those samples use Quart, the asynchronous version of Flask, which enables them to use the asynchronous versions of the functions from the openai package.
response = openai.ChatCompletion.create(
  messages=[{"role": "system", "content": "You are a helpful assistant."},
            {"role": "user", "content": request_message}],
  stream=True)
An asynchronous call to that same API looks like:
response = await openai.ChatCompletion.acreate(
  messages=[{"role": "system", "content": "You are a helpful assistant."},
            {"role": "user", "content": request_message},],
  stream=True)
The difference is just the addition of await to wait for the results of the asynchronous function (and signal that the process can work on other tasks), along with the change in method name from create to acreate. That's a small difference in our app code, but it's a significant difference when it comes to mocking those calls, so it's worth pointing out.
Mocking a streaming call
In our tests of the apps, we don't want to actually make calls to the OpenAI servers, since that'd require authentication and would use up quota needlessly. Instead, we can mock the calls using the built-in pytest fixture monkeypatch with code that mimics the openai package's response.
Here's the fixture that I use to mock the asynchronous acreate call:
@pytest.fixture
def mock_openai_chatcompletion(monkeypatch):

    class AsyncChatCompletionIterator:
        def __init__(self, answer: str):
            self.answer_index = 0
            self.answer_deltas = answer.split(" ")

        def __aiter__(self):
            return self

        async def __anext__(self):
            if self.answer_index < len(self.answer_deltas):
                answer_chunk = self.answer_deltas[self.answer_index]
                self.answer_index += 1
                return openai.util.convert_to_openai_object(
                    {"choices": [{"delta": {"content": answer_chunk}}]})
            else:
                raise StopAsyncIteration

    async def mock_acreate(*args, **kwargs):
        return AsyncChatCompletionIterator("The capital of France is Paris.")

    monkeypatch.setattr(openai.ChatCompletion, "acreate", mock_acreate)
The final line of that fixture swaps the acreate method with my mock method that returns a class that acts like an asynchronous generator thanks to its __anext__ dunder method. That method returns a chunk of the answer each time it's called, until there are no chunks left.
Mocking non-streaming call
For the other repo, which supports both streaming and non-streaming response, the mock acreate method must account for the non-streaming case by immediately returning the full answer.
    async def mock_acreate(*args, **kwargs):
        messages = kwargs["messages"]
        answer = "The capital of France is Paris."
        if "stream" in kwargs and kwargs["stream"] is True:
            return AsyncChatCompletionIterator(answer)
        else:
            return openai.util.convert_to_openai_object(
                {"choices": [{"message": {"content": answer}}]})
Mocking multiple answers
If necessary, it's possible to make the mock respond with different answers based off the passed on the last message passed in. We need that for the chat + search app, since we also use a ChatGPT call to generate keyword searches based on the user question.
Just change the answer based off the messages keyword arg:
    async def mock_acreate(*args, **kwargs):
        messages = kwargs["messages"]
        if messages[-1]["content"] == "Generate search query for: What is the capital of France?":
            answer = "capital of France"
        else:
            answer = "The capital of France is Paris."
Mocking other openai calls
We also make other calls through the openai package, like to create embeddings. That's a much simpler mock, since there's no streaming involved: