Friday, March 31, 2023

Adding Microsoft Graph authentication as a Flask Blueprint

Over the last month, I've been working a lot with the Microsoft Graph API identity platform, which makes it possible for users to login to a website with a Microsoft 365 account. With some additional configuration, it even acts as a generic customer identity management solution.

For Python developers, msal has been the traditional package for interacting with the API. However, the author of that library recently developed a higher-level package, identity, to wrap the most common authentication flow. The ms-identity-python-webapp sample demonstrates how to use that flow in a minimal Flask web app.

Flask developers often use Blueprints and Application factories to organize large Flask apps, and many requested guidance on integrating the authentication code with a Blueprint-based application. I have developed a few Blueprint-based apps lately, so I decided to attempt the integration myself. Good news: it worked! 🎉

You can see my integration in the identity branch of flask-surveys-container-app, and look through the changes in the pull request.

To aid others in their integration, I'll walk through the notable bits.

The auth blueprint

First I added an auth blueprint to bundle up the auth-related routes and templates.

auth/
├── __init__.py
├── routes.py
└── templates/
    └── auth/
        ├── auth_error.html
        └── login.html

The routes in the blueprint are similar to those in the original sample. However, I added a line to store next_url inside the current session. By remembering that, a user can login from any page and get redirected back to that page (versus getting redirected back to the index). That's a much nicer user experience in a large app.

@bp.route("/login")
def login():
    auth = current_app.config["AUTH"]
    session["next_url"] = request.args.get("next_url", url_for("index"))
    return render_template(
        "auth/login.html",
        version=identity.__version__,
        **auth.log_in(
            scopes=current_app.config["SCOPE"],
            redirect_uri=url_for(".auth_response", _external=True)
        ),
    )

@bp.route("/getAToken")
def auth_response():
    auth = current_app.config["AUTH"]
    result = auth.complete_log_in(request.args)
    if "error" in result:
        return render_template("auth/auth_error.html", result=result)
    next_url = session.pop("next_url", url_for("index"))
    return redirect(next_url)


@bp.route("/logout")
def logout():
    auth = current_app.config["AUTH"]
    return redirect(auth.log_out(url_for("index", _external=True)))

The templates in the auth blueprint now extend base.html, the only template in the root templates directory. That gives the authentication-related pages a more consistent UI with the rest of the site.

App configuration

The global app configuration happens in the root __init__.py, mostly inside the create_app function.

To make sure I could access the identity package's Auth object from any blueprint, I added it to app.config:

app.config.update(
    AUTH=identity.web.Auth(
        session=session,
        authority=app.config.get("AUTHORITY"),
        client_id=app.config["CLIENT_ID"],
        client_credential=app.config["CLIENT_SECRET"],
    )
)

I also used the app.context_processor decorator to inject a user variable into every template that gets rendered.

@app.context_processor
def inject_user():
    auth = app.config["AUTH"]
    user = auth.get_user()
    return dict(user=user)

Finally, I registered the new auth blueprint in the usual way:

from backend.auth import bp as auth_bp

app.register_blueprint(auth_bp, url_prefix="")

Requiring login

Typically, in an app with user authentication, logging in is required for some routes while optional for others. To mark routes accordingly, I defined a login_required decorator:

def login_required(f):
    @wraps(f)
    def decorated_function(*args, **kwargs):
        auth = current_app.config["AUTH"]
        if auth.get_user() is None:
            login_url = url_for("auth.login", next_url=request.url)
            return redirect(login_url)
        return f(*args, **kwargs)
    return decorated_function

When that decorator sees that there is no current user, it forces a redirect to the auth blueprint's login route, and passes along the current URL as the next URL.

I then applied that decorator to any route that required login:

@bp.route("/surveys/new", methods=["GET"])
@login_required
def surveys_create_page():
    return render_template("surveys/surveys_create.html")

Accessing user in templates

I want to let users know their current login status on every page in the app, and give them a way to either login or log out. To accomplish that, I added some logic to the Bootstrap nav bar in base.html:

{% if user %}
  <li class="nav-item dropdown">
      <a class="nav-link dropdown-toggle" href="/"
            id="navbarDropdown" role="button"
            data-bs-toggle="dropdown" aria-expanded="false">
        {{ user.get("name")}}
      </a>
      <ul class="dropdown-menu dropdown-menu-end" aria-labelledby="navbarDropdown">
        <li class="nav-item">
          <a class="nav-link" href="{{ url_for('auth.logout') }}">Sign out</a>
        </li>
      </ul>
  </li>
{% else %}
  <li class="nav-item">
    <a class="nav-link" href="{{ url_for('auth.login') }}">Sign in</a>
  </li>
{% endif %}

...And that's about it! Look throughthe full code or pull request for more details. Let me know if you have suggestions for a better way to architect the auth blueprint, or if you end up using this in your own app. 🤔
Friday, March 3, 2023

Deploying a containerized FastAPI app to Azure Container Apps

Based on my older post about deploying a containerized Flask app to Azure Container Apps, here's a similar process for deploying a FastAPI app instead.

First, some Docker jargon:

  • A Docker image is a multi-layered environment that is exactly the environment your app thrives in, such as a Linux OS with Python 3.11 and FastAPI installed. You can also think of an image as a snapshot or a template.
  • A Docker container is an instance of an image, which could run locally on your machine or in the cloud.
  • A registry is a place to host images. There are cloud hosted registries like DockerHub and Azure Container Registry. You can pull images down from those registries, or push images up to them.

These are the high-level steps:

  1. Build an image of the FastAPI application locally and confirm it works when containerized.
  2. Push the image to the Azure Container Registry.
  3. Create an Azure Container App for that image.

Build image of FastAPI app

I start from a very simple FastAPI app inside a main.py file:

import random

import fastapi

app = fastapi.FastAPI()

@app.get("/generate_name")
async def generate_name(starts_with: str = None):
    names = ["Minnie", "Margaret", "Myrtle", "Noa", "Nadia"]
    if starts_with:
        names = [n for n in names if n.lower().startswith(starts_with)]
    random_name = random.choice(names)
    return {"name": random_name}

I define the dependencies in a requirements.txt file. The FastAPI documentation generally recommends uvicorn as the server, so I stuck with that.

fastapi==0.92.0
uvicorn[standard]==0.20.0

Based on FastAPI's tutorial on Docker deployment, I add this Dockerfile file:

FROM python:3.11

WORKDIR /code

COPY requirements.txt .

RUN pip install --no-cache-dir --upgrade -r requirements.txt

COPY . .

EXPOSE 80

CMD ["uvicorn", "main:app", "--host", "0.0.0.0", "--port", "80", "--proxy-headers"]

That file tells Docker to start from a base image which has python 3.11 installed, create a /code directory, install the package requirements, copy the code into the directory, expose port 80, and run the uvicorn server at port 80.

I also add a .dockerignore file to make sure Docker doesn't copy over unneeded files:

.git*
**/*.pyc
.venv/

I build the Docker image using the "Build image" option from the VS Code Docker extension. However, it can also be built from the command line:

docker build --tag fastapi-demo .

Now that the image is built, I can run a container using it:

docker run -d --name fastapi-container -p 80:80 fastapi-demo

The Dockerfile tells FastAPI to use a port of 80, so the run command publishes the container's port 80 as port 80 on the local computer. I visit localhost:80/generate_name to confirm that my API is up and running. 🏃🏽‍♀️

Deploying Option #1: az containerapp up

The Azure CLI has a single command that can take care of all the common steps of container app deployment: az container up.

From the app folder, I run the up command:

az containerapp up \
  -g fastapi-aca-rg \
  -n fastapi-aca-app \
  --registry-server pamelascontainerregistry.azurecr.io \
  --ingress external \
  --target-port 80 \
  --source .

That command does the following:

  1. Creates an Azure resource group named "fastapi-aca-rg". A resource group is basically a folder for all the resources it creates after.
  2. Creates a Container App Environment and Log Analytics workspace inside that group.
  3. Builds the container image using the local Dockerfile.
  4. Pushes the image to my existing registry (pamelascontainerregistry.azurecr.io). I'm reusing my old registry to save costs, but if I wanted the command to create a new one, I would just remove the registry-server argument.
  5. Creates a Container App "fastapi-aca-app" that uses the pushed image and allows external ingress on port 80 (public HTTP access).

When the steps are successful, the public URL is displayed in the output:

Browse to your container app at:
http://fastapi-aca-app.salmontree-4f877506.northcentralusstage.azurecontainerapps.io 

Whenever I update the app code, I run that command again and it repeats the last three steps. Easy peasy! Check the az containerapp up reference to see what additional options are available.

Deploying Option #2: Step-by-step az commands

If you need more customization of the deploying process than is possible with up, it's also possible to do each of those steps yourself using specific Azure CLI commands.

Push image to registry

I follow this tutorial to push an image to the registry, with some customizations.

I create a resource group:

az group create --location eastus --name fastapi-aca-rg

I already had a container registry from my containerized FastAPI app, so I reuse that registry to save costs. If I didn't already have it, I'd run this command to create it:

az acr create --resource-group fastapi-aca-rg \
  --name pamelascontainerregistry --sku Basic

Then I log into the registry so that later commands can push images to it:

az acr login --name pamelascontainerregistry

Now comes the tricky part: pushing an image to that repository. I am working on a Mac with an M1 (ARM 64) chip, but Azure Container Apps (and other cloud-hosted container runners) expect images to be built for an Intel (AMD 64) chip. That means I can't just push the image that I built in the earlier step, I actually have to build specifically for AMD 64 and push that image.

One way to do that is with the docker buildx command, specifying the target architecture and target registry location:

docker buildx build --push --platform linux/amd64 \
    -t pamelascontainerregistry.azurecr.io/fastapi-aca:latest .

However, a much faster way to do it is with the az acr build command, which uploads the code to cloud and builds it there:

az acr build --platform linux/amd64 \
    -t pamelascontainerregistry.azurecr.io/fastapi-aca:latest \
    -r pamelascontainerregistry .

⏱ The `docker buildx` command takes ~ 10 minutes, whereas the `az acr build` command takes only a minute. Nice!

Deploy to Azure Container App

Now that I have an image uploaded to a registry, I can create a container app for that image. I followed this tutorial.

I upgrade the extension and register the necessary providers:

az extension add --name containerapp --upgrade
az provider register --namespace Microsoft.App
az provider register --namespace Microsoft.OperationalInsights

Then I create an environment for the container app:

az containerapp env create --name fastapi-aca-env \
    --resource-group fastapi-aca-rg --location eastus

Next, I generate credentials to use for the next step:

az acr credential show --name pamelascontainerregistry

Finally, I create the container app, passing in the username and password from the credentials:

az containerapp create --name fastapi-aca-app \
    --resource-group fastapi-aca-rg \
    --image pamelascontainerregistry.azurecr.io/fastapi-aca:latest \
    --environment fastapi-aca-env \
    --registry-server pamelascontainerregistry.azurecr.io \
    --registry-username pamelascontainerregistry \
    --registry-password <PASSWORD HERE> \
    --ingress external \
    --target-port 80

The command returns JSON describing the created resource, which includes the URL of the created app in the "fqdn" property. That URL is also displayed in the Azure portal, in the overview page for the container app. I followed the URL, appended the API route "/generate_name", and verified it responded successfully. 🎉 Woot!

When I make any code updates, I re-build the image and tell the container app to update:

az acr build --platform linux/amd64 \
    -t pamelascontainerregistry.azurecr.io/fastapi-aca:latest \
    -r pamelascontainerregistry .

az containerapp update --name fastapi-aca-app \
  --resource-group fastapi-aca-rg \
  --image pamelascontainerregistry.azurecr.io/fastapi-aca:latest 

🐳 Now I'm off to containerize more apps!

Thursday, March 2, 2023

Rendering matplotlib charts in Flask

Way back in the day when I was working in Google developer relations, we released one of my favorite tools: the Google Charts API. It was an image API which, with the right set of query parameters, could produce everything from bar charts to "Google-o-meters". The team even added custom map markers to the API at one point. I pointedly asked team "do you promise not to deprecate this?" before using the map marker output in Google Maps API demos, since Google had started getting deprecation-happy. They promised not to, but alas, just a few years later, the API was indeed deprecated!

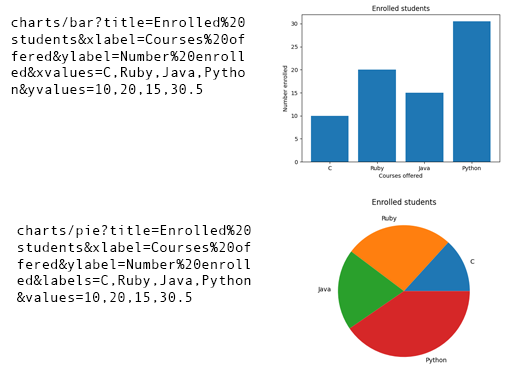
In honor of the fallen API, I created a sample app this week that serves a simple Charts API, currently outputting just bar charts and pie charts.

API URLs on left side and Chart API output on right side

To output the charts, I surveyed the landscape of Python charting options and decided to go with matplotlib, since I have at least some familiarity with it, plus it even has a documentation page showing usage in Flask.

Figure vs pyplot

When using matplotlib in Jupyter notebooks, the standard approach is to use pylot like so:

import matplotlib.pyplot as plt

fig, ax = plt.subplots()
ax.pie(data["values"], labels=data.get("labels"))

However, the documentation discourages use of pyplot in web servers and instead recommends using the Figure class, like so:

from matplotlib.figure import Figure

fig = Figure()
axes = fig.subplots(squeeze=False)[0][0]
axes.pie(data["values"], labels=data.get("labels"))

From Figure to PNG response

The next piece of the puzzle is turning the Figure object into a Flask Response containing a binary PNG file. I first save the figure into a BytesIO buffer from Python's io module, then seek to the beginning of that buffer, and finally use send_file to return the data with the correct mime-type.

from io import BytesIO

# Save it to a temporary buffer.
buf = BytesIO()
fig.savefig(buf, format="png")
buf.seek(0)
return send_file(buf, download_name="chart.png", mimetype="image/png")

You can see it all together in __init__.py, which also uses the APIFlask framework to parameterize and validate the routes.

Fast-loading Python Dev Containers

Since discovering Dev Containers and Github Codespaces a few months ago, I've become a wee bit of a addict. I love having an environment customized for each project, complete with all the tools and extensions, and with no concern for polluting the global namespace of my computer. However, there is one big drawback to loading a project in a Dev Container, whether locally in VS Code or online in Codespaces: it's slow! If the container isn't already created, it has to be built, and building a Docker container takes time.

So I want my Dev Containers to open fast, and pretty much all of mine are in Python. There are two ways I've used to build Python Dev Containers, and I now realize one is much faster than the other. Let's compare!

Python base image

Perhaps the most obvious approach is to use a Python-dedicated image, like Microsoft's Python devcontainer image. That just requires a Dockerfile like this one:

FROM --platform=amd64 mcr.microsoft.com/devcontainers/python:3.11

Universal container + python feature

However, there's another option: use a Python-less base image, like Microsoft's base devcontainer image and then add the "python" Feature on top. Features are a way to add common toolchains to a Dev Container, like for Python, Node.JS, Git, etc.

For this option, we start with the Dockerfile like this:

FROM --platform=amd64 mcr.microsoft.com/devcontainers/base:bullseye

And then, inside devcontainer.json, we add a "features" key and nest this feature definition inside:

"ghcr.io/devcontainers/features/python:1": {
    "version": "3.11"
}

Off to the races!

Which one of those options is better in terms of build time? You might already have a guess, but I wanted to get some empirical data behind my Dev Container decisions, so I compared the same project with the two options. For each run, I asked VS Code to build the container without a cache, and I recorded the resulting size and time from start to end of build. The results:

python image base + python feature
Base image size 1.29 GB 790.8 MB
Dev Container size 1.29 GB 1.62 GB
Time to build 12282 ms 94643 ms

The python image starts off larger than the base image (1.29 GB vs 790 MB), but after the build, the base+python container is larger at 1.62 GB. There's a huge difference in the time to build, with the python container building in 12,282ms while the base+python container requiring 8x as much time. So, features seem to take a lot of time to build. I'm not a Docker/Dev Container expert, so I won't attempt to explain why, but for now, I'll avoid features when possible. Perhaps the Dev Container team has plans for speeding up features in the future, so I'll keep my eyes peeled for updates on that front.

If you've been experimenting with Python Dev Containers as well and have learnings to share, let me know!

Hosting Python Web Apps on Azure: A Price-Off

When I started my job in June as a Microsoft Cloud Advocate for Python developers, one of my first goals was to port my old Google App Engine apps over to Azure. Those apps were doomed anyway, as they were using Python 2.7, so it was a great time to give them a make-over. I deploy most Azure samples to my corporate account, but I wanted to experience all the aspects of being an Azure developer, including the $$$, so I decided to host them on a personal Azure account instead. I also decided to deploy to a couple different hosting options, to see the differences.

The two apps:

  • pamelafox.org: My personal homepage, a Flask website that pulls data from a Google Spreadsheet (it's like a database, I swear!). It was previously on App Engine with memcached to cache the data pulls, so I ported it to Azure Container Apps with a CDN in front of the views.
  • translationtelephone.com: A game to translate a phrase between many languages. It was previously on App Engine with the default GAE database (BigTable-based), so I ported it to Azure App Service with a PostgreSQL Flexible Server.

Both of these are relatively low-traffic websites, so I would expect to pay very little for their hosting costs and for my traffic to be compatible with the cheaper SKUs of each Azure resource. Let's see how the costs have worked out for each of them.

Azure Container Apps + CDN

Here are the costs for January 2023, for all the resources involved in hosting pamelafox.org:

Azure resource SKU Monthly cost
Container Registry Basic $5.15
Azure Container Apps (No SKUs) $3.23
Content Delivery Network Microsoft CDN (Classic) $0.00

Perhaps surprisingly, the most expensive part is the Container Registry pricing. The least expensive SKU has a per-day pricing that can host up to 10 GB. My registry is storing only a single container that's only 0.33 GB, so I'm not maximizing that resource. If I had a few (or 30!) more container apps, I could re-use the same registry and share the cost.

The actual host, Azure Container Apps, is only $3.23, and that's likely helped by the Azure CDN in front. Azure Container Apps are priced according to usage (memory/vCPU), and the CDN means less usage of the ACA. The CDN cost only $0, which is my kind of number!

Azure App Service + PostgreSQL

Here are the costs for January 2023, for all the resources involved in hosting pamelafox.org:

Azure resource SKU Monthly cost
App Service Basic (B1) $12.11
DB for PostgreSQL Flexible Server Basic (B1MS) $0.00 (Free for now)

My costs for this website are higher due to App Service pricing per hour, regardless of requests/memory/CPU usage. For my region and currency, at the B1 tier, that's always around $12 per month. There is also a Free tier, but it doesn't support custom domains, so it's not an option for this site.

The PostgreSQL server is currently free for me, as I'm taking advantage of the first 12 months free. That only applies to one managed PostgreSQL server, any additional ones will cost me. Past the first year and first server, the cost would be ~$13 for the SKU and region I'm using.

Takeaways

Given the way that Azure Container Apps is priced, it seems like a better fit for my low-traffic websites, especially in conjunction with an aggressive CDN. I may port Translation Telephone over to ACA instead, to halve the costs there. However, I've actually already ported pamelafox.org to Azure Static Web Apps, which should be entirely free, since I've realized it's a bit of a waste to run a Flask app for a webpage that changes so infrequently. That's another great option for hobbyist websites.

If you're figuring our potential pricing for your Python apps on Azure, definitely read through the pricing pages, try the Azure pricing calculator, and make sure to set up a budget alert in your Azure account to remind you to continually monitor how much you're paying.